Windows Based Firmware Build Tools
Basic instructions for setting up the tools. Screenshots and more
detailed explainations for some of these steps are shown below.
- Download the tools: sdcc_ok_7jun02_win32.zip (2 megabytes)
and extract (using WinZIP) to C:\SDCC. See figure 1
for correct placement of the directories and files.
- Download source code from the firmware page. WinZIP can unpack the .tar.gz archives. The source code must be on the same drive as SDCC, in this example C:\MP3 was used.
Do not use spaces in the directory name for the source code.
- Open a Command Prompt or MS-DOS Prompt window, and add C:\SDCC\BIN to your PATH
- You can manually do this by typing:
PATH=%PATH%;C:\SDCC\BIN at the command prompt in the window. You can skip the rest of this step and
return when you are tired of manually typing this command each time you
start a new command window.
- Windows 98: Create a shortcut to the MS-DOS Prompt, and
edit the shortcut properties, and under the "Program"
tab, specify batch file C:\SDCC\SDCCPATH.BAT. See figure 2 for details.
- Windows XP: Create a command prompt shortcut, edit the shortcut properties, and
add " /K PATH=%PATH%;C:\SDCC\BIN" after "cmd.exe" in the "Target".
See figure 3 for details.
- Windows XP alternate: In the command prompt shortcut, specify the target as: %SystemRoot%\system32\cmd.exe /k "c:\sdcc\sdccpath.bat" (suggested by Fabrizio, Oct 15, 2002)
Type "PATH" at the prompt to verify that C:\SDCC\BIN appears in the list of directories.
- Navigate to C:\MP3 by typing "CD \MP3". You may also need to type "C:"
if you start on a different drive. The command prompt should show "C:\mp3>"
to let you know you're in the correct directory. You can also
edit the "Working" or "Start in"
setting within the MS-DOS/Command Prompt shortcut properties, so that you
will start in the correct directory and not need to do this step.
- Type "make". After some time and many messages scrolled off the window, you should end up with mp3player.hex (and many other intermediate files).
Figure 4 shows what you should see after a successful build.
If you get an error, see the troubleshooting section.
You can type "make clean" to delete all the non-source files.
Please help me to improve this page. I personally use a Redhat Linux
system for firmware development, so
I really depend on your feedback to improve these Windows instructions.
-Paul
More Information
- Newbie Developer Guide
by Bernie Pallek. Has many useful bits of advise, and Cygwin-based instructions.
- Older Version Of This Page,
by Chris Brinton. Many windows users felt cygwin was too
difficult (which is why it was replaced with this newer version).
Bernie has volunteered to help answer windows-related setup questions.
He actually uses windows (I do not), so there's a good chance he can
help if you run into trouble. Bernie's email is
Bernie.Pallek AT corel.com.
Details For The Installation Steps
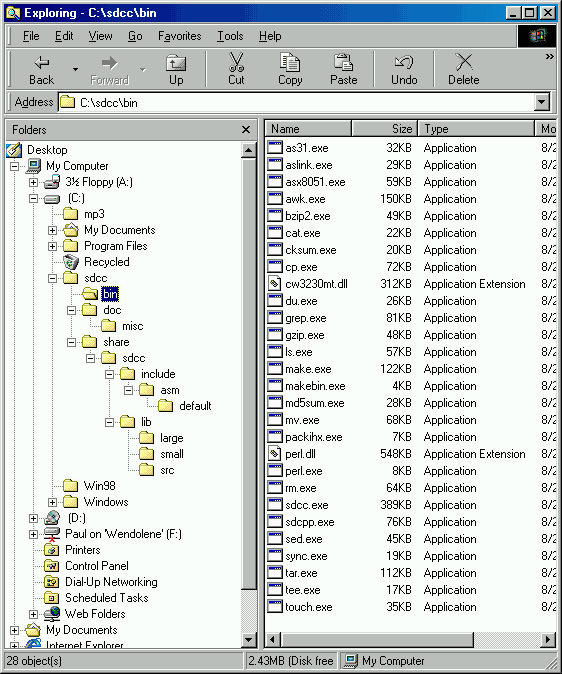
Figure 1: Correctly Placed Installation In C:\SDCC (26 EXE and 2 DLL files in C:\SDCC\BIN)
|
Figure 2: Windows 98 MS-DOS Prompt Shortcut Properties To Run SDCCPATH.BAT
|
In Windows 98, to set up a shortcut (figure 2) that automatically runs the SDCCBAT.BAT
batch file, follow these steps:
- Launch Windows Explorer, Start -> Programs -> Windows Explorer
- Navigate to C:\Windows\Start Menu\Programs
- Right click, hold and drag the "MS-DOS Prompt" shortcut to the desktop
- Select "Copy Here" when the popup menu appears as you release
- Right click on the new shortcut, and select Properties
- Select the Program tag
- Set "Batch file:" to "C:\SDCC\SDCCPATH.BAT"
- Set "Working:" to "C:\SDCC" (or whatever directory your project code will be in).
- Click Apply and OK to save your changes.
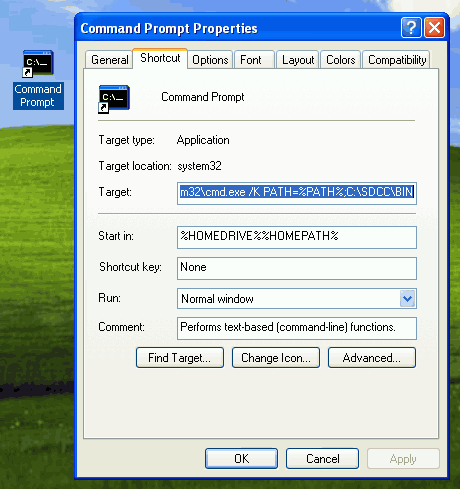
Figure 3: Windows XP, Adding PATH To Command Prompt Properties
|
In Windows XP, to create a shortcut (figure 3) which automatically sets up the
PATH properly, follow these steps:
- Start Menu, Click "All Programs", and then "Accessories"
- Right click, hold and drag the "Command Prompt" to the desktop
- Select "Copy Here" when the popup menu appears as you release
- Right click on the new shortcut, and select Properties
- The "Shortcut" tab should be displayed (if not, click on that tab)
- Add this text to "Target:"
/K PATH=%PATH%;C:\SDCC\BIN
There must be a space between the end of cmd.exe and the /K, and there is a space
between the "/K" and "PATH=%PATH%;C:\SDCC\BIN" The /K is a forward slash,
and the slashes in the PATH part are backwards. The %PATH% and C must be
separated by a semicolon (;). C and \SDCC\BIN are separated by a full colon (:).
- Optional: Set "Start in:" to the directory where you copied the mp3 player source code.
- Click Apply and OK to save your changes.
- Run the command prompt, type "PATH" and check that C:\SDCC\BIN appears in the list.
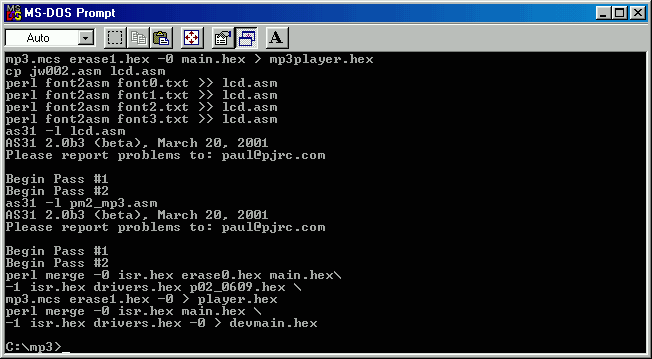
Figure 4: Successful Compile in Windows 98 (many lines scrolled off top)
|
Troubleshooting The Windows Build Tools
Here is a list of errors (that you hopefully won't encounter),
with an explaination and the suggested method to resolve each.
- Bad Command Or File Name, when you type "make". This means
the C:\SDCC\BIN directory is not listed correctly in your PATH. Type PATH at
the command prompt and verify that the C:\SDCC\BIN directory is indeed
listed correctly. Syntax is critical, so check the direction of those
slashs, colons and semicolons, and so on. Also, make sure that the 26
executables and 2 DLLs are in C:\SDCC\BIN (and not something like
C:\SDCC\SDCC\BIN). SDCC as supplied from the official SDCC web site
does not contain the extra utilities (Make, Perl). If you installed
a non-recommended SDCC version (which might have other problems) you
will probably need to manually copy these other required programs.
In some versions of windows, the PATH must not
include and directories with spaces in their names. If any directory
in the list (even one not associated with SDCC) has a space in its name,
it could cause trouble. In such a case, you may need to type a complete
path command without that directory, or using its short 8.3 name.
- Clock Skew Detected. This occurs when one or more source code
files have a timestamp in the future (relative to your PC's clock... a
common problem if your PC's clock is not accurate). To
solve this problem, type "touch *" to update the timestamps on all files,
and then "make clean" to delete all the unnecessary files. When you
build again with "make", you should not see this error.
- process_begin: CreateProcess((null) some command here...) failed. This means "make" was unable to run one of the required programs (which should have been installed in C:\SDCC\BIN). The name of the missing program should appear immediately after "CreateProcess((null)".
- get_mp3_mcs_files is the program mentioned by the process_begin: CreateProcess(...) error: This is normal, as this is a special script used by
developers working on the FPGA. Make is supposed to ignore this error. If
the build stops because of this error, it is quite likely that you have
more than one copy of make.exe on your hard drive, and you are not running
the one provided here.
- '.' is not recognized as an internal or external command,
operable program or batch file in the middle of the build
process. This can also appear as "Bad Command Or File Name"
and it occurs after "./hexfmt", "./merge", or something similar.
The older firmware revs ran the perl scripts as
"./<ScriptName>" in the Makefile,
which is a syntax that depends on
a unix compatible shell. The Makefiles in newer firmware always
use "perl <ScriptName>", that works in both unix
and windows. You can edit the Makefile, or just download the
newer firmware.
- Access is denied. This error can occur in Windows 2000
and XP if a file that is written (such as lcd.hex or mp3player.hex)
already exists from a previous build and is read-only or is owned
by a different user. TODO: any XP users out there with some
good suggestions for a sentence to put here describing how to
fix this problem??
- [exact error unknown] If the Borland C compiler is
installed, you may be running Borland's Make utility instead of
GNU Make. A sure sign is many borland directories in the PATH
before C:\SDCC\BIN. If you type "make" in an empty directory,
Borland's Make will print a message with its version and a
Borland copyright notice. GNU make (the one you need) will
print the message "
C:\SDCC\BIN\MAKE.EXE: *** No rule to make
target `makefile'.  Stop.
". You can solve this problem by
removing the borland directories from your path, by moving
C:\SDCC\BIN to the beginning of the path, or by simply copying
the GNU MAKE.EXE file to the directory with the mp3 player
source code (MSDOS always searches the current directory before
the directories in the path).
Please help add to this troubleshooting list.
If you run into trouble, please write down or make a screen capture of
the exact error message that appears. Once a solution is found, we
can add it to this list to help others in the future. It is critically
important to get the exact error message.
WinCVS Software For Access To The Latest Developer Firmware
TODO: These instructions were written by Chris Brinton.
I am planning to rewrite this section with screenshots of
WinCVS.
CVS is required to obtain the very latest version of the source code,
which is in active development. CVS is not part of the actual build
process... it is a tool that communicates with the CVS server at PJRC
to obtain the code in development and coordinate effort among developers.
You do not need CVS if you only want to compile the firmware source
archives that are available on the website. In that case, just download
and unpack the firmware code, and skip this step. But remember, to
download the very latest code that is in development (not release on the
web site yet), you must use CVS.
Note: cvs uses for 2401 to communicate. If you are behind a firewall,
be aware of this.
[Snip, Cygwin CVS instructions removed, WinCVS is much easier for windows users]
install wincvs v1.2 - www.wincvs.org
a. click download, click x86 version 1.2
typical install, default location.
b. start wincvs
c. under admin->preferences set:
cvs root: :pserver:anonymous@pjrc.com:/usr/local/cvs
authentication:
passwd file on cvs server
cvs version 1.1
d.select admin->login,
enter
appropriate home dir
enter nothing
for the password.
you should
now be logged in.
e.for first time checkout:
select
Create->checkout module.
for module
name, use mp3
enter a
directory where you want the module to go
under
checkout options, select Force using CVSROOT (-d)
hit ok
This should work for a little while and populate the
directory with the cvs files.
To update to the most recent set of files, select the module
directory in the cvs browser and hit Modify->Update selection, then
hit ok.
MP3 Player, Windows Based Firmware Build Tools, Paul Stoffregen
http://www.pjrc.com/tech/mp3/win32_setup.html
Last updated: November 28, 2003