Release 8.1.5
A67440-01
Library |
Product |
Contents |
Index |
| Net8 Administrator's Guide Release 8.1.5 A67440-01 |
|
![]()
![]()
This chapter describes how to configure your network.
Specific topics discussed are:
Before a service, such as a database, can receive connections from clients, clients must be configured to use net service names. Net service names are network descriptions of service names. Each network description specifies one or more network routes to the service, including any number of Net8 components, such as listeners. Net service names also specify whether network connections should be load balanced among multiple listeners and/or fail over to an alternate listener if a network connection cannot be established.
Specifically, a net service name identifies the:
The listener address is used by the client to connect to the listener. Once connected, the client passes the address and service information to the listener.
When an instance starts, it registers the following registration information with the listener:
When listener receives a client's request for connect, it verifies the client information with the information it has received from the instance, as well as information it has stored in the LISTENER.ORA file. If the information matches, a connection is granted.
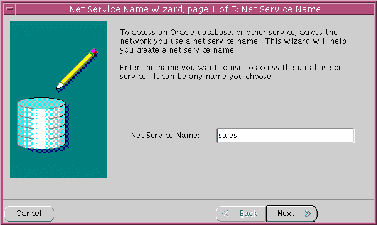
Client configuration is accomplished by creating a list of the net service names that map to services and addresses of listener destinations stored in a TNSNAMES.ORA client configuration file, an Oracle Names server, or another naming method. When an end user connects to a service, the service is identified by the net service name. For example:
sql> CONNECT username/password@net_service_name
A service name is a logical representation of a service, which may include a database. A service may comprise one or more instances. When creating a net service name, you must identify a release 8.1 service with a service name. Optionally, you may identify a release 8.1 instance with a instance name.
Shown below is a sample of TNSNAMES.ORA file, which shows how a net service provides a network description of a service:
net_service_name= (description=(address= (protocol_address_information))(connect_data= (service_name=service_name) (instance_name=instance_name)))
In the example above, notice how the service name is identified by the SERVICE_NAME parameter and the instance name is identified by the INSTANCE_NAME parameter.
The service name is a string that is the global database name, a name comprised of the database name and domain name, entered during installation or database creation. If you are not sure what the global database name is, you can obtain it from the combined values of the SERVICE_NAMES parameter in the database initialization file, INITSID.ORA. For example, a service name may be SALES.COM, where SALES is the database name and COM is the domain.
The instance name includes the name of the instance. It is typically the SID entered during installation. If you are not sure what the SID is, you can obtain it from the INSTANCE_NAME parameter.
The table below describes the SERVICE_NAMES and INSTANCE_NAME parameters.
Net8 configuration is based upon one of three models:
Net8 can resolve net service names using the following methods:
| Naming Method | Description |
|---|---|
|
Host Naming |
Instead of net service names, clients use an alias that is mapped to a database's global database name during a connection. A host name is used to identify a database's global database name via an existing name resolution service. This name resolution service might be Domain Name Services (DNS), Network Information Service (NIS) or simply a centrally-maintained set of Additional Information: See "Configuring the Network with the Host Naming Method". |
|
Local Naming |
Resolves net service names to network addresses by using information configured and stored on each individual client. Local naming is most appropriate for simple distributed networks with a small number of services that change infrequently. Additional Information: See "Configuring the Network with the Local Naming Method". |
|
Oracle Names |
Oracle Names stores names and addresses of all services on a network on an Oracle Names server. Connection requests are routed through an Oracle Names server, which resolves the net service name to a network address. The information is then returned to the client. Additional Information: See "Configuring the Network with the Oracle Names Method". |
|
External Naming |
External naming refers to net service name resolution by using a supported third-party naming service. Additional Information: See "Configuring the Network with the External Naming Method". |
For further information regarding choosing the right method, see "Resolving Net Service Names".
Depending on the naming method you use, the following configuration files may be created or modified in $ORACLE_HOME/network/admin on UNIX and ORACLE_HOME\network\admin on Windows platforms:
See also the following:
Configuration of these files is described for each naming method in this chapter.
|
Note: This section describes configuration from a release 8.1 perspective. If you have an existing release 8.0 or release 7.x configuration, see Chapter 4, "Understanding Release 8.1 Installation and Net8 Products". |
Host naming can eliminate the need for service name lookup in the TNSNAMES.ORA configuration files in environments where simple connectivity is desired. However, host naming is not suitable for large or complex environments where advanced features such as connection pooling, external procedures, or heterogeneous services, which require additional connect information, are desired. In these cases, another naming method is recommended.
The host naming method is available for TCP/IP network environments only. When instances register with the listener, the global database name of the server, a name comprised of the database name and domain name, is registered. The global database name is mapped to host name and alias in an existing name resolution service. Client use the alias in their connect string to connect to the database.
Clients may connect to a server using the alias if:
To configure the host naming method, perform these tasks:
Step 1: Configure the Listener with the Global Database Name
Step 2: Configure HOSTNAME as the First Naming Method
The global database name must be registered with the listener. How this registration takes place depends upon the release of the database.
If the database can find the listener, information about the database is automatically registered with the listener, including the global database name. The listener is found if:
If the database cannot find the listener, the LISTENER.ORA file must be configured with the GLOBAL_DBNAME parameter, as described in "Oracle8i Release 8.0 or Previous" below.
If the database is an Oracle8i release 8.0 database or Oracle7 database, database information is registered with the listener through the LISTENER.ORA file. For these database, statically configured the SID_LIST_listener_name section to include the GLOBAL_DBNAME parameter, as shown below:
sid_list_listener=(sid_list=
(sid_desc=
 (global_dbname=sales.com)
 (sid_name=db1)
 (oracle_home=/u01/app/oracle/8.0.5)
)
See "Configuring a Listener with Service Information" for further information.
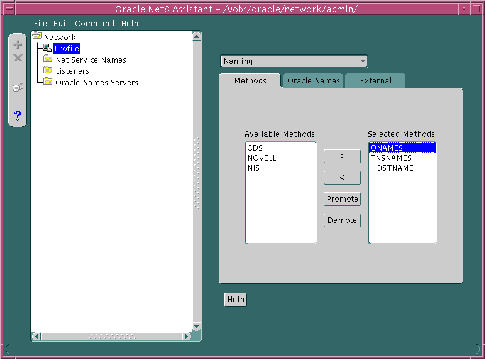
Configure host naming as the first method specified in the NAMES_DIRECTORY_PATH parameter in the SQLNET.ORA file. This parameter specifies the order of naming methods Net8 will use to reconcile services.
To specify local naming as the first naming method:
The SQLNET.ORA file should contain an entry that lists HOSTNAME first in the NAMES.DIRECTORY_PATH parameter:
names.directory_path=(hostname, tnsnames)
The global database name must be resolved through an IP address translation mechanism, such as DNS, NIS, or a centrally-maintained TCP/IP host file, /etc/hosts. The alias created for the global database name must match the global database name.
It is important to note that the domain portion of the global database name must match the network domain.
For example, if a global database name of SALES.COM for a database exists on a machine named SALES-PC, the entry in the /etc/hosts file would like the following.
#IP address of server     host name   alias
144.25.219.146            sales-pc    sales.com
Clients would use SALES.COM in their connect string, as described in "Connecting to a Database". If the client and server are in the same domain of COM, the client only needs to enter SALES in the connect string.
|
Note: This section describes configuration from a release 8.1 perspective. If you have an existing release 8.0 or release 7.x configuration, see Chapter 4, "Understanding Release 8.1 Installation and Net8 Products". |
With the local naming method, net service names are added to the TNSNAMES.ORA file. A net service name is mapped to a network address contained in a connect descriptor. A connect descriptor contains the location of the listener through a protocol address and the service name of the service to which to connect. Clients use this net service name when making a connection with an application.
An example of a TNSNAMES.ORA file's basic syntax for a net service name mapped to a connect descriptor is shown in Figure 6-1. DESCRIPTION contains the connect descriptor, ADDRESS is the listener address, and CONNECT_DATA contains the service name.
net_service_name= (description=(address= (protocol_address_information))(connect_data= (service_name=service_name) ) )
Each connect descriptor can contain one or more listener addresses, as shown in Figure 6-2:
net_service_name= (description=(address= (protocol_address_information))(address= (protocol_address_information))(address= (protocol_address_information))(connect_data= (service_name=service_name) ) )
Optional parameters, such as connect-time failover, client load balancing, and Oracle Connection Manager features, may be set for a list of addresses within a connect descriptor or all addresses among multiple connect descriptors.
For more information about these features, see Chapter 7, "Enabling Optional Net8 Features" and "Local Naming Parameters (TNSNAMES.ORA)".
After a Custom installation on the client or server, the Net8 Configuration Assistant prompts you to configure a naming methods. If the local naming method is chosen, the Net8 Configuration Assistants prompts you to configure net service names in the TNSNAMES.ORA file. If you choose to use the Net8 Configuration Assistant to create net service names, ensure the listener protocol addresses match in the TNSNAMES.ORA and LISTENER.ORA files. Use the online help for instruction.
Net service names can be added to the TNSNAMES.ORA file at any time. To configure the local naming method, perform these tasks:
Step 1: Configure Net Service Names
Step 2: Configure TNSNAMES as the First Naming Method
Step 3: Distribute Configuration
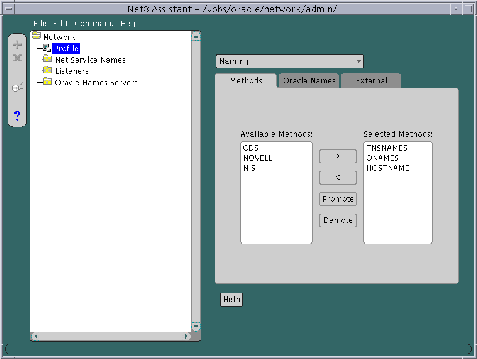
To configure with the local naming method, use either the Net8 Assistant or the Net8 Configuration Assistant on the server:
To use the Net8 Assistant:
If you want to be explicit, the net service name may be qualified with the client's domain. The net service name is automatically domain qualified if the NAMES.DEFAULT_DOMAIN parameter in SQLNET.ORA is specified. For further information, see "Configuring Domains".
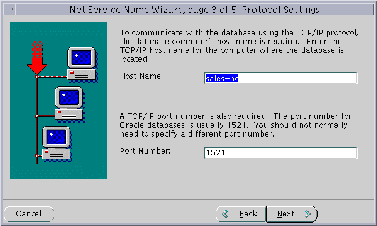
See "Configuring Protocol Addresses" for further information about protocol addresses.
When configuring the listener to listen on TCP/IP for typical Net8 clients, you should choose the default port or 1521. If you do not, you must configure the LOCAL_LISTENER parameter in the INITSID.ORA file and resolve the listener name through a naming method. For further information about configuring non-default port numbers in LISTENER.ORA, see "Configuring a Listener that Uses a Non-Default Port".
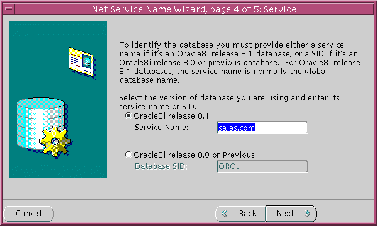
The service name is typically the global database name. See "Setting Service Names and Instance Names" for further information about the service name string to use.
If destination service is prior to release 8.1, click Oracle8 Version 8.0 or Previous, enter a SID in the Database SID field, then click Next.
A successful test results in "The connect test was successful." message in the Connect Test dialog box:
If the test was not successful:
See also the following:
To use the Net8 Configuration Assistant:
If you select the Oracle8i release 8.1 database or service option, the service name you enter is typically the global database name. See "Setting Service Names and Instance Names" for further information about the service name string to use.
Note:
Configure local naming as the first method specified in the NAMES_DIRECTORY_PATH parameter in the SQLNET.ORA file. This parameter specifies the order of naming methods Net8 will use to reconcile services.
To specify local naming as the first naming method:
The SQLNET.ORA file should contain an entry that lists TNSNAMES first in the NAMES.DIRECTORY_PATH parameter:
names.directory_path=(tnsnames, onames, hostname)
After one client is configured, it is best to simply copy over the TNSNAMES.ORA and SQLNET.ORA configuration files to the same location on the clients. This will ensure the files are consistent. Otherwise, you must use Net8 Assistant or Net8 Configuration Assistant on every client, introducing possible errors.
Ensure the listener (located on the server) is configured to "listen on" on the same protocol and protocol address you configured for the net service name. By default, the listener should already be configured for your operating system's primary protocol, typically TCP/IP. For further information about configuring the listener, see "Configuring Protocol Addresses".
|
Note: This section describes configuration from a release 8.1 perspective. If you have an existing release 8.0 or release 7.x configuration, see Chapter 4, "Understanding Release 8.1 Installation and Net8 Products". |
Oracle Names simplifies the setup and administration of global, client/server computing networks. Oracle Names makes network address and database link information available to all nodes throughout the network. Each database server's network address is identified with a simple service name. Client applications then can request a database connection with that name rather than a lengthy address. Oracle Names shields users and applications from changes made to the network infrastructure. It provides for centralized administration of network service names.
An Oracle Names server stores the following information:
| Data | Description |
|---|---|
|
database global database names and addresses |
The Oracle Names server retrieves information about the database, including the global database name (database name and domain) and address, from the listener. The address is configured in the LISTENER.ORA file, and the global database name is registered during database startup or statically configured in the LISTENER.ORA file. You do not to register this information. |
|
other Oracle Names server names and addresses |
An Oracle Names server stores the names and addresses of all other Oracle Names servers in the same administrative region. If there is more than one administrative region in a network, the Oracle Names server will store the name and address of at least one Oracle Names server in the root administrative region and each of the immediate sub-regions. You do not need to register this information. |
|
net service names |
If you register net service name with the NAMESCTL control utility or the Net8 Assistant, an Oracle Names server stores them. An Oracle Names server also stores gateways to non-Oracle databases and Oracle RDB databases. |
|
global database link |
Database links allow a database to communicate with another database another. The name of a database link is the same as the global database name of the database to which the link points. Typically, only one database link should exist per database. The following types of database links may be created:
Because the Oracle Names retrieves the global database name from the listener, a global database link that is the global database name is automatically registered with the Oracle Names server. Therefore, you do not need to register this information. User name and password credentials for the global database link may be registered with the Oracle Names server using the Net8 Assistatnt.These global database links may be supplemented with link qualifiers defined through the Net8 Assistant. Global database links may be superseded with private and public database links created by individual users. For more information about private and public database links, see Oracle8i Distributed Database Systems. |
|
aliases |
An Oracle Names server stores aliases or alternative service names for any defined net service name, database service or global database link. Aliases may be registered with the Oracle Names server using either the NAMESCTL control utility or Net8 Assistant. |
|
Oracle Connection Managers |
An Oracle Names server stores the names and listening addresses of all Oracle Connection Managers on the network. You do not to register this information. |
Configuring Oracle Names involves the following tasks:
Step 1: Consider Oracle Names Options
Step 3: Create an Oracle Names Server
Step 4: Configure Clients and Database Servers To Use Oracle Names Servers
Step 5: Configure the Listener
Step 6: Register Data with the Oracle Names Server
Step 7: (Optional) Delegate Domains to Delegated Administrative Regions
Prior to creating an Oracle Names server, you must decide whether:
For more assistance with the decisions above, see "Oracle Names Architecture".
Ensure the following is installed:
How an Oracle Names server is created depends upon whether you want region data:
When information is added to an Oracle Names server, the information is stored in the database and in the Oracle Names server's cache files. If the database is unavailable, the information in the cache files is used.
The cache files are stored in $ORACLE_HOME/network/names on UNIX platforms and ORACLE_HOME\network\names on Windows NT:
A default Oracle Names server named ONAMES_host is created during installation for a non-region database configuration. This Oracle Names is configured to listener on TCP/IP with port 1575. It contains basic configuration that does not include multiple domains or multiple regions. If you would like to use this Oracle Names server, skip this step and proceed to "Step 2: Discover Oracle Names Servers".
The following sections cover both modes:
Whichever method you choose, Oracle Corporation recommends you create more than one Oracle Names server for the network, in case one should go down.
To store service data in an Oracle database, perform the following tasks:
To configure the database server:
sql> CONNECT system/password
where password is MANAGER for the SYSTEM user account by default.
sql> CREATE user user
  identified by password
  default tablespace users
  temporary tablespace temp;
$ORACLE_HOME/network/admin on UNIX and ORACLE_HOME\network\admin\names on Windows NT platforms. This script creates the tables needed by Oracle Names to store information. Optionally, run NAMESUPG.SQL to define old tables.
sql> CONNECTuser/passwordsql> @oracle_home/network/admin/namesini.sql;
For each machine where Oracle Names is installed and where you want an Oracle Names server, create an Oracle Names server from the Net8 Assistant.
The Names Wizard starts.
The wizard guides you through the creation and configuration process, prompting for:
If you choose TCP/IP, Oracle Corporation recommends using the default and officially registered port of 1575 for the Oracle Names server.
(Click Use a region database.)
If you choose TCP/IP, Oracle Corporation recommends using the default and officially registered port of 1521 for the listener.
If you specify this Oracle Names server is in the root administrative region, configuration completes.
If you specify this Oracle Names server is not in the root administrative region, it assumed this Oracle Names server is in a delegated administrative region. The wizard then prompts you for the local administrative region's domain name and the address of an Oracle Names server in the root administrative region before completing.
When the wizard completes, the following message appears:
The Net8 Assistant creates a NAMES.ORA file with at least the following settings:
A NAMES.ORA file is shown below with annotations of content:
#Oracle Names server name. The name should include the name of the domain this Oracle Names server is in.names.server_name=namesvr2.com #Oracle Names server listening protocol addressnames.addresses=(address=(protocol=tcp)(host=namesrv2-pc)(port=1575))[(address=...))]#Database repository informationnames.admin_region=(region=(description=(address=(protocol=tcp)(host=sales-pc)(port-1521))(connect_data=(service_name=sales.com))(userid=system) (password=password) (name=local_region)(refresh=86400)(retry=60)(expire=600))#If an Oracle Names server is in a delegated administrative region, identify the address of an Oracle Names server in the root administrative region.names.domain_hints=(address=(protocol=tcp)(host=namesrv1-pc)(port=1575))# Specify the domain controlled by this region and the time to live (TTL). If this is the root administrative region, you must have NAME= (null) to identify the root domain properly.names.domains=(domain=(name=)(min_ttl=86400))See "Configuring Protocol Addresses" for more information about protocol syntax needed for address information.
If you want the region to administer more than one domain, specify the additional domains in the NAMES.DOMAINS parameter with the Net8 Assistant:
In the example below, NAMES.DOMAINS contains a listing for the root, COM, ORACLE.COM, and HQ.ORACLE.COM domains. All the domain precedent to HQ.ORACLE.COM must be defined in order to define HQ.ORACLE.COM.
names.domains=(domain_list=(domain=(name=)(min_ttl=86400))(domain=(name=com)(min_ttl=86400))(domain=(name=oracle.com)(min_ttl=86400))(domain=(name=hq.oracle.com)(min_ttl=86400)))
Start the Oracle Names server using either the Net8 Assistant or the NAMESCTL control utility:
To store data in files and have it replicated between Oracle Names server during updates, performs these tasks:
For each machine where Oracle Names is installed and where you want an Oracle Names server, create an Oracle Names server from the Net8 Assistant:
The Names Wizard starts.
The wizard guides you through the creation and configuration process, prompting you for
If you choose TCP/IP, Oracle Corporation recommends using the default and officially registered port of 1575 for the Oracle Names server.
(Click Don't use a region database.)
If this is not the first Oracle Names server in the region, the wizard then prompts you to discover the other Oracle Names servers or to specify the address of another Oracle Names server in the region.
If you specify this Oracle Names server is in the root administrative region, configuration completes.
If you specify this Oracle Names server is not in the root administrative region, it assumed this Oracle Names server is in a delegated administrative region. The wizard then prompts you for the local administrative region's domain name and the address of an Oracle Names server in the root administrative region before completing.
When the wizard completes, the following message appears:
A Names Server, onames_server, has been created with default settings. Use the Configure Server section to modify the default configuration.
The Net8 Assistant creates a NAMES.ORA file with at least the following settings:
A NAMES.ORA file is shown below with annotations of content:
#Oracle Names server name. The name should include the name of the domain this Oracle Names server is in.names.server_name=namesvr2.com #Oracle Names server listening protocol address(address=(protocol=tcp)(host=namesrv2-pc)(port=1575))[(address=...))]#If an Oracle Names server is in a delegated administrative region, identify the address of an Oracle Names server in the root administrative region.names.domain_hints=(address=(protocol=tcp)(host=namesrv1-pc)(port=1575)) # Specify the domain controlled by this region and the time to live (TTL). If this is the root administrative region, you must have NAME= (null) to identify the root domain properly.names.domains=(domain=(name=)(min_ttl=86400))
See "Configuring Protocol Addresses" for more information about protocol syntax needed for address information.
If you want the region to administer more than one domain, specify the additional domains in the NAMES.DOMAINS parameter with the Net8 Assistant:
In the example below, NAMES.DOMAINS contains a listing for the root, COM, ORACLE.COM, and HQ.ORACLE.COM domains. All the domain precedent to HQ.ORACLE.COM must be defined in order to define HQ.ORACLE.COM.
names.domains=(domain_list=(domain=(name=)(min_ttl=86400))(domain=(name=com)(min_ttl=86400))(domain=(name=oracle.com)(min_ttl=86400))(domain=(name=hq.oracle.com)(min_ttl=86400)))
After all the Oracle Names servers are configured, have each Oracle Names, except the first Oracle Names server in the region, discover the other Oracle Names servers in a region.
See "Understanding Discovery" for a description of discovery.
On the machine where Oracle Names resides, use either the Net8 Assistant or the NAMESCTL control utility:
To configure the client and database server machines:
$ORACLE_HOME\network\names on UNIX or SDNS.ORA file in ORACLE_HOME\network\names on Windows platforms. This file contains the order of names and addresses of the Oracle Names server(s) to contact. Client machines read this file to find the addresses of Oracle Names servers to contact. Use either the Net8 Assistant or the NAMESCTL utility.
See "Understanding Discovery" for a description of discovery.
The SQLNET.ORA file should contain an entry that lists ONAMES first in the NAMES.DIRECTORY_PATH parameter:
names.directory_path=(onames, tnsnames, hostname)
To add or configure these features:
Configure the listener with listening database protocol addresses if you are not using your operating system's primary protocol. For further information about configuring the listener, see "Configuring Protocol Addresses".
Additionally, set USE_PLUG_AND_PLAY_listener_name=ON in the LISTENER.ORA file with the Net8 Assistant. This permits the listener to register database information, such as the service name, SID, and global database name, with Oracle Names servers:
As described in the table in "Configuring the Network with the Oracle Names Method", Oracle Names server store many kinds of information, including as database locations, Oracle Names server locations, net service names, aliases, global database links, and Oracle Connection Manager. Some of this information is automatically registered with the Oracle Names server because the database registers information with the listener. If you would like to store the following kinds of information, you must register it using either the Net8 Assistant or the NAMESCTL control utility:
Registration only needs to occur with one Oracle Names server in an administrative region. The other Oracle Names servers will see the information if data is stored in a region database, or the information will be propagated to other Oracle Names if you chose not to use a region database.
After registering these kinds of information, you should query them, as described in "Testing Network Objects Using NAMESCTL or the Net8 Assistant".
Oracle Corporation advises creating a net service name for each service. If a net service name is not created, a user trying to connect will have to pass the global database name to make a connection. Rather than provide this information to your end users, create a net service name for the service.
Use either the Net8 Assistant or the NAMESCTL control utility:
| Use the Net8 Assistant... | Use the control utility NAMESCTL... |
|---|---|
|
Create and register a net service name with the Oracle Names server:
For example, to register a net service name of SALES with a default TCP/IP listening address, enter:
Additional Information: See "Configuring Protocol Addresses" for more information about protocol syntax needed for address information. |
If you have been using local naming as your configuration method and want to migrate to an Oracle Names configuration, the net service name information used in the TNSNAMES.ORA file can uploaded to an Oracle Names server. To load information from a local naming configuration file into an Oracle Names server, use either the Net8 Assistant or the NAMESCTL control utility:
Oracle Corporation recommends creating one global database link per database. A global database link that is the global database name is automatically registered with the Oracle Names server, such as SALES.COM.
For example, a connection to a remote database with the global database link would be:
sql> CONNECT @sales.com
Therefore, you do not need to register this information unless you want to enter user name and password credentials for it.
To register a global database link, use either the Net8 Assistant or the NAMESCTL control utility. Because the NAMESCTL utility is limited in global database link registration, Oracle Corporation recommends you use the Net8 Assistant.
| Use the Net8 Assistant... | Use the control utility NAMESCTL... |
|---|---|
|
Create and register a global database link with the Oracle Names server:
For example, to register a global database link of SALES.COM with a default TCP/IP listening address, enter:
Additional Information: See "Configuring Protocol Addresses" for more information about protocol syntax needed for address information. The NAMESCTL utility will not permit user name and password credentials. |
While one global database link per database is recommend, there is no limit on the number of link qualifiers that may be added. Link qualifiers are appended to global database link to provide alternate settings for the database user name and password credentials. For example, a link qualifier of RDBMS.OMD can be appended to SALES.COM. A connection to a remote database with the global database link and link qualifier would be:
sql> CONNECT @sales.com@emp
Link qualifiers are primarily for older Oracle database environments where multiple database links are used. Rather than use multiple database links, multiple link qualifiers can be created for a database link.
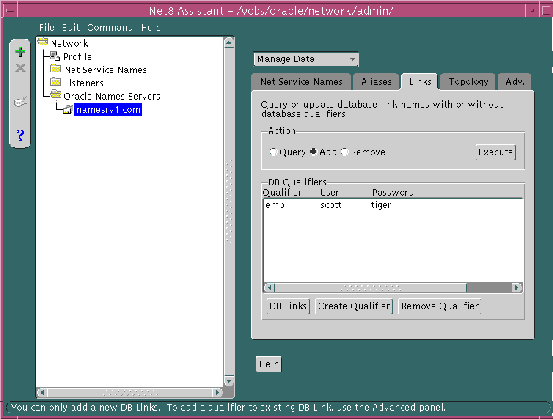
To register a global link qualifier for a global database link, use the Net8 Assistant. The NAMESCTL utility does not support creation of link qualifiers.
The Database Qualifier dialog box appears:
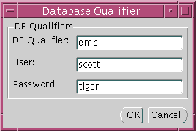
The link qualifier is added to the DB Qualifiers list box:
To verify a global database link and link qualifier is working correctly:
sql> CONNECT user_name/password@db_link;
sql> CONNECT user_name/password@db_link@link_qualifier;
For example:
sql> CONNECT scott/tiger@sales.com;
sql> CONNECT scott/tiger@sales.com@emp;
sql> SELECT * from  table@db_link;
sql> SELECT * from  table@db_link@link_qualifier;
For example:
sql> SELECT * from EMP@sales.com;
sql> SELECT * from EMP@sales.com@emp;
For more information about database links, see Oracle8i Distributed Database Systems.
An alias can be used for type of item stored in the Oracle Names server, such as a Oracle Names server, net service name, or global database link.
To register a global database link, use either the Net8 Assistant or the NAMESCTL control utility.
| Use the Net8 Assistant... | Use the control utility NAMESCTL... |
|---|---|
|
Create and register an alias with the Oracle Names server:
For example, to register a net service name of SALES with a default TCP/IP listening address, enter:
Additional Information: See "Configuring Protocol Addresses" for more information about protocol syntax needed for address information. |
If delegated administrative regions are configured, the upper-level administrative region must delegate sub-domains to the delegated administrative regions. Otherwise, the Oracle Names servers in the upper-level administrative region will assume authority over all sub-domains.
Once a domain is delegated, the Oracle Names servers in the current region will forward subsequent operations to the sub-region where the domain is administered by Oracle Names servers.
To delegate a domain, use either the Net8 Assistant or the NAMESCTL control utility.
| Use the Net8 Assistant... | Use the control utility NAMESCTL... |
|---|---|
|
Create and register an alias with the Oracle Names server:
Additional Information: See "Configuring Protocol Addresses" for more information about protocol syntax needed for address information.
For example, to delegate domain ACME.COM serviced by NAMESRV3.ACME.COM, enter:
|
External naming refers to the method of resolving a net service name to a network address by using a supported non-Oracle naming service. External naming resolve net service names stored in customers' native (non-Oracle) naming services. They include:
Organizations and corporations already using Network Information Service (NIS) as part of their systems infrastructure have the option to store Oracle net service names and addresses in NIS, using NIS External Naming.
When a user gives a command such as
sqlplus scott/tiger@payroll
(where "payroll" is an Oracle net service name) NIS External Naming on the node running the client program (or server acting as a client program) contacts an NIS server located somewhere in the network, and passes the net service name to the NIS server. The NIS server resolves the net service name into a Net8 address and returns this address to the client program (or server acting as a client program). The client program then uses this address to connect to the Oracle database.
A machine that acts as an NIS server runs a program called ypserv, which handles name requests. ypserv stores different types of data in special files called maps. For example, passwords are stored in a map called passwd.byname. Oracle database net service names are stored in a map called tnsnames.
When a user issues a command like the one in the previous section, NIS External Naming uses an RPC call to contact the ypserv program and passes the Oracle net service name "payroll" and the name of the map--tnsnames. The ypserv program looks in the tnsnames map for the name "payroll" and its corresponding value, which is the address for the net service name. The address is returned to the client, and the client program (or server acting as a client program) uses this address to contact the database server.
NIS External Naming requires SQL*Net 2.2 or greater.
Before configuring servers to support the NIS External Naming, make sure that NIS is configured and running on the NIS servers that need to resolve Oracle database net service names. Consult your NIS documentation for specifics.
To add the tnsnames map to the existing set of NIS maps:
tnsnames map using the tns2nis program.
For example, run tns2nis on the command line with one argument:
tns2nis tnsnames.ora
tns2nis reads the NATIVE.ORA file from the current directory. (If TNSNAMES.ORA is not located in the current directory, you can use a full path name to specify its location--for example, /etc/native.ora or $ORACLE_HOME/network/admin/tnsnames.ora).
The "tnsnames" map is then written into the current working directory.
tnsnames to the NIS server, if it is not already there.
tnsnames map using makedbm, which is an NIS program. Refer to your NIS documentation for more information.
makedbm converts the tnsnames map into two files that the NIS server can read. The location of these files is platform-specific. Refer to your platform-specific documentation for details.
For example, to generate and install a tnsnames map on the Sun Solaris, as root enter the following at the command line
# makedbm tnsnames /var/yp/'domainname'/tnsnames
You can test the NIS server to see if the map has been installed properly by typing a command with the format:
ypmatch net_service_name tnsnames
For example, you might enter:
ypmatch payroll.com tnsnames
This returns the length of the address (in characters) followed by the address; for example:
	99 (description=(address=(protocol=tcp)

  (host=garlic)(port=1999)))

  (connect_data=(service_name=dirprod)))
To configure clients, configure NDS as the first method specified in the NAMES_DIRECTORY_PATH parameter in the SQLNET.ORA file. This parameter specifies the order of naming methods Net8 will use to reconcile services.
The SQLNET.ORA should contain an entry that looks like the following:
names.directory_path=(nis, tnsnames, hostname)
NDS External Naming allows you to use native NDS naming conventions to connect to an Oracle database on a Novell NDS-enabled network. After the NDS External Naming has been installed on clients and servers, users can enter:
username/password@net_service_name
NDS External Naming provides network users with the following benefits:
The NDS External Naming resides on the client workstation and translates the NDS object name into a TNS address. The client code gets attributes from the NDS tree for the NDS object whose name matches the Oracle net service name. This name can be a full name or a partial name. If it is a partial name, it will be qualified with respect to the current name context.
There are three aspects to the server-side NDS External Naming:
During the Oracle installation process on a NetWare 4 server the NDS schema is extended to include an object class called "ORACLE:DBInstance". For NDS External Naming to function, this class will need an attribute called "ORACLE:TNSAddress". If the class does not exist, it is created and will include the TNSAddress attribute. If the class exists but the TNSAddress attribute does not, the class will be modified. The NLM that performs this during installation is called ORASCHEM.NLM.
The SPX protocol for NetWare looks for a value in CONFIG.ORA called ORACLE_SAP. The value of this parameter is ON or OFF. If this parameter is not specified, the default is ON. This has performance implications for SPX networks. When ORACLE_SAP is ON, the SQL*Net listener advertises its address using SAP (Service Advertising Protocol). When ORACLE_SAP is set to OFF, the SQL*Net listener relies on NDS to deliver information to its clients.
If your network consists entirely of NDS enabled clients (that is, clients using NetWare 4 and above), you will get better network performance if you edit the CONFIG.ORA file to set ORACLE_SAP to OFF.
When the listener is started, it stores its address in the NDS database by locating the Oracle database instance that resides on its server.
At that point, the address(es) is (are) accessible to the client from the NDS database
NDS External Naming requires SQL*Net 2.2 or later and Oracle 7.2 or later. It can be used with any client running Novell libraries, but requires NetWare 4.1 or later on the server.
To configure clients:
-On UNIX, run netasst at $ORACLE_HOME/bin.
-On Windows NT, choose Start > Programs > Oracle - HOME_NAME > Network Administration > Net8 Assistant.

The SQLNET.ORA file should contain an entry that lists NOVELL first in the NAMES.DIRECTORY_PATH parameter:
names.directory_path=(novell, tnsnames, hostname)
Add the following parameter to the SQLNET.ORA file to specify the default name context in which to look for the name to be resolved.
native_names.nds.name_context
For example, if the name of the database object is "Payroll.Finance.Oracle" and the SQLNET.ORA parameter is NATIVE_NAMES.NDS.NAME_CONTEXT=Finance.Oracle, then the name "Payroll" will be qualified to ".Payroll.Finance.Oracle". This is an example of a typeless name.
native_names.nds.name_context=OU=Finance.O=Oracle
This line will be parsed to produce the typed name
CN=Payroll.OU=Finance.O=Oracle.
This parameter works similarly to the NET.CFG parameter "name context". The name context in SQLNET.ORA will override the entry in NET.CFG. If the SQLNET.ORA parameter is not specified, the NET.CFG parameter will be used. If no name context is specified in either file, it defaults to [root]. See the Novell client documentation for more information about the NET.CFG parameters.
To configure the NetWare Server:
-On UNIX, run netasst at $ORACLE_HOME/bin.
-On Windows NT, choose Start > Programs > Oracle - HOME_NAME > Network Administration > Net8 Assistant.
$ORACLE_HOME/nlm:
oracle_sap=[off|on]
ORACLE_SAP can be set to either ON or OFF. When ORACLE_SAP is ON, the listener advertises its address using SAP (Service Advertising Protocol). When ORACLE_SAP is set to OFF, the listener relies on NDS to deliver information to its clients. If not specified in CONFIG.ORA, ORACLE_SAP defaults to on. To reduce network traffic on a network where all clients use NDS, use:
oracle_sap=off
Following are some known limitations when using the NDS External Naming:
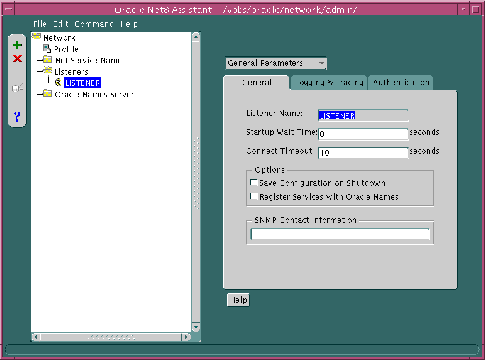
Services coordinate their session with the help of a listener. The listener receives connection requests on behalf of a client application. Listener are configured to "listen on" an address specified in a listener configuration file, LISTENER.ORA, for a database service or non-database service. Once the LISTENER.ORA file is configured, the listener may be managed with the Listener Control Utility (LSNRCTL).
An Oracle8i database instance registers itself with the listener. Prior releases required configuration of the database SID description information. In order to take advantage of release 8.1 features, use the latest listener.
By default the following listening endpoints are configuration automatically during installation:
Additionally, the SID_LIST is automatically configured for the database and external procedures.
The default LISTENER.ORA is shown below with annotations of content:
listener=
  (description_list=
    # ipc listenening endpoint for external procedures' connections
    (description=
      (address_list=
        (address=(protocol=ipc)(key=extproc0))
      )
    )
    # tcp/ip listenening endpoint for java option connections
    (description=
      (protocol_stack=
        (presentation=giop)
        (session=raw)
      )
      (address_list=
        (address=(protocol=tcp)(host=sales-pc)(port=2481))
      )
    )
    # tcp/ip listenening endpoint for database connections
    (description=
      (address_list=
        (address=(protocol=tcp)(host=sales-pc)(port=1521))
      )
    )
  )
# list of services for a listener named LISTENER to receive requests for
sid_list_listener=
  (sid_list=
    # service description for external procedures
    (sid_desc=
      (sid_name=plsextproc)
      (oracle_home=c:\orahome81)
      (program=extproc)
    )
    # service description for the database specified
    (sid_desc=
      (global_dbname=sales.com)
      (oracle_home=c:\orahome81)
      (sid_name=sales)
    )
  )
The following listener configuration items are addressed in this section:
See also the following:
If you modify the LISTENER.ORA, the listener must be stopped and re-started with the LSNRCTL utility.
To stop the listener:
lsnrctllsnrctl> start[listener_name]
To stop the listener:
lsnrctllsnrctl> stop[listener_name]
listener_name is the name of the listener defined in the LISTENER.ORA file. It is not necessary to identify the listener if you are using the default listener, named LISTENER.
For further information, see:
The listener address you configured for either local naming or Oracle Names must also be configured in LISTENER.ORA. During a Typical or Minimal installation, TCP/IP is automatically configured in the LISTENER.ORA. The other protocols, however, are not configured. To configure other protocol listener addresses:
If a LISTENER.ORA has been configured during installation and listener has never been started with the LSNRCTL control utility, the Listeners folder will not display a listener. If this occurs, exit the Net8 Assistant, start the listener (as described in "Net8 Component Startup Overview"), and start the Net8 Assistant again.
Note:
If a listener does not exist because a LISTENER.ORA was not installed:

When configuring the listener to listen on TCP/IP for typical Net8 clients, you should choose the default port or 1521. If you do not, you must configure the LOCAL_LISTENER parameter in the INITSID.ORA file and resolve the listener name through a naming method. For further information about configuring non-default port numbers in LISTENER.ORA for Net8 clients, see "Configuring a Listener that Uses a Non-Default Port".
If IIOP Clients was chosen, ensure the protocol was TCP/IP on port 2481 or TCP/IP with SSL on port 2482. If you do not, you must configure the LOCAL_LISTENER parameter or the MTS_DISPATCHERS parameter's LISTENER attribute in the INITSID.ORA file, and resolve the listener name through a naming method. For further information about configuring non-default port numbers in LISTENER.ORA for IIOP clients, follow the steps in "Configuring a Non-Default Listener".
For example, a LISTENER.ORA file statically configured with the for SPX address for service named oraservc1 in addition to the default TCP/IP address is shown below:
listener=
  (address=
     (protocol= tcp)
     (host= sales-pc)
     (port= 1521)
   )
  (address=
     (protocol= spx)
     (service=orasrvc1)
   )
If you configure a TCP/IP listener addresses that does not use the default 1521 port for Net8 clients, you must configure the LOCAL_LISTENER parameter in the INITSID.ORA file and resolve it with a net service name entry in the TNSNAMES.ORA file or Oracle Names server.
The LOCAL_LISTENER parameter should be configured as follows:
local_listener=listener_name
In order for the dispatcher to register its information with a non-default listener, the listener name you specified for the LOCAL_LISTENER parameter must be resolved through a naming method, such as a TNSNAMES.ORA file on the server or an Oracle Names server.
The entry should only contain the address of the listener, not the service name information in the CONNECT_DATA portion.
The Net8 Assistant does not allow you to configure a TNSNAMES.ORA without the CONNECT_DATA information. Therefore, Oracle Corporation recommends you create the TNSNAMES.ORA manually.
If the listener name is LISTENER1, the listening endpoint uses TCP/IP on port 1421, and the chosen naming method is the local naming method, the entry in the TNSNAMES.ORA would be:
listener1.us.oracle.com=
(description=
  (address=
     (protocol= tcp)
     (host= sales-pc)
     (port= 1421)
  )
)
Multiple addresses are supported, but multiple address connect-time failover and client load balancing features are not supported. Oracle Connection Manager's SOURCE_ROUTE parameter is supported.
An entry for the listener can be made through an Oracle Names server through the Net8 Assistant:
(address=(protocol= tcp)(host= sales-pc)(port= 2481))
By default the listener name is LISTENER. The listener name must be unique on any given node. The listener can be given any name.
To provide a listener with a new name:
If you expect the listener to handle large volumes of connection requests, you may specify a queue for the process. This will allow the listener to dynamically handle larger numbers of concurrent connection requests.
To specify a queue size for a listener, enter a value to the QUEUESIZE parameter at the end of any listening address:
listener=
  (address=
     (protocol= tcp)
     (host= sales-pc)
     (port= 1521)
     (queuesize=20)
   )
In order for the listener to accept client requests to an Oracle8i release 8.0 or Oracle7 database, the LISTENER.ORA file must be configured with information about the database. Static configuration is also required for other services, such as external procedures and heterogeneous services, and some management tools, including Oracle Enterprise Manager.
See Chapter 7, "Enabling Optional Net8 Features" for more information about statically configuring the listener for external procedures and heterogeneous services. See the Oracle Enterprise Manager Configuration Guide for Oracle Enterprise Manager configuration.
|
CAUTION: Implementing connect-time failover does not allow use of static service configuration parameters in the LISTENER.ORA file. However, static configuration is required for Oracle8i release 8.0 or Oracle7 databases and Oracle Enterprise Manager. See "Connect-Time Failover" for further information about connect-time failover and the Oracle8i Parallel Server Setup and Configuration Guide for additional configuration instructions on setting up connect-time failover for Oracle Parallel Server in an Oracle Enterprise Manager environment. |
To configure information about database instances that the listener is servicing, you will need to provide the following information in the listener configuration file:
To statically configure the listener:
An excerpt of a LISTENER.ORA file statically configured with the SID_LIST_listener_name section is shown below:
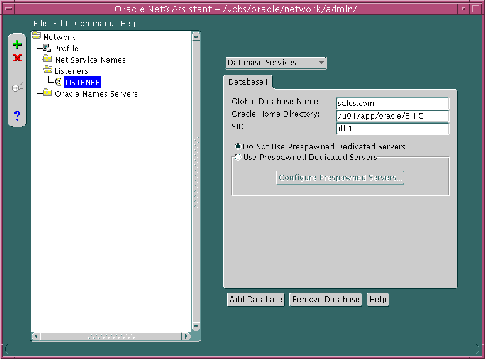
sid_list_listener=(sid_list=
(sid_desc=
 (global_dbname=sales.com)
 (sid_name=db1)
 (oracle_home=/u01/app/oracle/8.1.5)
)
To create prespawned dedicated servers, add the following four parameters in each SID_DESC in the LISTENER.ORA file:
To configure prespawned dedicated servers:
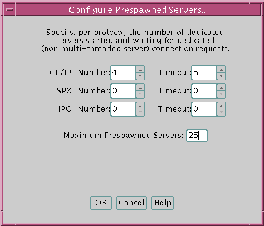
An excerpt of a LISTENER.ORA file configured with prespawned dedicated server is shown below:
sid_list_listener=(sid_list=
(sid_desc=
 (global_dbname=sales.com)
 (sid_name=db1)
 (oracle_home=/u01/app/oracle/product/8.1.5)
 (prespawn_max=25)
 (prespawn_list=
  (prespawn_desc=
   (protocol=tcp)
   (pool_size=4)
   (timeout=5)
   )
  )
 )
)
When a connection is made, the client and the receiver of the request, such as a listener, Oracle Names server, or Oracle Connection Manager, are configured with identical protocol addresses. The purpose of the address is to identify the network address of a network object. The client uses this address to send the connection request to a particular network object location, and the recipient "listens" for requests on this address, and grants a connection based on its address information matching the client information. It is important to install the same protocols for the client and the connection recipient, as well as configure the same address.
This section covers the following topics:
Protocol addresses are contained within the following components:
| ADDRESS | |
|---|---|
|
Purpose: |
Defines a protocol address. This parameter may be embedded under ADDRESS_LIST or DESCRIPTION. A DESCRIPTION is typically only used in a TNSNAMES.ORA or LISTENER.ORA file. Additional Information: Each protocol has its own required parameters needed in the address, as explained in "Protocol Parameters". |
|
Example: |
(address= (protocol=tcp) (host=sales-pc) (port=1521) ) |
| ADDRESS_LIST | |
|---|---|
|
Purpose: |
Defines lists of addresses that share a set of common characteristics. This parameter may be embedded under DESCRIPTION or DESCRIPTION_LIST. A DESCRIPTION or DESCRIPTION_LIST is typically only used in a TNSNAMES.ORA or LISTENER.ORA file. For a description of DESCRIPTION and DESCRIPTION_LIST, see "DESCRIPTIONS and DESCRIPTION_LISTs". Note: If there is only one list in a TNSNAMES.ORA or a LISTENER.ORA file, ADDRESS_LIST is not necessary. |
|
Example: |
(address_list= (address= (protocol=tcp) (host=sales-pc) (port=1521) ) (address= (protocol=tcp) (host=hr-pc) (port=1521) ) ) (address_list= (address= (protocol=tcp) (host=finance-pc) (port=1521) ) (address= (protocol=tcp) (host=sales-pc) (port=1521) ) ) |
The listener, Oracle Names server and Oracle Connection Manager are identified by protocol addresses. The table below describes the parameters used by the supported Oracle protocols:
| Protocol | Parameter | Description |
|---|---|---|
|
All |
PROTOCOL |
Indicates the type of network on which the TNS-based application resides. |
|
Bequeath1 |
PROGRAM |
Identifies the Oracle8i executable. |
|
Bequeath |
ARGV0 |
Identifies the service name. |
|
Bequeath |
ARGS |
Identifies the source of the connection (local client). |
|
IPC |
KEY |
Indicates a way of identifying the server. Oracle Corporation recommends using the name of the service. |
|
Named Pipes |
SERVER |
Indicates the name of your Oracle8i server computer. |
|
Named Pipes |
PIPE |
Indicates the pipe name you use to connect to your server (the same PIPE keyword you specified on server with Named Pipes). This name can be any arbitrary name. |
|
LU6.2 |
LU_NAME |
Identifies the Oracle8i server; must be a fully-qualified name. |
|
LU6.2 |
LLU or LOCAL_LU |
Identifies the local LU alias. This parameter cannot be used with LLU_NAME. |
|
LU6.2 |
LLU_NAME or LOCAL_LU_NAME |
Specifies the local LU name; must be a fully qualified name. This parameter cannot be used with LLU. |
|
LU6.2 |
MODE or MDN |
Identifies the log mode entry of the LU6.2 network; the value is typically ORAPLU62. |
|
LU6.2 |
PLU or PARTNER_LU_NAME |
Identifies the Oracle8i server; must be a fully qualified name.This parameter cannot be used with PLU_LA. |
|
LU6.2 |
PLU_LA or PARTNER_LU_LOCAL_ALIAS |
Identifies the partner LU alias of the Oracle7 Server. This parameter cannot be used with PLU. |
|
LU6.2 |
TP_NAME or TPN |
Identifies the transaction program name of the host machine. This parameter is not required for a connection to an MVS host. |
|
SPX |
SERVICE |
Defines the name of the TNS-based application on the network. (Mandatory for server and client.) Speak to your network administrator to learn the service names of TNS-based applications on your network. |
|
TCP/IP and TCP/IP with SSL |
HOST |
Identifies the server. |
|
TCP/IP and TCP/IP with SSL |
PORT |
Identifies the listening port number:
Note: Oracle Corporation allows port numbers from 1 to 65535, but port numbers less than 1024 are restricted to use by privileged processes on many operating systems. |
|
1
Bequeath requires configuration information in TNSNAMES.ORA but not in LISTENER.ORA. |