Release 8.0.3
A53746-01
Library |
Product |
Contents |
Index |
| Oracle Networking Products Getting Started for Windows Platforms Release 8.0.3 A53746-01 |
|
![]()
![]()
This chapter discusses some common network administration tasks that may need to be performed on the server and client. Topics include:
Common administration tasks to perform on the server side include:
The table below explains how to start Oracle Names using either the command line utility NAMESCTL80 or the Windows NT Control Panel.
| To start | Using the Command Line Utility NAMESCTL80 | Using the Windows NT Control Panel |
|---|---|---|
|
Oracle Names |
From the taskbar, select Start > Run.
C:\>NAMESCTL80.EXE
NAMESCTL> STATUSIf the STATUS command indicates the Oracle Names Server is running, go to Step 6. If the Oracle Names Server is not running, go to Step 5.
NAMESCTL>START
NAMESCTL>REORDER_NS
NAMESCTL>EXIT |
The Services dialog box appears. Look for the OracleNames80 service. A blank in Status column indicates that the service is not running. If the service is already running, close the dialog box and continue with the section "Starting the Listener".
The service starts.To change the startup mode to automatic:Click Startup. Select Automatic.Click Close.
C:\>NAMESCTL80
NAMESCTL>REORDER_NS
NAMESCTL>EXIT |
Stop the Oracle Names Server (if you are using it) when you have completed database connections.
The table below explains how to start the listener:
| To start | Using the Command Line Utility LSNRCTL80 | Using the Windows NT Control Panel |
|---|---|---|
|
Listener |
From the taskbar, select Start > Run.
C:\>LSNRCTL80.EXE
LSNRCTL>STATUS [listener_name]where listener_name is the name of the listener defined in the LISTENER.ORA file with the alias LISTENER. It is not necessary to identify the listener if you are using the default listener, named LISTENER.If the STATUS command indicates the listener is running, continue to Step 5. If the listener is not running, go to Step 6.
LSNRCTL>SET PASSWORD passwordLSNRCTL>STOP [listener_name]SET PASSWORD is only required if the password is set in the LISTENER.ORA file. The password is defaulted to ORACLE.
LSNRCTL>START [listener_name]
LSNRCTL>EXIT |
The Services dialog box appears. Look for the OracleTNSListener80 service. A blank in Status column indicates that the service is stopped.If the listener is running, continue to Step 2. If the listener is not running, go to Step 4.
Note: The default service name for the listener is OracleTNSListener80. If you have renamed your listener (default is LISTENER), then the name of the service will be appended with the name you have given the listener. The Services confirmation dialog box confirms it is OK to stop the Service. The listener is stopped. Continue to Step 4. The listener is started. |
Stop the listener when all database connections have completed, and the Oracle Names Server has been stopped.
| Note::
The listener can be left running on the server, if you choose. |
| Note:
If you are not authorized for access on the server, ask your server administrator for assistance. |
The table below explains how to start the Connection Manager using either the command line utility CMCTL80 or the Windows NT Control Panel.
To stop the Connection Manager using either the command line utility CMCTL80 or the Windows NT Control Panel:
Test the network configuration by performing a loopback test on the server.
A loopback test uses Net8 to go from the server back to itself, bypassing the Interprocess Communication (IPC). Performing a successful loopback verifies that Net8 is functioning on the server side.
Before performing a loopback test, perform the following tasks described earlier in this chapter:
Perform a loopback test on the server using Oracle Net8 Easy Config.To perform the loopback test:
From the taskbar, select Start > Programs > Oracle for Windows NT or Windows 95> Oracle Net8 Easy Config.
Oracle Net8 Easy Config appears.
The status of the test appears in the field below the Test button. Click Done when the test is complete.
The Finish screen appears.
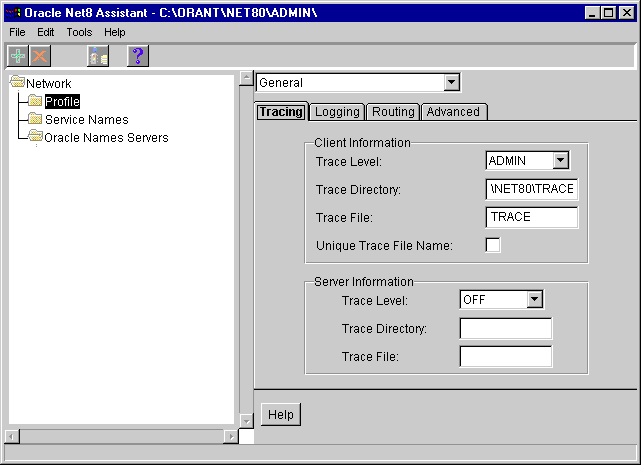
Tracing assists you in diagnosing and troubleshooting networking performance and problems. To enable tracing on either the client or server:
From the taskbar, select Start > Programs > Oracle for Windows NT or Windows 95 > Oracle Net8 Assistant.
The profile details appear on the right side of the screen.
From the taskbar, select Start > Programs > Oracle for Windows NT or Windows 95 > Oracle Net8 Assistant.
Oracle Net8 Assistant appears:
The service name details appear on the right side of the screen: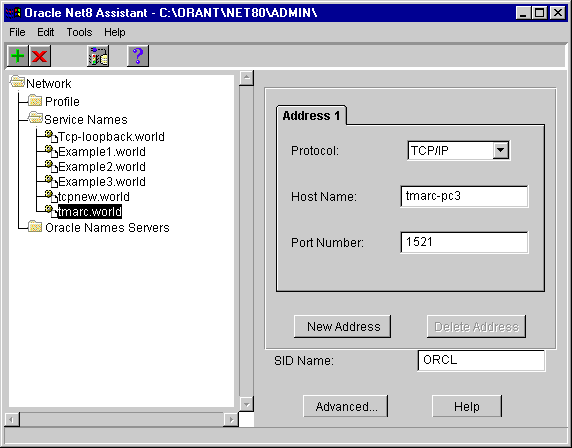
The Advanced Options screen appears:
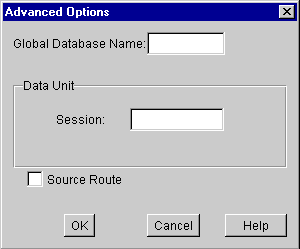
where:
| Field | Description |
|---|---|
|
Global Database Name |
This name consists of the database name and the network domain in which it resides. This unique identifier takes the form of databasename.domain. For example, for a database named SYSTEM in the domain WORLD, the global database name is SYSTEM.WORLD. |
|
Data Unit, Session |
The buffer where Net8 holds data before transmitting it across the network. The value you enter here will optimally be a multiple of the normal transport frame size, which is 1064 for an Ethernet network. The default value is 2048. |
|
Source Route |
Indicates that you want to use Connection Manager. Select if you want to use Connection Manager. See the section in Chapter 4, "Configuring the Network". |
Oracle Net8 Assistant creates the TNSNAMES.ORA and the SQLNET.ORA configuration files.
The Oracle Net8 Assistant exits.
Connection pooling is a feature used in a MTS environment.To enable connection pooling, you must edit the INITSID.ORA configuration file for your server, where SID is the system ID for your database instance. This file contains the parameters defined for your server.
| Note:
Connection pooling only works with MTS in a TCP/IP environment. This feature cannot be enabled if you are using multiplexing. |
| Additional Information:
See Oracle8 Reference Guide for more information about the parameters in this file. |
After testing the server side configuration, perform client side administration tasks by:
If your are using TCP/IP as a network protocol:
If you are not using TCP/IP, skip to "Verifying Oracle Database Connections Using TNSPING80" in this chapter.
Most TCP/IP transports attempt to use the Domain Name Service (DNS). DNS is a service used to translate the host name specified in the TNSNAMES.ORA file into the host internet address (IP). If a Domain Name Server is present on your network and the TCP/IP vendor supports DNS, the host name is successfully translated to the host address. The host IP address can be determined by using the Control Panel's Network utility to access DNS information.
Depending on your vendor, workstation configuration, and network configuration, your TCP/IP software can also use a HOSTS file to map host names to Internet addresses if DNS is not detected or supported.
If DNS and the HOSTS file are unable to resolve the host name during a remote database connection, the following error message appears:
ORA-12545: TNS: name lookup failure
If your network administrator cannot resolve the problem, the solution to this error message is to go around DNS and the HOSTS file by modifying the (HOSTS = server_name) section of the TNSNAMES.ORA so server_name is changed to the IP address of the server.
The following sections explain how to determine the server's IP address and verify that DNS and the HOSTS file are working correctly.
| Note:
If you are not authorized for access on the server, ask your Database Administrator for assistance. |
To determine the server IP address:
The Network window appears.
The Protocols view appears:
The Microsoft TCP/IP Properties dialog box appears with the IP Address view:
If you are using TCP/IP, PING allows you to determine if DNS or the HOSTS file are correctly set up and your network operating system is functioning correctly.
To use PING:
PING server_name
where server_name is the host name, alias, or Internet address of the server to which you are trying to connect. If your network in functioning correctly, the following message appears:
Reply from server_name: bytes=nn time=nnms
If there is a problem, this message appears:
Request timed out
or:
Reply from server_name: Destination host unreachable
The following is a partial list of reasons why a host is inaccessible:
If PING returns an error message, ask your network administrator to help you resolve the problem. If the problem is not resolved, and you attempt to make a Net8 connection, you may receive one of the following error messages:
Use the TNSPING80 utility to determine whether or not you can reach the listener service. TNSPING80, however, never actually connects with the listener. A socket is never created and opened. TNSPING80 only checks to ascertain that a listener is present on the server side.
When you connect to a listener using TNSPING80, an estimate of the round trip time in milliseconds appears. If TNSPING80 fails, a network error message appears without the resource use of a database connection.
To use TNSPING80:
From the client, enter:
TNSPING80 service_name count
where service_name is the database alias (or service name) and count is the number of times the program attempts to reach the server. count is optional.
The output looks like:
TNS Ping Utility for 32-bit Windows: Version 8.0.3.0.0 - Production on 27 MAY-
97 20:20:33

Copyright, 1997(c) Oracle Corporation 1997. All rights reserved.

Attempting to contact
(ADDRESS=(COMMUNITY=tcp.world)(PROTOCOL=TCP)(Host=host_name)(Port=1521))
OK (60 msec)
Use Oracle Net8 Easy Config to determine whether or not you can reach the listener service. To verify connectivity, be sure to perform these tasks first:
From the taskbar, select Start > Programs > Oracle for Windows NT or Windows 95> Oracle Net8 Easy Config.
Oracle Net8 Easy Config appears.
The status of the test appears in the field below the Test button. Click Done when the test is complete.
The Finish screen appears.
The client cache service is installed as a manual service. Once the cache process starts, the process stores all information received from a Names Server. To enable this feature, start the process:
| To start | Using the Command Line Utility NAMESCTL80 | Using the Windows NT Control Panel |
|---|---|---|
|
Client Address Caching |
NAMESCTL>START_CLIENT_CACHE |
| Note:
The Client Cache Service can only be used in an Oracle Names environment with DDO enabled. |
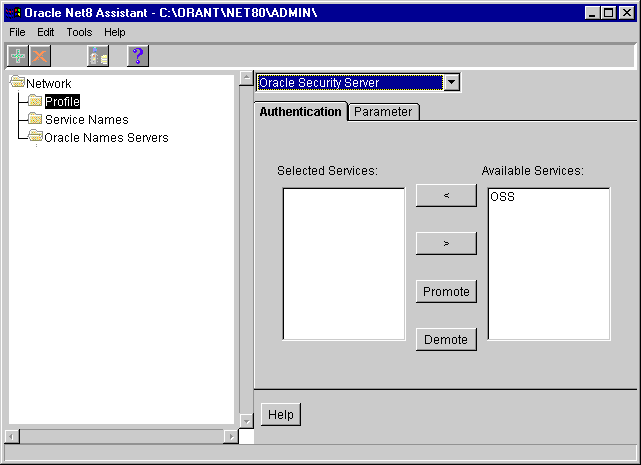
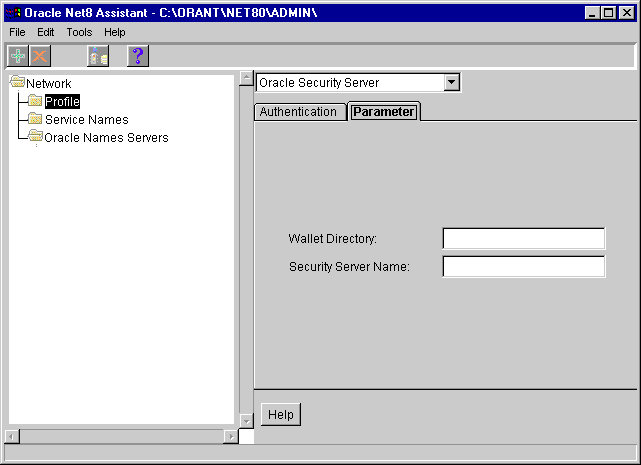
If you want to configure a Windows NT system as an Oracle Security Server, use Oracle Enterprise Manager, the graphical administration tool. To configure a client to use Oracle Security Server:
From the taskbar, select Start > Programs > Oracle for Windows NT or Windows 95 > Oracle Net8 Assistant.
The profile details appear on the right side of the screen.
Note:
|
| Additional Information:
See:
|