Introduction
Please read all instructions carefully! Unlike the other assignments you'll be receiving, this homework is quite detailed so it won't take you a significant amount of time. It contains step-by-step instructions and is not meant to be difficult. If you hit a snag, please post about your issue on Piazza.
Development is significantly easier when all of the Hadoop services will be hosted on one machine. Using small data sets and the standalone services, you can implement your applications in a development environment and then deploy them on a cluster of machines. Due to the nature of the applications, no code changes are required whether you run on a single machine or many.
In this class, you will have access to a distributed Hadoop environment, but these environments are temporary in nature and will typically only be used for testing in a larger environment. For development, we will be using Hortonworks HDP Sandbox; a self-contained VM image pre-loaded with all the needed Hadoop software.
For this homework, we'll be getting the Sandbox downloaded, getting the Twitter API keys necessary for you to do the assignments this semester, accessing your git repository to submit your projects and homeworks, and doing some brief testing to make sure everything is working.
Goals
- Download and prepare the Hortonworks HDP Sandbox
- Use some basic commands to make sure HDFS and YARN are working
- Obtain Twitter API keys and test the stream
- Clone your Git repository and submit your homework
Hardware Requirement
If you intend to work in the lab, you should have a USB drive with at least 16 GB of free space. Flash drives or USB-powered hard disks are the most convenient option. If you will be working on your personal laptop or desktop, you may want one regardless for backups.
Note: Ensure your drive is formatted as NTFS. FAT32 has an unacceptable file size limit for virtual machines.
HyperV
Software Requirements
Linux on VirtualBox
Virtualization allows us to run a virtual machine ("the guest") on a physical machine ("the host"). For the purposes of the class projects, we assume that the host machine is a modern PC with at least 4 GB of RAM, a 1.5 GHz Dual-Core processor, at least 50 GB of available disk space. The host operating system can be Windows, Linux, or Mac OS X. While 64-bit host operating systems are preferred, 32-bit will be sufficient. For more details on hardware and software requirements refer to the VirtualBox home page.
Part 1: Getting the Sandbox working
The ITE 240 Lab has VirtualBox installed on the Linux partitions of the machines in the lab.
- Download the latest VirtualBox image of HDP 2.x.x on Hortonworks Sandbox to your computer.
- Open the downloaded file, which will launch VirtualBox software.
- The default settings for this VM is 8192 GB of RAM and 4 CPUs. Now is a good time to adjust these settings to match your host machine's available resources. You typically shouldn't give more than half of the host machine's resources to your VM, so if you have 8 GB of RAM and a dual-core CPU, set your VM to use 4096 MB of RAM and 1 CPU.
- After you've chosen your settings, check the 'Reinitialize the MAC address' box and select Import.
- The VM should import into VirtualBox cleanly. If you receive an error about a corrupt disk image, you'll need to download the image once again.
- Start the VM. This VM is known as a headless VM, meaning there is no desktop on the VM. We are going to add some desktop tools so you can use this VM for development. Below is a summary of a blog post I found here.
- Click on the headless VM window and press Alt+F5. Username is root, password is hadoop, and you'll have to create a new password for the root user. Don't forget it!
- Let's now add a bunch of packages using yum. Type these into the terminal, make sure the commands complete succesfully and double check your spelling.
[root@sandbox ~]$ yum -y groupinstall "Desktop"
[root@sandbox ~]$ yum -y groupinstall "Desktop Platform"
[root@sandbox ~]$ yum -y groupinstall "X Window System"
[root@sandbox ~]$ yum -y groupinstall "Fonts"
[root@sandbox ~]$ yum -y groupinstall "Graphical Administration Tools"
[root@sandbox ~]$ yum -y groupinstall "Internet Browser"
[root@sandbox ~]$ yum -y groupinstall "General Purpose Desktop"
[root@sandbox ~]$ yum -y groupinstall "Office Suite and Productivity"
[root@sandbox ~]$ yum -y groupinstall "Graphics Creation Tools"
[root@sandbox ~]$ yum -y groupinstall "Development tools"
- Edit /etc/inittab in your preferred text editor, changing the number 3 to 5.
id:5:initdefault:
- Create a user who is named after your GL user ID, in my case it is shadam1.
# For example:
[root@sandbox ~]$ useradd shadam1
[root@sandbox ~]$ passwd shadam1
New password:
Retype new password:
passwd: all authentication tokens updated successfully
- Create a file named after your GL user ID under /etc/sudoers.d/, for example /etc/sudoers.d/shadam1. Enter the following content, replacing my user name with your own. This will give you superuser priviledges if needed.
shadam1 ALL=(ALL) ALL
- Shutdown the VM
[root@sandbox ~]$ poweroff
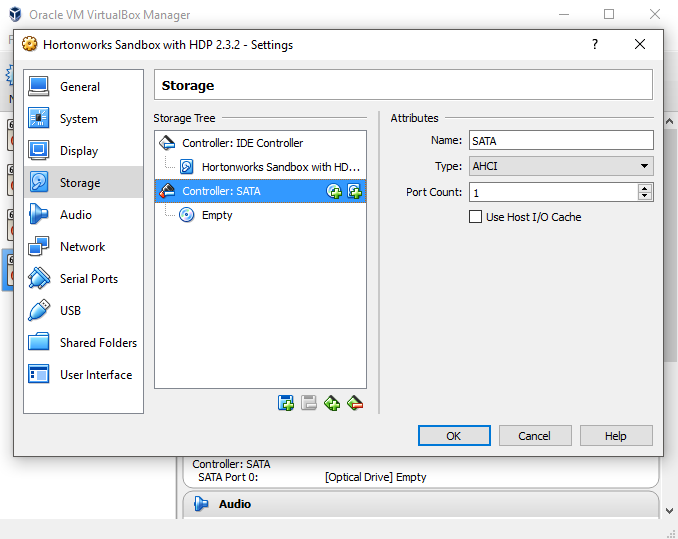
- In VirtualBox Manager, right click on the VM and click settings. Go to Storage, right click on the large box, select Add SATA Controller. Right click the new SATA controller, and select Add Optical Driver, Leave Empty.
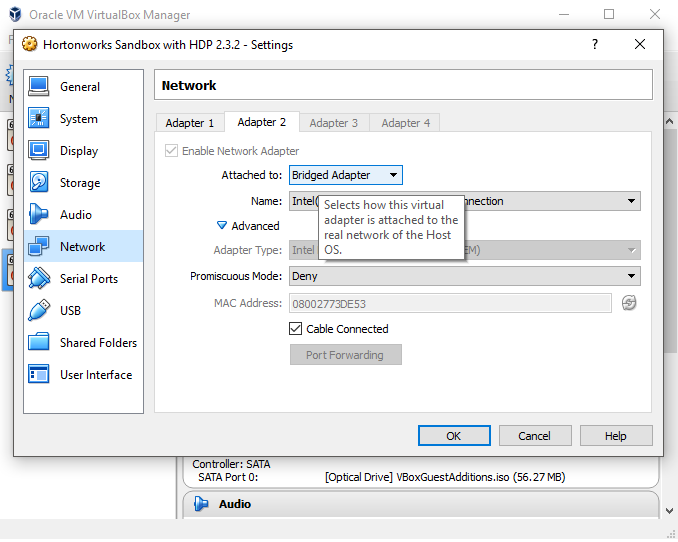
- Select Network, go to Adapter 2, check Enable the Network Adapter, and select Bridged Adapter as the value of 'Attached to'. This will allow your VM to access the internet.
- Click OK to save the new settings and start the VM.
- Scroll through the giant list of users to locate your GL username and login as that user.
- You should now be seeing a desktop. Launch a terminal via Applications->System Tools->Terminal. You may want to drag the Terminal icon in this menu over to the top toolbar as you'll be using the Terminal a lot.
- Install the latest kernel packages and reboot the machine.
[shadam1@sandbox ~]$ sudo yum -y install kernel*
[shadam1@sandbox ~]$ sudo reboot
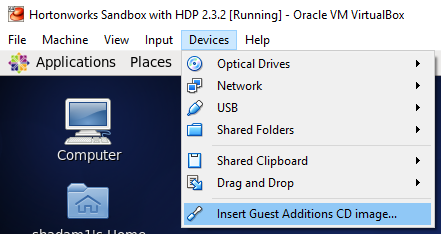
- Login as the root user by selecting 'Other...' at the bottom of the Giant User List and entering root's login credentials. Under the Devices menu in the VirtualBox window, select 'Install Guest Additions CD image...'.
- Select OK and then Run. This will install the guest additions so you can copy/paste back and forth between the host and guest machine and a bunch of other stuff. There is an error on some of the extensions, but it doesn't seem to affect the machine that much. There are additional instructions here should you want to follow the additional steps to get all of the additions installed.
- Reboot the machine once again and login as yourself.
- You should now be able to open Firefox for internet use. Navigate to localhost:8080, and view Ambari. The login for Ambari is admin/admin.
- At this point, to conserve resources, feel free to open Ambari and stop some services you won't be needing at this point. The services you do need are:
- HDFS
- MapReduce2
- YARN
- ZooKeeper
Part 2: Playing in the Sandbox
At this point you should now have a desktop with a connection to the internet and that various Hadoop tools we'll be using throughout the course. We'll be doing some basic HDFS commands and running a sample MapReduce job to make sure everything is working.
-
First, we must make our home directory in HDFS. Just like how every linux user has a home directory under /home, every user of HDFS has a home directory under /user. This is to prevent confusion between /home on the local filesystem and /user in HDFS. Enter the below commands to create your user, replacing shadam1 with your username.
[shadam1@sandbox ~]$ sudo -u hdfs hdfs dfs -mkdir /user/shadam1/
[shadam1@sandbox ~]$ sudo -u hdfs hdfs dfs -chown shadam1:shadam1 /user/shadam1/
# The 'put' command moves a file from the local filesystem to a destionation directory
[shadam1@sandbox ~]$ hdfs dfs -put /usr/hdp/current/pig-client/CHANGES.txt /user/shadam1/
# The 'cat' command will print the contents of a file to stdout
[shadam1@sandbox ~]$ hdfs dfs -cat CHANGES.txt
# ... a bunch of output
# The 'ls' command will list the files in a provided HDFS path.  If no path is provided, or it is not an absolute path, it assumes you are located in your home directory.  Note that there is no concept of a working directory when using HDFS.
[shadam1@sandbox ~]$ hdfs dfs -ls -R
-rw-r--r--   3 shadam1 shadam1     190058 2016-02-04 19:57 CHANGES.txt
- Now we will run a sample MapReduce job over the file we just put in HDFS.
[shadam1@sandbox ~]$ yarn jar /usr/hdp/2.3.2.0-2950/hadoop-mapreduce/hadoop-mapreduce-examples.jar wordcount CHANGES.txt output
# ... a bunch of output
[shadam1@sandbox ~]$ hdfs dfs -ls -R
drwx------   - shadam1 shadam1          0 2016-02-04 19:58 .staging
-rw-r--r--   3 shadam1 shadam1     190058 2016-02-04 19:57 CHANGES.txt
drwxr-xr-x   - shadam1 shadam1          0 2016-02-04 19:58 output
-rw-r--r--   3 shadam1 shadam1          0 2016-02-04 19:58 output/_SUCCESS
-rw-r--r--   3 shadam1 shadam1      83856 2016-02-04 19:58 output/part-r-00000
Part 3: Twitter API Access
The second objective of this homework is to obtain your Twitter API keys and make sure you are able to access the data.
- Go to Twitter's new application registration page and fill out the form. The application name, description, and website are all fairly irrelevant. Note that you'll need to log into your Twitter account if you are not already logged in, and you'll need to create one if you don't aready have one.
- First, we need to upgrade ruby to a newer version than what is installed.
[shadam1@sandbox ~]$ cd
[shadam1@sandbox ~]$ sudo yum erase -y ruby ruby-devel
[shadam1@sandbox ~]$ wget http://cache.ruby-lang.org/pub/ruby/2.3/ruby-2.3.0.tar.gz
[shadam1@sandbox ~]$ tar -xf ruby-2.3.0.tar.gz
[shadam1@sandbox ~]$ cd ruby-2.3.0
[shadam1@sandbox ~]$ ./configure -prefix=/usr
[shadam1@sandbox ~]$ make
[shadam1@sandbox ~]$ sudo make install
[shadam1@sandbox ~]$ sudo gem update --system
[shadam1@sandbox ~]$ sudo gem install bundler
- On your VM, clone the twurl git repository and install the gem. Twurl is a curl-like command line tool for interaction with Twitter's API, and we will be using it to test the authorization. I don't expect we will be using it much more than this, but it's a neat tool!
[shadam1@sandbox ~]$ cd
[shadam1@sandbox ~]$ git clone https://github.com/twitter/twurl.git
[shadam1@sandbox ~]$ cd twurl/
[shadam1@sandbox twurl]$ sudo gem install twurl
- Back in your browser, navigate to the Twitter Apps page, select the application you chose, and follow the 'Keys and Access Tokens' tab. Note the Consumer Key and Consumer Secret entries; you'll need them in the next step.
- Enter the below command, copy/pasting the values of your consumer key and secret as the values of the command line option (without the < >). Follow the link, login using your Twitter credentials, and copy/paste the PIN number back in the Terminal to complete the authorization process.
[shadam1@sandbox twurl]$ twurl authorize --consumer-key <your.key> --consumer-secret <your.secret>
Go to <link omitted> and paste in the supplied PIN
8564638
Authorization successful
- Execute the below command to view your timeline. If you have not tweeted, the results are probably not that interesting, so be sure you tweet once before running this command.
[shadam1@sandbox twurl]$ twurl /1.1/statuses/user_timeline.json
... a bunch of json...
Part 4: Submitting your Homework
The final objective is to learn how to submit your homeworks for this course. We will be using git to submit homeworks and projects this semester. For this project, you will submit a screen shot of your running virtual machine along with a file containing the output of a couple commands. Let's walk through the steps of installing git, generating the files to commit, and then pushing your project to the repository.
- Initialize git with your name and email, see below for an example. You'll only have to do this once.
[shadam1@sandbox ~]$ git config --global user.name "Adam Shook"
[shadam1@sandbox ~]$ git config --global user.email "shadam1@umbc.edu"
-
Checkout your git repository from the UMBC GL servers, where <glusername> is your username for the GL servers. You will likely be prompted for your password. If you receive an error, please contact the instructor. This command will create a directory named <glusername>-gitrepo in your user's home directory.
[shadam1@sandbox ~]$ git clone ssh://<glusername>@linux.gl.umbc.edu/afs/umbc.edu/depts/cmsc/ajshook/491s16/<glusername> ~/<glusername>-gitrepo
-
Change to this directory and make a "hw1" folder.
[shadam1@sandbox ~]$ cd ~/shadam1-gitrepo
[shadam1@sandbox shadam1-gitrepo]$ mkdir hw1
[shadam1@sandbox shadam1-gitrepo]$ cd hw1
-
Take a screenshot and place the screenshot image in the hw1 directory of your git repo. The name of this file should be "hw1-ss", with an appropriate file name extension for your image. An example screenshot is here. The 'Print' key is mapped to take screenshots in the Linux VM, but you may receive an error that gnome-screenshot is not installed. Execute "sudo yum install -y gnome-utils" to install the utilities, then it can work. If your host machine is a Mac, you can change the key mapping to something different under System -> Settings -> Keyboard Shortcuts.
-
Tarball your submission files, add the tarball to your git repository, commit it with an appropriate message, and push it to the GL server.
[shadam1@sandbox ~]$ cd ~/shadam1-gitrepo
[shadam1@sandbox shadam1-gitrepo]$ mkdir hw1
[shadam1@sandbox shadam1-gitrepo]$ cd hw1/
[shadam1@sandbox shadam1-gitrepo]$ twurl /1.1/statuses/user_timeline.json > twurl.out
[shadam1@sandbox shadam1-gitrepo]$ hdfs dfs -ls -R &> script.out
[shadam1@sandbox shadam1-gitrepo]$ cat script.out
drwx------   - shadam1 shadam1          0 2016-02-04 19:58 .staging
-rw-r--r--   3 shadam1 shadam1     190058 2016-02-04 19:57 CHANGES.txt
drwxr-xr-x   - shadam1 shadam1          0 2016-02-04 19:58 output
-rw-r--r--   3 shadam1 shadam1          0 2016-02-04 19:58 output/_SUCCESS
-rw-r--r--   3 shadam1 shadam1      83856 2016-02-04 19:58 output/part-r-00000
[shadam1@sandbox hw1]$ ll
total 156
-rw-rw-r-- 1 shadam1 shadam1 155551 2016-02-04 20:04 hw1-ss.png
-rw-rw-r-- 1 shadam1 shadam1    359 2016-02-04 20:04 script.out
-rw-rw-r-- 1 shadam1 shadam1  52183 2016-02-04 20:04 twurl.out
[shadam1@sandbox hw1]$ tar -zcvf hw1.tar.gz hw1-ss.png twurl.out script.out
hw1-ss.png
script.out
twurl.out
[shadam1@sandbox hw1]$ rm hw1-ss.png script.out twurl.out
[shadam1@sandbox hw1]$ git add hw1.tar.gz
[shadam1@sandbox hw1]$ git commit -m "Submit homework one files"
 create mode 100644 hw1/hw1.tar.gz
[shadam1@sandbox hw1]$ git push
-
Verify your submission was complete by cloning your repository once again to some temporary directory.
What to do if you want to get a 0 on this project:
Any of the following items will cause significant point loss. Any item below with an asterisk (*) will give that submission a 0.
- Missing hw1.tar.gz*
- Submissions in excess of 10MB*
- Missing any of the required files above
- Submissions that do not extract with the command "tar -zxvf hw1.tar.gz"