In this lab you will implement a streaming video server and client that communicate using the Real-Time Streaming Protocol (RTSP) and send data using the Real-time Transfer Protocol (RTP). Your task is to implement the RTSP protocol in the client and implement the RTP packetization in the server.
We will provide you code that implements the RTSP protocol in the server, the RTP de-packetization in the client, and takes care of displaying the transmitted video. You do not need to touch this code.
There are 4 classes in the assignment.
After completing the code, you can run it as follows.
First, start the server with the command
java Server server_port
where server_port is the port your server listens to for incoming RTSP connections. The standard RTSP port is 554, but you will need to choose a port number greater than 1024.
Then, start the client with the command
java Client server_name server_port video_file
where server_host is the name of the machine where the server is running, server_port is the port the server is listening on, and video_file is the name of the file you want to request (we have provided one example file movie.Mjpeg). The file format is described in the Appendix.
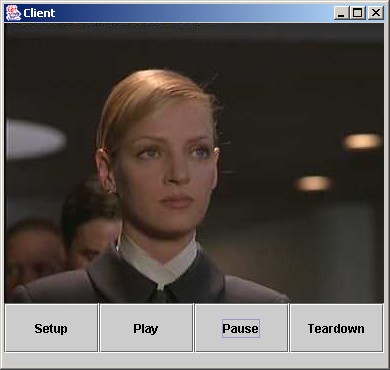
The client opens a connection to the server and pops up a window like this:
You can send RTSP commands to the server by pressing the buttons. A normal RTSP interaction goes as follows.
The server alway replies to all the messages the client sends. The reply codes are roughly the same as in HTTP. The code 200 means that the request was successful. In this lab you do not need to implement any other reply codes. For more information about RTSP, please see RFC 2326.
Your first task is to implement the RTSP on the client side. To do this, you need to complete the functions that are called when the user clicks on the buttons in the user interface. For each button in the interface there is a handler function in the code. You will need to implement the following actions in each handler function.
When the client starts, it also opens the RTSP socket to the server. Use this socket for sending all RTSP requests.
Note: You must insert the CSeq header in every request you send. The value of the CSeq header is a number which is incremented by one for each request you send.
Here is a sample interaction between the client and server. The client's requestes are marked with C: and server's replies with S:. In this lab both the client and the server are very simple. They do not have sophisticated parsing routines and they expect the header fields to be in the order you see below. That is, in a request, the first header is CSeq, and the second one is either Transport (for SETUP) or Session (for all other requests). In the reply, CSeq is again the first and Session is the second.
C: SETUP movie.Mjpeg RTSP/1.0
C: CSeq: 1
C: Transport: RTP/UDP; client_port= 25000

S: RTSP/1.0 200 OK
S: CSeq: 1
S: Session: 123456

C: PLAY movie.Mjpeg RTSP/1.0
C: CSeq: 2
C: Session: 123456

S: RTSP/1.0 200 OK
S: CSeq: 2
S: Session: 123456

C: PAUSE movie.Mjpeg RTSP/1.0
C: CSeq: 3
C: Session: 123456

S: RTSP/1.0 200 OK
S: CSeq: 3
S: Session: 123456

C: PLAY movie.Mjpeg RTSP/1.0
C: CSeq: 4
C: Session: 123456

S: RTSP/1.0 200 OK
S: CSeq: 4
S: Session: 123456

C: TEARDOWN movie.Mjpeg RTSP/1.0
C: CSeq: 5
C: Session: 123456

S: RTSP/1.0 200 OK
S: CSeq: 5
S: Session: 123456
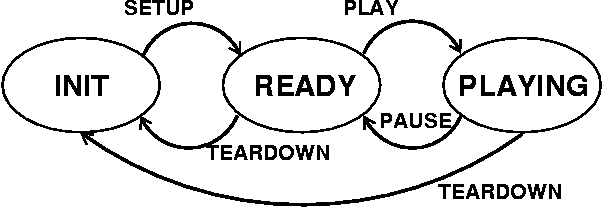
One of the key differences between HTTP and RTSP is that in RTSP each session has a state. In this lab you will need to keep the client's state up-to-date. Client changes state when it receives a reply from the server according to the following state diagram.
On the server you will need to implement the packetization of the video data into RTP packets. For this you will need to create the packet, set the fields in the packet header, and copy the payload (i.e., one video frame) into the packet.
When the server receives the PLAY-request from the client, it starts a timer which is triggered every 100 ms. At these times the server will read one video frame from the file and send it to the client. The server creates an RTPpacket-object which is the RTP-encapsulation of the video frame.
The server calls the first constructor of the class RTPpacket to perform the encapsulation. Your task is to write this function. You will need to do the following: (the letters in parenthesis refer to the fields in the RTP packet format below)
Because we have no other contributing sources (field CC == 0), the CSRC-field does not exist. The length of the packet header is therefore 12 bytes, or the first three lines from the diagram below.
    0                   1                   2                   3
    0 1 2 3 4 5 6 7 8 9 0 1 2 3 4 5 6 7 8 9 0 1 2 3 4 5 6 7 8 9 0 1
   +-+-+-+-+-+-+-+-+-+-+-+-+-+-+-+-+-+-+-+-+-+-+-+-+-+-+-+-+-+-+-+-+
   |V=2|P|X|  CC   |M|     PT      |       sequence number         |
   +-+-+-+-+-+-+-+-+-+-+-+-+-+-+-+-+-+-+-+-+-+-+-+-+-+-+-+-+-+-+-+-+
   |                           timestamp                           |
   +-+-+-+-+-+-+-+-+-+-+-+-+-+-+-+-+-+-+-+-+-+-+-+-+-+-+-+-+-+-+-+-+
   |           synchronization source (SSRC) identifier            |
   +=+=+=+=+=+=+=+=+=+=+=+=+=+=+=+=+=+=+=+=+=+=+=+=+=+=+=+=+=+=+=+=+
   |            contributing source (CSRC) identifiers             |
   |                             ....                              |
   +-+-+-+-+-+-+-+-+-+-+-+-+-+-+-+-+-+-+-+-+-+-+-+-+-+-+-+-+-+-+-+-+
You must fill in the header in the array header of the RTPpacket-class. You will also need to copy the payload (given as argument data) to the variable payload. The length of the payload is given in the argument data_length.
The above diagram is in the network byte order (also known as big-endian). The Java Virtual Machine uses the same byte order so you do not need to transform your packet header into the network byte order.
For more details on RTP, please see RFC 1889.
Here are some examples on how to set and check individual bits or groups of bits. Note that in the RTP packet header format smaller bit-numbers refer to higher order bits, that is, bit number 0 of a byte is 2^7 and bit number 7 is 1 (or 2^0). In the examples below, the bit numbers refer to the numbers in the above diagram.
Because the header-field of the RTPpacket class is an array of type byte, you will need to set the header one byte at a time, that is in groups of 8 bits. The first byte has bits 0-7, the second byte has bits 8-15, and so on. In Java an int is 32 bits or 4 bytes.
To set bit number n in variable mybyte of type byte:
mybyte = mybyte | 1 << (7 - n);
To set bits n and n + 1 to the value of foo in variable mybyte:
mybyte = mybyte | foo << (7 - n);
Note that foo must have a value that can be expressed with 2 bits, that is, 0, 1, 2, or 3.
To copy a 16-bit integer foo into 2 bytes, b1 and b2:
       b1 = foo >> 8;
       b2 = foo & 0xFF;
After this, b1 will have the 8 high-order bits of foo and b2 will have the 8 low-order bits of foo.
You can copy a 32-bit integer into 4 bytes in a similar way.
If you're not comfortable setting bits, you can find more information in the Java Tutorial.
Suppose we want to fill in the first byte of the RTP packet header with the following values:
In binary this would be represented as
        1 0 | 0 | 0 | 0 0 1 1
        V=2   P   X   CC = 3

       2^7 . . . . . . . . 2^0
Lab's proprietary MJPEG (Motion JPEG) format.
In this lab, the server streams a video which has been encoded into a proprietary MJPEG file format. This format stores the video as concatenated JPEG-encoded images, with each image being preceded by a 5-Byte header which indicates the bit size of the image. The server parses the bitstream of the MJPEG file to extract the JPEG images on the fly. The server sends the images to the client at periodic intervals. The client then displays the individual JPEG images as they arrive from the server.