Assignment Goals
The primary goals of this assignment are:
- Create a UE Plugin from scratch.
- Create a UE object importer.
- Create a UE asset action for an existing asset type (691 only).
- Get experience looking through other plugin code and engine source as a strategy for working with a large codebase.
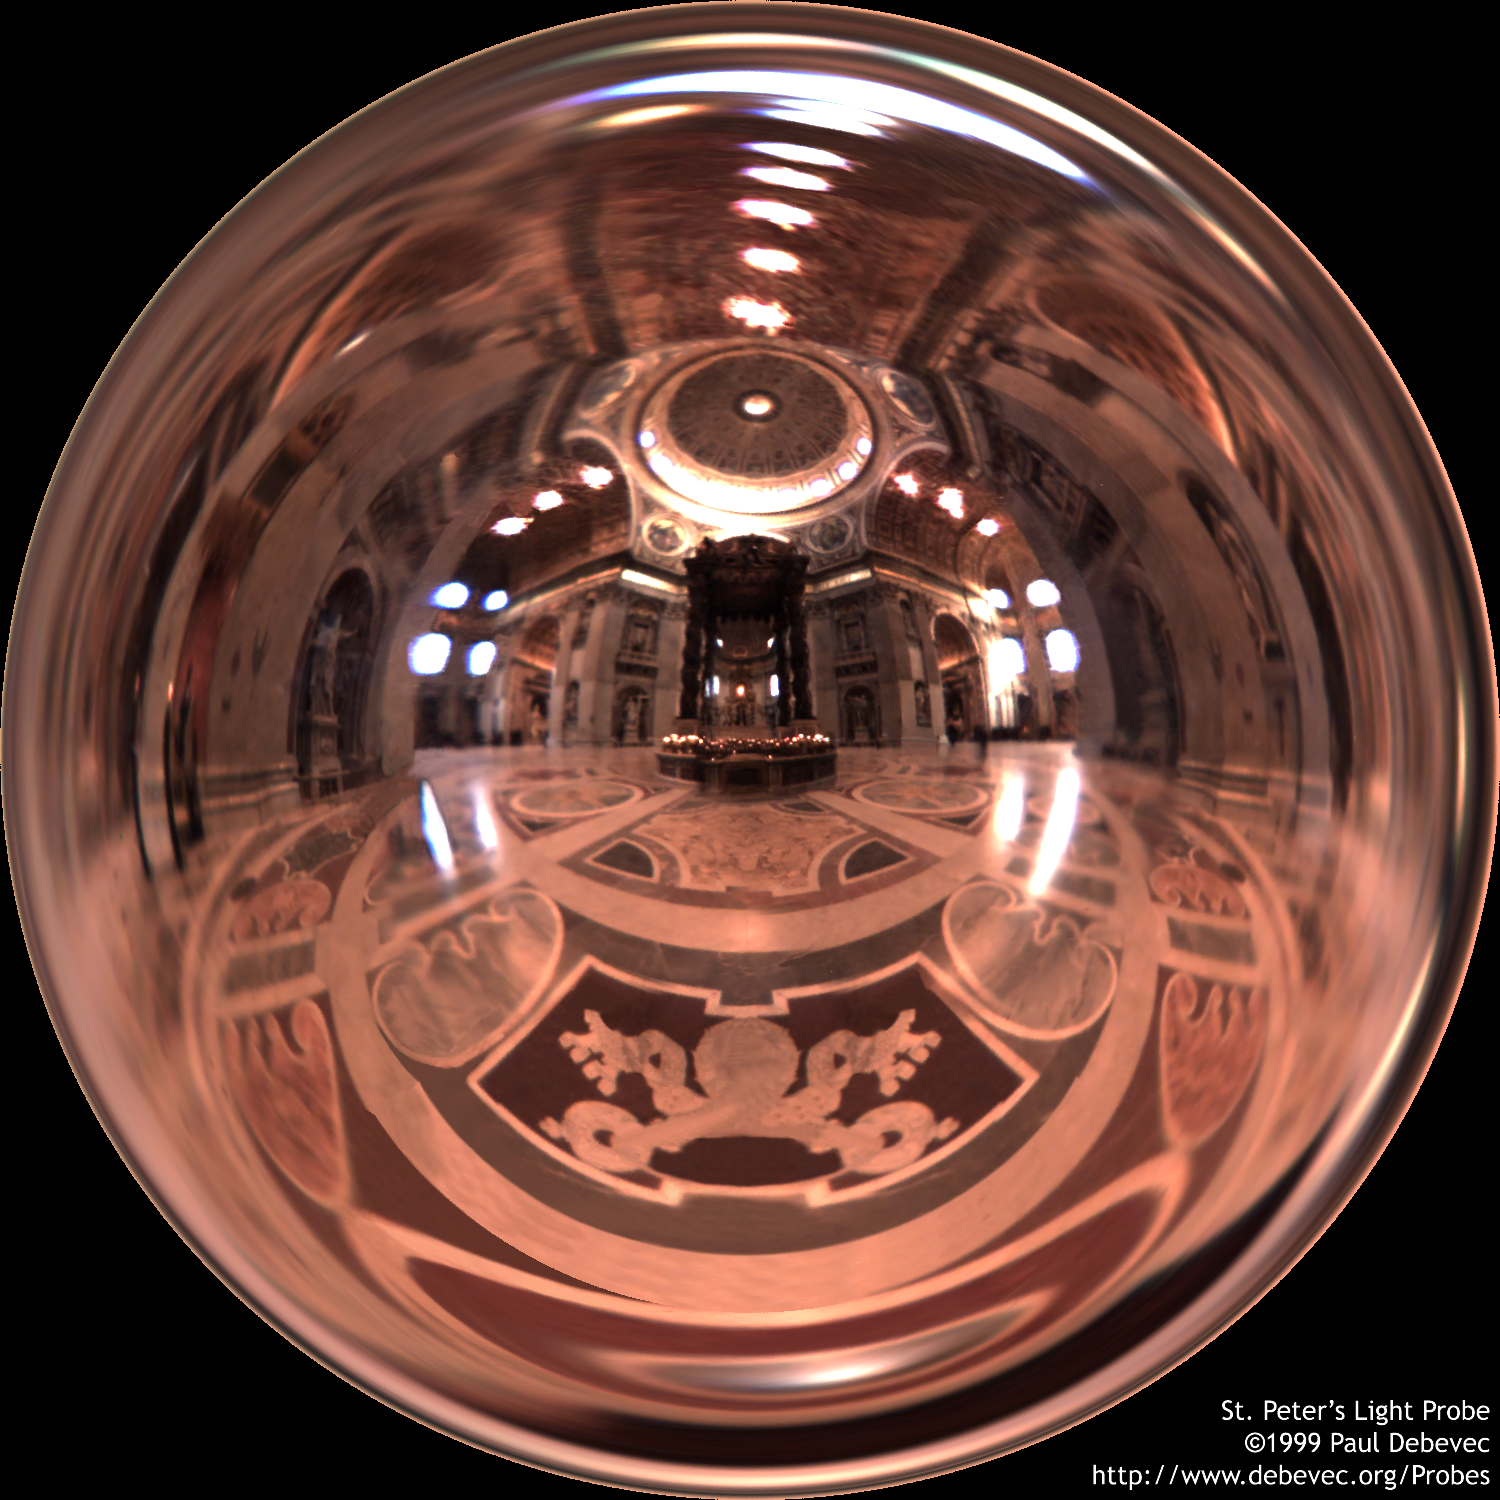
For this assignment, the goal is to ultimately convert a high dynamic range light probe from a file in PFM format into a form we can use in the engine.
A light probe captures light from all directions, and can be used to make realistic lighting and reflection. You will find nine samples from Paul Debevec's light probe page in the hdrenv directory of your git repository. Light probes can be created using a capture device with special lenses, photos of a reflective sphere, or constructed from multiple photos. They are especially useful when trying to combine CGI elements with live action in film production, where it is common to include a reflective sphere somewhere in the shot that can be easily removed in postproduction.
Textures are often classified into the more common low dynamic range (LDR) images or high dynamic range (HDR). In LDR, intensity in the range 0-1 is represented by a fixed-point data type like a byte. Anything too bright is clamped to 1. In HDR, intensity is represented in a floating point format, so the sky might be in the 100's and the sun on the order of 10,000, all of which would be clamped to 1 in an LDR texture. It is important that light probes be stored as floating-point high dynamic range images, since many lighting computations can scale the incoming light by relatively small factors, but the brightest spots should still show through.
The sphere map is a popular representation for light probes (as in the example). This can be captured by taking pictures of a reflective sphere (these samples were made from photos of a 3-inch ball bearing). To use you just need to figure out which point on the sphere would result in the desired reflection direction. For a reflection direction, R, and a sphere image taken looking down the X axis, the computation to figure out the texture coordinates for the reflection of R is:
0.5 - (0.5/PI) * acos(R.x) * normalize(R.yz)
Details
Create a project
- Create a Blank C++ project with no starter content called assn5.
- As usual, put the project at the top level of your git repository
- Create an "assn5" level and set it as your editor startup map.
Create a test material and object
- Create a new material.
- Set the Blend Mode to Translucent
- Hook a "Fresnel" node up to the Opacity
- Hook a "Texture Sample" node to the Emmissive Color, with the UVs input computed using the expression above from the reflection direction given by the "Reflection Vector".
- For testing, you can import one of the *_LDR.png sphere maps to use as your texture.
- Drag a copy of the SM_MatPreviewMesh_01 static mesh from the Engine content folder into your scene, and set the first of its three materials (Element 0) to your test material
Create your asset loader
- This time you will start from a Blank code plugin.
- Add an asset load class derived from UFactory to your plugin.
- Add this in new header and C++ files, not in the same files as the ModuleInterface
- Run GenerateProjectFiles and restart Visual Studio after adding the new files
- Make your factory
- To load from a file, you should override the UFactory::FactoryCreateFile or UFactory::FactoryCreateBinary function. Find examples in the engine and engine plugins.
- To avoid undefined symbol errors, add the module for UFactory to your plugin's Build.cs.
- Call Formats.Add in your class constructor to tell UE that you handle files with the pfm file extension. Note that the code that implements Formats.Add cannot handle extra spaces before the extension, or before or after the ";" that separates the extension from description.
- At this point, if your importer creates and returns an empty UTexture2D object, you should be able to drag a pfm file into the Content window and get an empty texture object to confirm that your format registration code is correct.
- Delete the old imported asset before trying to import again. Assuming you have not actually used it for anything (added it to any materials or as a property on another object), it is safe to "Force Delete" when removing the object.
- Parse the pfm header
- Though our files are all color (PF), you should support both PF and Pf forms.
- Our files do have at least one comment line in the header. Skip anything starting with a # to the end of the line.
- Pay attention to the scale and endianness term in the header. The provided files are not the same endianness as either Intel or Apple CPUs, so you will need deal with swapping the bytes. You should do it only if necessary (so you should not the swap byte order if given a different file with scale -1).
- The PFM format page is not very precise about what to do with the scale when it is not 1. Divide each texel by the absolute value of the scale as a normalization.
- If things go wrong, use UE_LOG to send a message to the Editor Output window and return nullptr.
- Load the data into a UTexture2D
- Create a UTexture2D with NewObject, using the InParent, Name, and Flags that were passed into your factory function.
- Two texture source formats take 32-bit floats: TSF_R32F and TSF_RGBA32F. I recommend creating a temporary buffer to reorder the byte order of the data and, at least for RGB data, to add a 4th channel as (R,G,B,1).
- PFM images start on the top row, while UE5 textures start on the bottom row, so you will also need to flip the image top to bottom during the load
- For the GPU representation (specified by CompressionSettings), use either a 16 or 32-bit float format.
- Texture->Source.Init() will initialize the size, format, and data. Use the width and height given in the file, 1 for the number of slices, and 1 for the number of mips. Look up "Source.Init(" for a number of examples of initializing a texture from data on the CPU.
- Call Texture->UpdateResource() to update the texture object with the loaded data.
- You can do this incrementally to test as you go: right dimensions with nullptr for the data, then set the TC format, then provide the data.
Grad Students
For rendering, graphics hardware has built-in support for cube textures, consisting of six square 2D textures looking out in the six directions: +X, -X, +Y, -Y, +Z, and -Z. The light probe page also provides each in a single image that contains all six faces in a cross like an unfolded cube (the *_cross.pfm files). To convert the unfolded cube format into the six faces, you will need to both extract the square sub-images and flip them around based on different assumptions for the axis directions. These are the directions for the unfolded cube, and for the six cube faces:
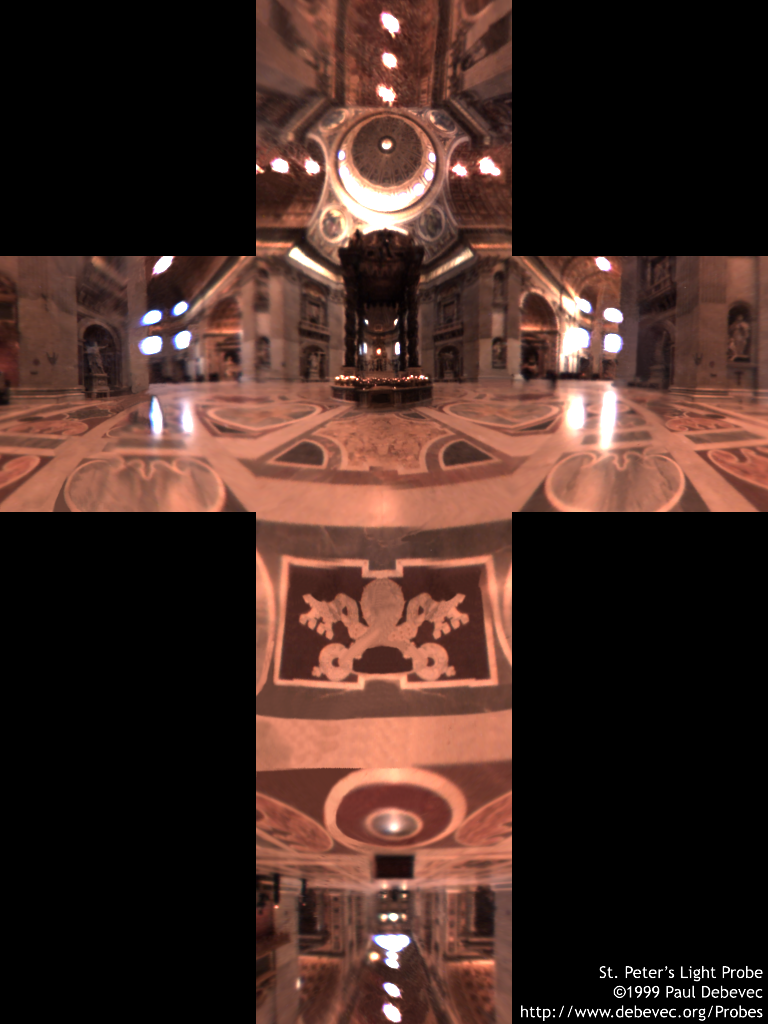 |  |  |
Also create an asset action to generate a new UTextureCube asset from an existing UTexture2D. This should show up in the context menu when you right-click on a texture in the Content window.
Hooking up the menu
The AssetAction method in the class slides is for new asset types. The following will help you set up this context menu action. Be sure to replace ModuleClass with your module class name and FactoryClass with a second, new factory for this portion of the assignment.
Add this to your module class definition
// delegate for extending content browser context menu
TSharedRef<FExtender> ExtendSelectionMenu(const TArray<FAssetData>& SelectedAssets);

// delegate to actually create the new cube map
void ExecuteConvertCube(class UTexture2D *SourceTexture);

// Pointer to content browser object
class FContentBrowserModule *ContentBrowserModule;

// handle to remove content browser menu extension on Shutdown
FDelegateHandle ExtenderDelegateHandle;
Then add this to your StartupModule function:
// Load content browser module
ContentBrowserModule = &FModuleManager::LoadModuleChecked<FContentBrowserModule>(
    TEXT("ContentBrowser"));

// Turn ExtendSelectionMenu function into delegate
FContentBrowserMenuExtender_SelectedAssets ContentMenuDelegate =
    FContentBrowserMenuExtender_SelectedAssets::CreateRaw(this,
        &ModuleClass::ExtendSelectionMenu);
ExtenderDelegateHandle = ContentMenuDelegate.GetHandle();

// Add to menu entry list
ContentBrowserModule->GetAllAssetViewContextMenuExtenders().Add(ContentMenuDelegate);
This for the ShutdownModule function
// Remove menu extender with matching handle
ContentBrowserModule->GetAllAssetViewContextMenuExtenders().RemoveAll(
  [DelegateHandle = ExtenderDelegateHandle](const FContentBrowserMenuExtender_SelectedAssets& Delegate)
  {
      return Delegate.GetHandle() == DelegateHandle;
  });
And add these new functions to the module cpp file
// Extend context menu
TSharedRef<FExtender> ModuleClass::ExtendSelectionMenu(const TArray<FAssetData>& SelectedAssets)
{
    TSharedRef<FExtender> Extender(new FExtender());

    // only when just one is selected
    if (SelectedAssets.Num() != 1) return Extender;

    // only when it is a texture
    UTexture2D *SourceTexture = Cast<UTexture2D>(SelectedAssets[0].GetAsset());
    if (! SourceTexture) return Extender;

    // only when the dimensions are correct
    int32 width = SourceTexture->GetSizeX();
    int32 height = SourceTexture->GetSizeY();
    if (width % 3 != 0 || height % 4 != 0 || width/3 != height/4)
        return Extender;

    // add to context menu
    TAttribute<FText> Label = LOCTEXT("CubeCreate","Create Cube Map");
    TAttribute<FText> Tooltip = LOCTEXT("CubeTooltip",
        "Create cube map from unfolded cube in a 2D texture");
    FSlateIcon Icon(FAppStyle::GetAppStyleSetName(), "ClassIcon.TextureCube");
    FUIAction Action(FExecuteAction::CreateRaw(this,&ModuleClass::ExecuteConvertCube,SourceTexture));
    Extender->AddMenuExtension(
        "GetAssetActions",      // which menu
        EExtensionHook::After,  // where to add
        nullptr,                // (empty) UI command list
        FMenuExtensionDelegate::CreateLambda(
            [Label, Tooltip, Icon, Action](FMenuBuilder& Builder)
            {
                Builder.AddMenuEntry(Label, Tooltip, Icon, Action);
            }
        )
    );

    return Extender;
}

// delegate to actually create the new cube map
void ModuleClass::ExecuteConvertCube(UTexture2D *SourceTexture)
{
    // build a new asset name
    const FString DefaultSuffix = TEXT("_Cube");
    FString PackagePath, Name;
    IAssetTools::Get().CreateUniqueAssetName(SourceTexture->GetOutermost()->GetName(),
        DefaultSuffix, PackagePath, Name);

    // Create the factory used to generate the asset
    FactoryClass* Factory = NewObject<FactoryClass>();
    Factory->SourceTexture = SourceTexture;

    // get content browser to make the new asset
    ContentBrowserModule->Get().CreateNewAsset(Name, FPackageName::GetLongPackagePath(PackagePath),
        UTextureCube::StaticClass(), Factory);
}
Some pointers for how you could have figured all of this out yourself:
- I started by right clicking on a texture and searching for a couple of the menu entries that came up: "Sprite Actions" and "Create Volume Texture". Those led to some of the necessary classes and functions, then I searched for other places those same classes and functions were used for simpler examples.
- It also helpful to look at the class definitions for FContentBrowserModule, FExtender, FMenuBuilder, and TDelegate.
- FRigLogicEditor.cpp is a good example for the StartupModule bits
- Paper2D ContextBrowserExtensions.cpp has code to remove a menu entry by saving a handle to the delegate and later removing it from the list (which I put directly into ShutdownModule).
- ContextBrowserExtensions.cpp also has an example of only adding the entry to the menu when certain conditions are met. I adapted this to number of assets selected (1), asset type (UTexture2D), and ratio of dimensions (3x4).
- Lots of the content browser extension code adds sub-menus. SConcertBrowser.cpp shows a single menu entry without the extra level of nesting (using AddMenuEntry instead of AddSubMenu).
- ExecuteCreateVolumeTexture for "Create Volume Texture" shows how to create a new asset from an existing texture
New Factory code
To create the new asset, you'll need to make a second factory class that creates the new UTextureCube object.
- Look at the factory used by ExecuteCreateVolumeTexture for an example. This factory should have a UTexture2D* SourceTexture member which is set by the above code, and create a new UTextureCube.
- You won't be able to use ReadTexture in your factory to get the source texture data because it does not fully support floating point TSF and TC types, but you can look at its code to figure out how to do it yourself.
Create a new reflective glass material using your cube texture. For a cube map, plug the reflection vector directly into the UVs input for the Texture Sample node.
Submission
As always, for full credit, you must commit multiple times during your development.
Add an assn5.txt. Tell us what works and what doesn't, and anything else you think we should know for grading. For grad students, tell us what extensions you did. If you did any extensions for extra credit, tell us which ones. Tell us where to find the test files for any extensions.
For the base assignment, include a link a screen shots of the UE texture editor pane for your 2D texture object, with the image, size, and format all visible. Also include a link to a screen shot of the SM_MatPreviewMesh_01 object using your light probe texture.
For the grad extension, also include links to screen shots of each of the six faces (select at the top of the texture editor pane).
Push to your repository, and tag your final commit with an assn5 tag. Make sure the image links are included in the commit that you tag for us to grade.