Assignment Goals
The primary goals of this assignment are:
- Implement behavior with Blueprint scripting.
- Create a UE5 Plugin to extend Blueprint.
- Access members and data of UE classes.
For this assignment, you'll be creating a new Blueprint node and Blueprint type in a plugin to support spawning objects with random positions driven by a density texture.
Placement
First a bit of background and math
A probability density \(\mathrm{PDF}(x)\) gives the density of random values at each \(x\). A valid probability density will be normalized to 1: \[\int_{-\infty}^{\infty}{\mathrm{PDF}(x)dx}=1.\]
To distribute points in 2D, we can interpret the values in each texel of a texture as a set of weights, which we turn into a discrete PDF by normalizing so the texel values sum to 1
|
|
You can turn a random variable R, uniformly distributed between 0 and 1, into a random variable X distributed according to the given PDF through the inverse cumulative density function
\[\textrm{CDF}(X)=\int_{-\infty}^X{\textrm{PDF}(x)dx}\] \[X = \textrm{CDF}^{-1}(R)\]In the discrete texture case, the CDF is just the sum of all the normalized texel values so far, and you can brute-force the inverse by searching for the texel where the CDF contains R:
\[ \begin{array}{lccc} \text{Cell A if }& 0 &\le R <& A' \\ \text{Cell B if }& A' &\le R <& A'+B' \\ \text{Cell C if }& A'+B' &\le R <& A'+B'+C'\\ \text{Cell D if }& A'+B'+C' &\le R <& 1 \\ \end{array} \]Once you have found a texel, you can place a point at some uniformly distributed location inside it:
\[ X = \left(\mathit{TexelX}+\mathit{Rand}()\right)/\mathit{Width};\quad Y = \left(\mathit{TexelY}+\mathit{Rand}()\right)/\mathit{Height} \]Details
Create a project
- Create a Blank C++ project with no starter content called assn4, and a level called "assn4" set as your default editor level.
- As usual, put the project at the top level of your git repository
- Find one or more a small textures to drive your spawn density
- I recommend no larger than 256x256
- So the sum of 256x256 texels with a maximum value of 256 will fit in the 24-bit mantissa of a float without loss of precision
- If you choose a texture from the Engine Content, drag to your Content folder and choose the "Copy" option
- It is worth creating several test textures in an image editing program like PhotoShop or Gimp.
- For example, a 2x2 texture with one white pixel and 3 black pixels should only place points within the one corner texel.
- I recommend no larger than 256x256
- If you want to see your texture on the objects in your scene, create a simple material using the TextureSample node.
Create random spawn Blueprint
This is primarily to work out the details of the blueprint before adding your new type and node
- Place a plane object in the scene
- It should be moved slightly above ground level and scaled to cover enough area for spawning
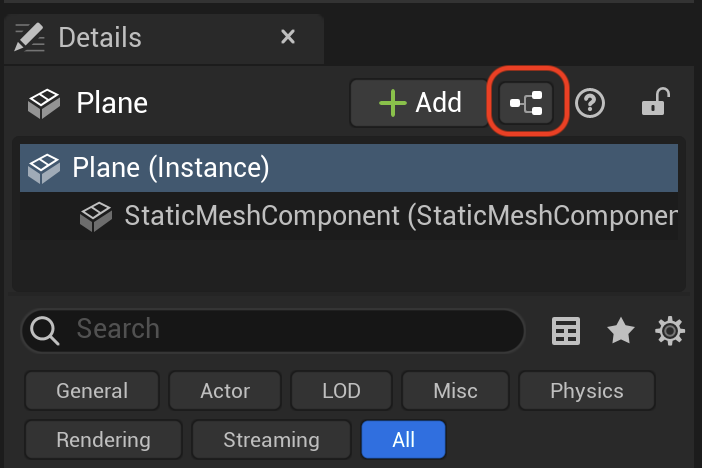 Near the top of the Details panel is a button to turn this into a Blueprint actor (see image at right).
- Add "Spawn Interval" and "Mesh" variables, which should be visible in the Details panel
- In either OnConstruction or BeginPlay, add an instanced static mesh component and set its mesh (you can choose one in the Engine Content)
- On Tick, check the elapsed time, and every spawn interval (in seconds), add an instance to your instanced static mesh at a random location above the plane.
- You can use Get Game Time In Seconds for timing.
- Blueprint has an If node, which is handy for conditional behavior.
- Use a RandomStream to generate two random coordinates
- You can use Get Local Bounds to find out the minimum and maximum coordinate extents of the plane, and Lerp to blend between two extreme values based on a random variable in the range 0-1.
- You'll probably need to use the Make and/or Break functions for Vector3f and Transform Create a Blueprint actor to continuously spawn models with random positions within a square.
Create a Blueprint plugin
- In Edit > Plugins, create a new Blueprint plugin
- Once loaded, you can recompile and hot-reload from Tools > Debug > Modules > (find your plugin in the list) > Recompile
- Make a blueprint enum to select what texture channel to use for the spawn probability: red, green, blue, or alpha
- Make a struct as a Blueprint type to hold:
- A FRandomStream for generating any random numbers you will need
- CDF data derived from the texture
- Make sure your struct is serializable
- Any values that should be saved must be marked with UPROPERTY()
- You can only save member data using types that also know how to serialize themselves (like TArray vs. data allocated using new or with non-UE types like std::vector)
- Create a make function for your struct that takes a texture and your enum and processes and saves the data as necessary.
- Use the UE::AssetUtils::ReadTexture function to access the texture data.
- Texture data is often only available on the CPU when run in the editor. If your make function is run OnConstruction, it can save data to be available even for binary packaged games.
- You can do whatever processing you want to the data at this stage and store any additional data members to make the run-time computation faster and/or easier.
- Create a density placement Blueprint function that takes one of your structs and produces a new random position based on the texture density. The algorithm for this would be:
- Generate a random number
- Linearly search through the CDF values until you find the right texel
- Generate two more random numbers for the position within the texel
- Return that final position
Blueprint test case
- Make a copy of your existing Blueprint test class
- Modify it to build your Blueprint struct OnConstruction
- Modify it to use your new density placement node for instance placement in your Tick function.
Grad Students
Do something O(log(N)) rather than an O(N) linear search to find the target texel. You can add extra data to your Blueprint struct if it is helpful.
Submission
As always, for full credit, you must have multiple incremental commits during your development.
Add an assn4.txt. Tell us what works and what doesn't, and anything else you think we should know for grading.
Include a link to your test texture (or a screenshot showing it)
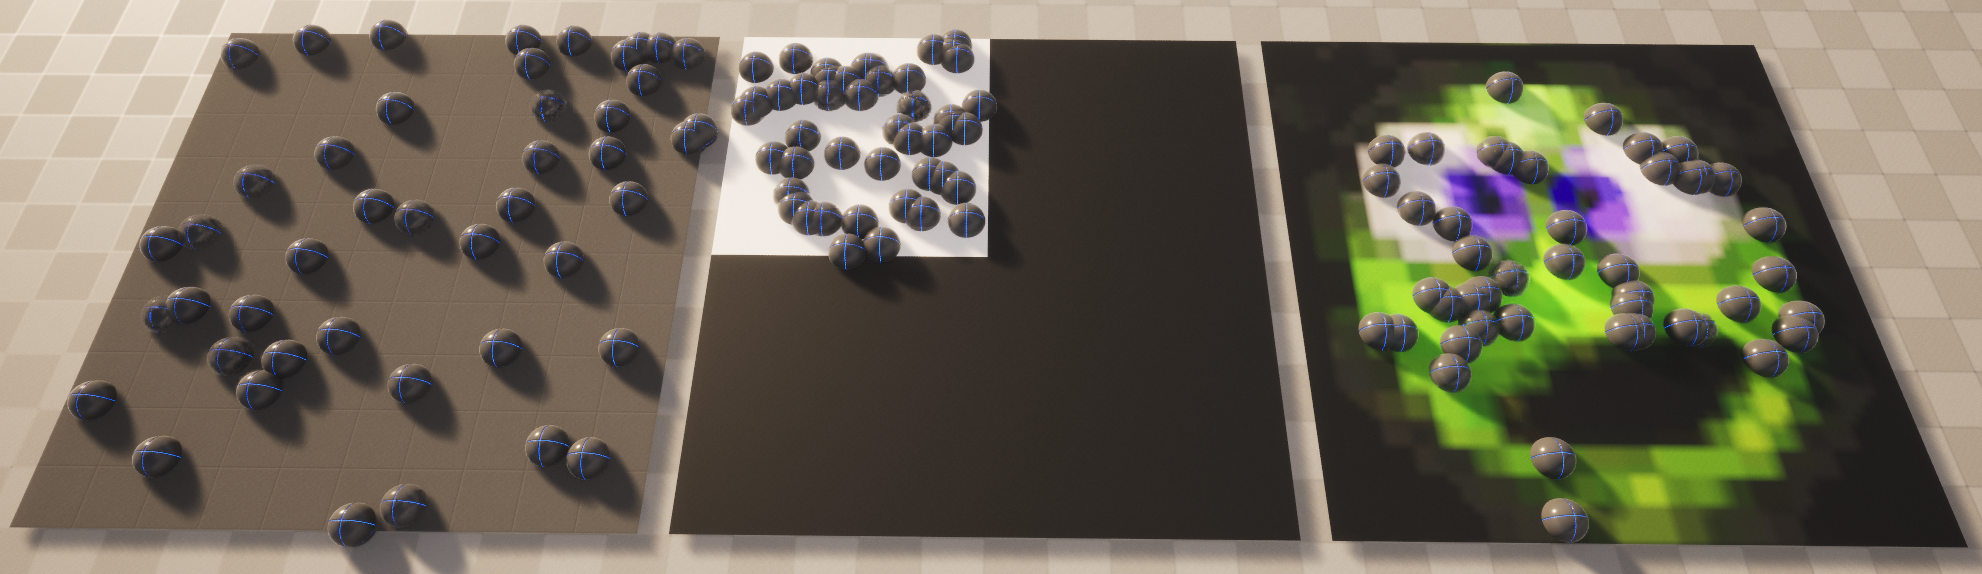
Include links to a few representative screen shots (or short videos) the uniformly placed spawning and the density-based spawning. For the density spawning, your test texture should have recognizeable features and the spawning should be far enough along for us to see them.
Push to your github, and tag your final commit with an assn4 tag (git tag assn4 followed by git push origin assn4).