5
Directly Create Snapshot Environment
This chapter explains how to build a snapshot environment while directly connected to the remote snapshot site. Instead of pre-creating the snapshot environment at a master site with deployment templates, this chapter will illustrate how to build the snapshot environment directly at the remote snapshot site. This chapter covers the following topics:
Overview
If deployment templates do not meet your requirements for building and distributing a snapshot environment, you have two other options:
- Build individual snapshot sites with replication manager.
- Build individual snapshot sites with API (see the Oracle8i Server Replication API Reference for more information).
This chapter will describe the concepts and procedures of building a snapshot site using Oracle's Replication Manager.
Setting Up Snapshot Site
Before you can begin to replicate using snapshots, you need to setup your remote snapshot site to support replication. Oracle's Replication Manager contains a wizard that allows you to quickly and easily prepare your remote site to support snapshots.
Complete the following steps to setup your remote snapshot site:
- Select Setup Wizard from the File menu.
- Enable the Setup Snapshot Sites radio-button and press the Next button.
- Enter the TNSNAMES alias for the target master site in the Master Site field.
This is the site that contains the master objects for your snapshot site (this site will be the target for the database links created at the snapshot site).
- Enter the password for the user
SYSTEM (at the master site) in the SYSTEM Password field and press the Next button.
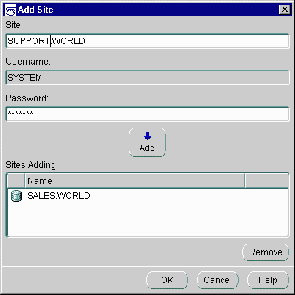
- Press the Add button to identify the remote database(s) that you want to setup for snapshot replication.
- Enter the TNSNAMES alias for the new snapshot site in the Site field.
- Enter the password for the user
SYSTEM (at the site specified in step 6) in the Password field and press the Add button (down arrow).
Figure 5-1 Identify Snapshot Sites with the Add Site Form
 Repeat steps 6 -- 7 to setup additional snapshot sites.
Press the OK button when you have identified all of the remote sites to setup for snapshot replication.
Press the Next button.
Enter a new snapshot administrator password in the Password field of the Administration object group.
To maintain security between the master and snapshot site, you are encouraged to change the default password (SNAPADMIN) to another alphanumeric password of at least 8 characters in length.
If necessary, enable the Use a propagator different from the administrator checkbox to specify a different user to handle the propagating and receiving functions.
- If you enabled the Use a propagator different from the administrator checkbox, enter a new name in the Schema field of the Propagator object group.
- Enter a new propagator password in the Password field of the Propagator object group.
Press the Next button after you have completed configuring your default users.
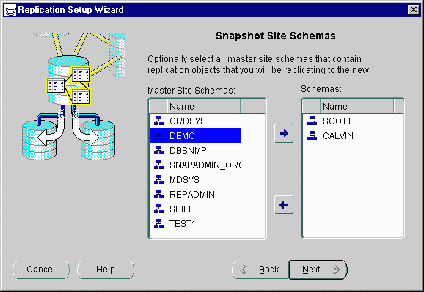
Select the schema(s) at the target master site that contains the objects that will be replicated to the snapshot site(s) and press the Add button (right arrow).
Press the <SHIFT> key to select a range of schema or press the <CTRL> key to individually select multiple schema.
Figure 5-2 Select Master Site Schemas to Replicate to Snapshot Site(s)
 Press the Next button.
If necessary, modify the Default Link Scheduling settings and press the Next button.
In most cases you will only modify the Schedule settings. These settings control how often the deferred transaction queue is pushed to the target master site and the snapshot is refreshed.
Press the Help button to view details about the individual settings on this page.
If necessary, modify the Default Purge Job Scheduling settings and press the Next button.
The Purge Job Scheduling settings define how often the deferred transaction queue is purged. Typically once a day (sysdate +1/24) is adequate for most replication installations.
Press the Help button to view details about the individual settings on this page.
If necessary, select a snapshot site and press the Customize button to modify the settings of a single snapshot site.
The Customize feature is helpful if you are using the Setup Wizard to configure more than one snapshot site at a time.
If you do customize a default site, you will notice that you can select the available tabs to modify the settings specified during the Setup Wizard.
Figure 5-3 Use Customize Snapshot Form to Modify a Single Snapshot Site
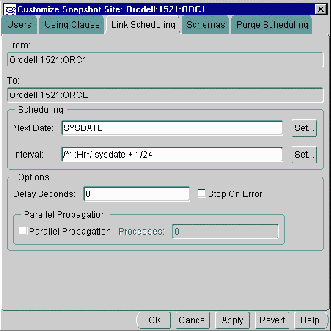
Press the OK button to complete the customization and return to the Setup Wizard.
Press the Next button when you have finished customizing the selected snapshot sites (or you want to skip customization).
Press the Finish button.
If you would like Replication Manager to record a script instead of building the actual snapshot site, enable the Record Script checkbox.
Press the OK button when you have confirmed your settings.
Replication Manager will now build (or generate a script for) your snapshot site with the setting you defined during the Setup Wizard.
Creating Snapshot Groups
A snapshot group in an advanced replication system maintains a partial or complete copy of all or some of the objects in a corresponding master group. Replication Manager has many features that help you create and manage snapshot groups. The following sections explain more about creating snapshot groups.
Before you create a new snapshot group, make sure that the following preliminary tasks have been completed.
To create a new snapshot group:
- Select the database in the left pane of the Replication Manager user interface where you want to create the snapshot group.
If you do not see the target database, you may need to close Replication Manager and relogin to the snapshot site.
- Select Create from the File menu
- Select Snapshot Group from the sub-menu.
You can optionally press the Create Snapshot Group button on the toolbar.
- Select the Available radio-button that matches the type of database link that you want to access the target master database with.
- Scheduled: Displays all database links that are currently scheduled to push a deferred transaction queue.
- Public: Displays all PUBLIC database links.
- All: Displays all database links, including scheduled, PUBLIC, and private.
- Select the database link that connects to the target master group and press the Next button.
The database link will use the global database name of the target database.
- Select the target master group that contains the objects that you want to replicate.
- If necessary, select the desired Propagation Mode radio-button and press the Next button.
- Asynchronous: Sometimes known as store-and-forward data replication, changes to an updateable snapshot are recorded in a deferred transaction queue and are periodically propagated (controlled by the scheduled link) to the target master site.
- Synchronous: Known also as real-time replication, changes made locally to an updateable snapshot are also propagated to the master table during the same transaction; if either update fails, then the whole transaction will fail.
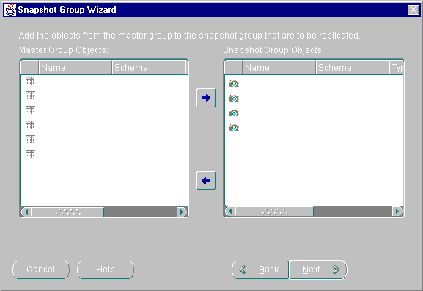
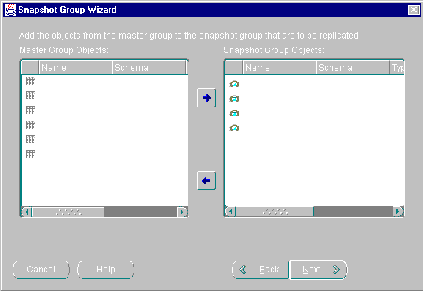
- Select the master group objects that you want to replicate and press the Add button (right arrow).
Press the <SHIFT> key to select a range of objects or press the <CTRL> key to individually select multiple objects.
Figure 5-4 Snapshot Group Wizard Converts Tables to Snapshots
 Press the Next button when you have completed selecting master objects.
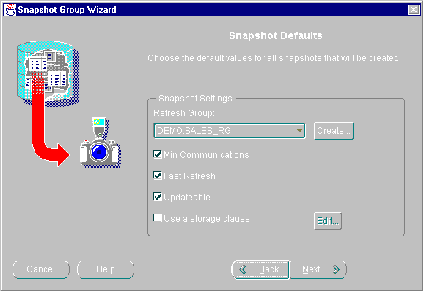
Modify your snapshot default settings as necessary:
Figure 5-5 Default Settings will be Applied to All Generated Snapshots
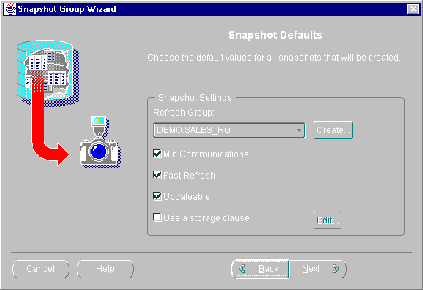
If you selected multiple tables in step 8 to become snapshots, the following settings will be applied to each of those generated snapshots.
- Select the refresh group that you want your replicated objects added to from the Refresh Group pull-down list. (Press the Create button to create a new refresh group.)
- Enable the following snapshot settings as necessary:
Min Communications: Reduces the amount of data required to support conflict resolution mechanisms. This feature should only be enabled for Oracle8 and greater databases.
Fast Refresh: Snapshot will be refreshed using the FAST refresh method (see "Refresh Types" on page for details).
Updateable: Allows users to modify the contents of a snapshots and have those changes propagated to the target master table. (See the "Primary Key" section on page for additional information.)
Use a storage clause: Allows user to define custom storage settings for the generated snapshots. If enabled, you can modify the extents, space usage, and number of transaction settings. Press the Edit button to modify these settings and see "Using a Storage Clause" on page for detailed information.
Press the Next button when you have completed modifying your default snapshot settings.
Modify your individual snapshot settings if necessary:
Whereas the previous page of the wizard allowed you to define global snapshot settings, this page allows you to individually modify snapshot settings.
- Select the snapshot that you want to modify from the list of Available Snapshots.
- Select the refresh group that you want your selected snapshot added to from the Refresh Group pull-down list. (Press the Create button to create a new refresh group.)
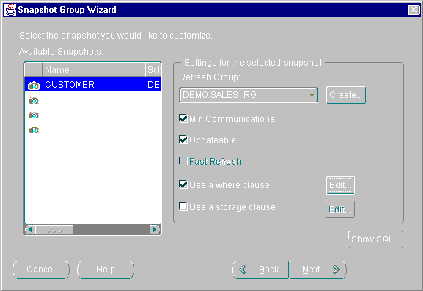
Figure 5-6 Settings will be Applied to Selected Snapshot Only
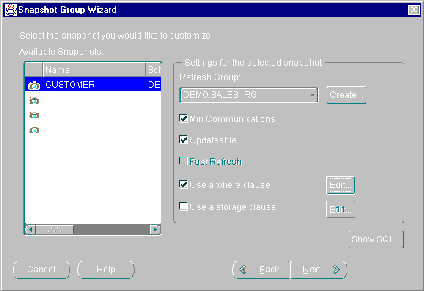 Enable the following snapshot settings as necessary:
Min Communications: Reduces the amount of data required to support conflict resolution mechanisms. This feature should only be enabled for Oracle8 and greater databases.
Updateable: Allows users to modify the contents of a snapshot and have those changes propagated to the target master table. (See the "Primary Key" section on page for additional information.)
Fast Refresh: Snapshot will be refreshed using the FAST refresh method (see "Refresh Types" on page for details).
Use a WHERE clause: Snapshot will contain a data subset of the target master table; this is helpful if you want to replicate only a range of data to the snapshot site. Press the Edit button to define the WHERE clause and see "Using a WHERE Clause" on page for detailed information.
Use a storage clause: Allows user to define custom storage settings for the generated snapshots. If enabled, you can modify the extents, space usage, and number of transaction settings. Press the Edit button to modify these settings and see "Using a Storage Clause" on page for detailed information.
Repeat steps 11a -- 11c to modify additional snapshots.
Press the Next button when you have completed modifying the settings of your individual snapshots.
Press the Finish button to complete the Snapshot Group Wizard.
Press the OK button to confirm your settings.
Replication Manager will now build your snapshot group with the objects and settings that you defined using the Create Snapshot wizard.
Using a WHERE Clause
As described in Chapter 3, "Snapshot Concepts & Architecture", snapshots may contain data subsets of a target master table (see "Data Subsetting with Snapshots" on page for additional information). The Using a WHERE Clause feature allows you to define the data subset for an individual snapshot.
If you enable the Using a WHERE Clause checkbox in step 12 of the "Creating Snapshot Groups" section (page ) and press the Edit button, then you will see the screen illustrated in Figure 5-7.
Figure 5-7 Define WHERE Clause Screen
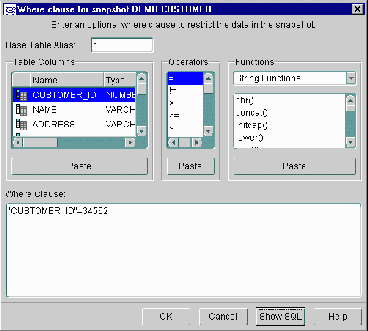
There are two methods of defining your WHERE clause:
- Manually type the WHERE clause
- Use the Table Columns, Operators, and Functions elements to build the WHERE clause
Manually Define WHERE Clause
Complete the following steps to manually define your WHERE clause:
- Type the WHERE clause using standard SQL in the Where Clause field.
- Press the OK button when you have completed defining your WHERE clause.
Use Elements to Define WHERE Clause
Complete the following steps to define your WHERE clause:
- Select the elements (Table Columns, Operators, and Functions) that you want to use in your WHERE clause and press the appropriate Paste button to add it to the generated WHERE clause.
As you add elements, you will see them appear in the Where Clause field below the lists of elements.
- Press the OK button when you have completed defining your WHERE clause.
Using a Storage Clause
If you enable the Use Storage Clause checkbox in steps 10 or 12 of the "Creating Snapshot Groups" section (page ) and press the Edit button, then you will see the Snapshot Storage screen illustrated in Figure 5-8. Use this screen to modify the storage characteristics of your snapshots(s).
Figure 5-8 Snapshot Storage Screen
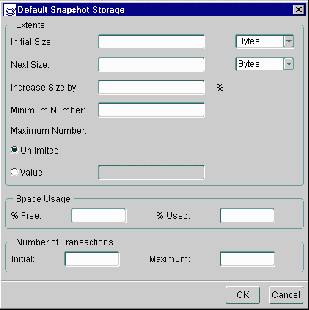
- Modify the storage settings as necessary.
For detailed information, see the references mentioned in the following descriptions:
- Extents: The settings in the Extents object group define the values in the Storage clause of your CREATE SNAPSHOT statement. See "Storage Clause" in the Oracle8i SQL Reference book for a detailed description of the parameters in the Extents object group. See the Oracle8i Tuning book for additional information about these settings.
- Space Usage: These parameters control the operation of data blocks. See "physical_attribute_clause" in the Oracle8i SQL Reference book for detailed information.
- Number of Transactions: These parameters control the amount of initial transactions allocated and the number of concurrent transactions. See "physical_attribute_clause" in the Oracle8i SQL Reference book for detailed information.
- Press the OK button when you have completed your storage modifications.
Managing Snapshot Groups
After you have created your snapshot groups, you may need to add, alter, or delete replicated objects. You may also need to alter the characteristics of your snapshot group and, at times, you may even need to delete a snapshot group. The following sections will describe how to use Oracle's Replication Manager to manage your snapshot groups.
Before you begin working with your snapshot groups, make sure that you are connected to the remote snapshot site. If you are not connected, you may need to disconnect and relogin to the target database.
Editing a Snapshot Group
To edit a snapshot group:
- Expand the database node that contains the snapshot group that you want to edit.
- Expand the Configuration node.
- Expand the Snapshot Groups node.
Figure 5-9 "Drill down" until you find the target snapshot group.
 Select the snapshot group that you want to alter.
You will now be able to modify the snapshot group settings and add or remove objects to or from your snapshot group. Please complete the steps in one of the following sections to modify your snapshot group: "Alter Snapshot Group Settings", "Adding Objects to a Snapshot Group", or "Deleting Objects from a Snapshot Group".
Alter Snapshot Group Settings
The General tab of the Snapshot Group property sheet allows you to change the propagation type and the target master group database. Complete the following steps to modify these settings:
- Verify that you have selected the target snapshot group (see "Editing a Snapshot Group" on page for instructions).
- Verify that the General tab is selected.
- If necessary, enter the new TNSNAMES alias to the new target master group database in the Link to Master field (you need to make sure to enter a target that has a database link pointing to it from the current snapshot database).
If you are not sure what TNSNAMES alias to enter, press the Browse button to select from a list of existing database links.
Changing the Link to Master database is very useful if the current target database is no longer available and you need to point your snapshot database to an alternate master database.
Figure 5-10 The General Tab of the Snapshot Group Property Sheet
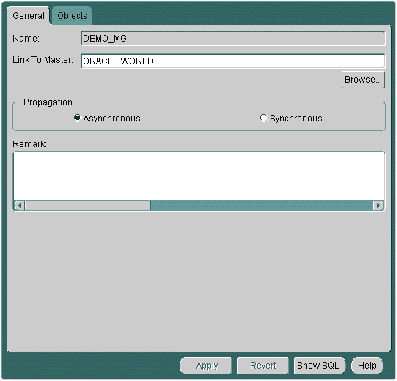 If necessary, alter the propagation type by selecting the appropriate radio-button:
- Asynchronous: Sometimes known as store-and-forward data replication, changes to an updateable snapshot are recorded in a deferred transaction queue and are periodically propagated (controlled by the scheduled link) to the target master site.
- Synchronous: Known also as real-time replication, changes made locally to an updateable snapshot are also propagated to the master table during the same transaction; if either update fails, then the whole transaction will fail.
Press the Apply button to save your settings.
Adding Objects to a Snapshot Group
To add objects to a snapshot group:
- Verify that you have selected the target snapshot group (see "Editing a Snapshot Group" on page for instructions).
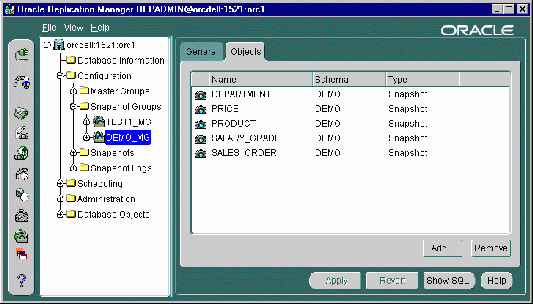
- Press the Objects tab.
You will see a list of all objects that are currently contained in the selected snapshot group (the schema, name, and type properties will be displayed for each object).
- Press the Add button to add an object or objects to the selected snapshot group.
The Snapshot Group Edit Wizard will appear.
- Select the master group objects that you want to replicate and press the Add button (right arrow).
Press the <SHIFT> key to select a range of objects or press the <CTRL> key to individually select multiple objects.
Figure 5-11 Snapshot Group Wizard Converts Tables to Snapshots
 Press the Next button when you have completed selecting master objects.
Modify your snapshot default settings as necessary:
If you selected multiple tables in step 4 to become snapshots, the following settings will be applied to each of those generated snapshots.
- Select the refresh group that you want your replicated objects added to from the Refresh Group pull-down list. (Press the Create button to create a new refresh group.)
- Enable the following snapshot settings as necessary:
Min Communications: Reduces the amount of data required to support conflict resolution mechanisms. This feature should only be enabled for Oracle8 and greater databases.
Fast Refresh: Snapshot will be refreshed using the FAST refresh method (see "Refresh Types" on page for details).
Updateable: Allows users to modify the contents of a snapshot and have those changes propagated to the target master table. (See the "Primary Key" section on page for additional information.)
Use a storage clause: Allows user to define custom storage settings for the generated snapshot. If enabled, you can modify the extents, space usage, and number of transaction settings. Press the Edit button to modify these settings and see "Using a Storage Clause" on page for detailed information.
Figure 5-12 Default Settings will be Applied to All Generated Snapshots
 Press the Next button when you have completed modifying your default snapshot settings.
Modify your individual snapshot settings if necessary:
Figure 5-13 Settings will be Applied to Selected Snapshot Only
Whereas the previous page of the wizard allowed you to define global snapshot settings, this page allows you to individually modify snapshot settings.
- Select the snapshot that you want to modify from the list of Available Snapshots.
- Select the refresh group that you want your selected snapshot added to from the Refresh Group pull-down list. (Press the Create button to create a new refresh group.)
- Enable the following snapshot settings as necessary:
Min Communications: Reduces the amount of data required to support conflict resolution mechanisms. This feature should only be enabled for Oracle8 and greater databases.
Updateable: Allows users to modify the contents of a snapshot and have those changes propagated to the target master table. (See the "Primary Key" section on page for additional information.)
Fast Refresh: Snapshot will be refreshed using the FAST refresh method (see "Refresh Types" on page for details).
Use a WHERE clause: Snapshot will contain a data subset of the target master table; this is helpful if you want to replicate only a range of data to the snapshot site. Press the Edit button to define the WHERE clause and see "Using a WHERE Clause" on page for detailed information.
Use a storage clause: Allows user to define custom storage settings for the generated snapshots. If enabled, you can modify the extents, space usage, and number of transaction settings. Press the Edit button to modify these settings and see "Using a Storage Clause" on page for detailed information.
- Repeat steps 11a -- 11c to modify additional snapshots.
Press the Next button when you have completed modifying the settings of your individual snapshots.
Press the Finish button to complete the Snapshot Group Wizard.
Press the OK button to confirm your settings.
Replication Manager will now add the selected objects to your snapshot group that you selected using the Edit Snapshot Group wizard.
Altering Objects in a Snapshot Group
To alter the definition of a replication object in a snapshot group, you should always use Replication Manager (or an equivalent API call). Use of Enterprise Manager or a SQL DDL command (for example, ALTER TABLE) to alter an object in a replicated environment can create inconsistencies.
Note:
Local customization of individual replicas at a snapshot site is outside the scope of Oracle's advanced replication facility. As a replication administrator, you must ensure that local customizations do not interfere with any global customizations done with Replication Manager.
|
You cannot alter the definition of nonsnapshot objects in a snapshot group. For more information about altering individual snapshots in a snapshot group, see "Altering a Snapshot".
Deleting Objects from a Snapshot Group
To remove objects from a snapshot group:
- Verify that you have selected the target snapshot group (see "Managing Snapshot Groups" on page for instructions).
- Press the Objects tab.
- Select the object or objects that you want to delete.
Press the <SHIFT> key to select a range of objects or press the <CTRL> key to individually select multiple objects.
- Press the Remove button.
- The Drop Object dialog box will appear.
Figure 5-14 Drop Object Dialog Box
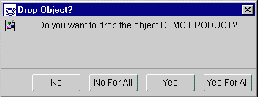
Press the button that meets your needs:
- No: The master object that corresponds with the displayed snapshot object will not be dropped.
- No for All: No master objects will be dropped (helpful if you have selected multiple objects to be removed).
- Yes: The master object that corresponds with the displayed snapshot object will be dropped.
- Yes for All: All master objects that corresponds with the snapshot object(s) that you have chosen will be dropped (helpful if you have selected multiple objects to be removed).
After the Drop Object dialog box disappears, press the Apply button.
Note:
When you drop an object from a snapshot group, Replication Manager automatically removes all corresponding system-generated objects that were necessary to support the object.
|
Regenerating Replication Support for an Updateable Snapshot
If it ever becomes necessary to regenerate replication support, Replication Manager allows you to do this quickly and easily. To generate support for an updateable snapshot:
- Expand the database node that contains the snapshot object that you want to generate replication support for.
- Expand the Configuration node.
- Expand the Snapshot Groups node.
- Expand the snapshot group that contains the updateable snapshot that you want to generate replication support for.
- Expand the Replicated Objects node.
- Expand the Snapshots node.
- Expand the schema that contains the target updateable snapshot.
- Select the updateable snapshot that you want to generate replication support for.
The snapshot property sheet will appear in the right pane of the Replication Manager user interface.
- Press the Generate button.
API Equivalent: DBMS_REPCAT.GENERATE_SNAPSHOT_SUPPORT
Deleting a Snapshot Group
To delete a snapshot group:
- Expand the database node that contains the snapshot group that you want to delete.
- Expand the Configuration node.
- Expand the Snapshot Groups node.
Figure 5-15 Right-click on Snapshot Group and Select Remove
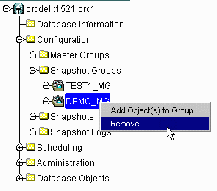 Right-click on the snapshot group that you want to delete and select Remove.
Press the OK button to confirm that you want to delete the selected snapshot group.
Note:
When you drop a snapshot group, you can also decide whether to drop the group's objects from the database. If you choose not to drop a group's objects when you drop the group, the objects remain in the database at the snapshot site. Snapshots that remain after dropping the corresponding snapshot group persist as ungrouped snapshots and will be refreshed as long as they remain in a refresh group. However, Oracle does not propagate any changes made to the updateable snapshot to the master site.
|
API Equivalent: DBMS_REPCAT.DROP_SNAPSHOT_REPGROUP
Managing Individual Snapshots
A snapshot is a local copy of table data that originates from one or more remote master tables. Applications can query the data in a read-only table snapshot, but cannot insert, update, or delete rows in the snapshot. However, applications can query, insert, update, or delete the rows in an updateable snapshot.
Oracle's data replication facility supports independent table snapshots as well as snapshots that are part of a snapshot group. Consider the following issues when deciding whether to create a new snapshot as part of a snapshot group:
- A snapshot group can contain simple, read-only and updateable snapshots.
- A snapshot group does not support complex read-only snapshots. Oracle creates all complex read-only snapshots independent of any snapshot group.
Replication Manager has many features that help you create and manage snapshots in an advanced replication environment. The following sections explain more about managing snapshots.
Creating a Snapshot
Before you create a new snapshot, make sure that the following preliminary tasks have been completed.
- Create the necessary Snapshot Logs to support FAST refreshable snapshots (see "Create a Snapshot Log" on page for details).
- Create a refresh group that snapshots can use for automatic refreshes.
To create a read-only snapshot independent of a snapshot group:
- Select the database in the left pane of the Replication Manager user interface where you want to create a snapshot.
If you don't see the target database, you may need to disconnect and relogin to the target database.
- Select Create from the File menu.
- Select Snapshot.
- Enter the name of your snapshot in the Name field.
- Select the schema from the Schema pull-down list that will store the new snapshot.
- If necessary, select a specific tablespace for your new snapshot from the Tablespace pull-down list.
- If necessary, modify the following snapshot Options according to the following:
- Updateable: If enabled, indicates that the current snapshot is updateable (changes to the snapshot will be propagated to the target master site).
- Logging: If enabled, specifies that the creation of the snapshot and any related indexes, partitions, or LOG storage characteristics will be logged in the redo log file.
- Cache: If enabled, specifies that Oracle pre-allocates and retains LOB data values in memory for faster access.
- Snapshot Index: This object group allows you to modify the storage characteristics and tablespace location for the index that is generated for you new snapshot.
Edit Storage: Press the Edit Storage button to modify the storage characteristics of the index that will be created for your new snapshot. See "Using a Storage Clause" on page for more information.
Tablespace: Select the tablespace that will hold the generated index from the Tablespace pull-down list.
- Enter the SELECT statement for you snapshot in the Snapshot Subquery field. For example, you might enter:
SELECT * FROM scott.emp WHERE empno = 7899
You do not need to enter a semi-colon at the end of your SELECT statement. To see the entire CREATE SNAPSHOT DDL, press the Show SQL button.
Your SELECT statement can be unfiltered, contain a simple WHERE clause, or contain several nested subqueries. For more information about subquery subsetting, see "Data Subsetting with Snapshots" on page .
- Press the Refresh tab.
- Selected the refresh method from the Refresh Type pull-down list that you want to use during the refresh of this snapshot (see "Refresh Types" on page for more information):
- FORCE: A FAST refresh will be tried first and if it fails, a COMPLETE refresh will be performed.
- COMPLETE: All of the data that satisfies the snapshot's defining query will be propagated to the snapshot.
- FAST: Only data that has changed will be propagated to the snapshot. If a fast refresh fails, then the snapshot will not be refreshed.
- Enable the Row ID checkbox to refresh your snapshot based on the Row ID of the changed data.
The Row ID checkbox should only be enabled when interoperating with Oracle 7.3 and earlier databases. See "Snapshot Log" for more information.
- If your individual snapshot will NOT be part of a refresh group, you will need to specify the start date and refresh interval for you your individual snapshot. If your snapshot will be part of a refresh group, skip to step 13 and be sure to follow the steps described in the "Adding Snapshots to a Refresh Group" section.
- Press the Set button next to the Start Date field to specify when the first refresh should occur.
- Select the appropriate date (or manually enter a date expression in the Date Expression field) and press the OK button.
- Press the Set button next to the Next Date field to specify when the next refresh should occur.
- Select the appropriate date (or manually enter a date expression in the Date Expression field) and press the OK button.
- Enter the name of the master rollback segment in the Master field.
- Select the local rollback segment from the Local pull-down list.
- Press the Storage tab.
- Modify the contents of the Storage tab as needed (see "Using a Storage Clause" on page for additional information).
- Press the Create button to complete creating your individual snapshot.
Altering a Snapshot
The following sections explain how to alter an ungrouped snapshot in an advanced replication environment.
Editing a Snapshot's Storage Settings
To edit a snapshot's storage settings:
- Expand the database node that contains the snapshot that you want to alter.
- Expand the Configuration node.
- Expand the Snapshots node.
- Expand the schema that contains the snapshot that you want to alter.
- Select the snapshot to alter.
The snapshot property sheet will appear in the right pane of the Replication Manager user interface.
- Modify the settings on the General, Refresh, Storage, and Master Info pages as necessary.
- Press the Apply button.
Manipulating a Snapshot's Base Table
Do not manipulate, modify, add to, or subtract from, the data in the base table of a snapshot. You can declare integrity constraints, such as referential or uniqueness constraints, for the base table of a snapshot. However, such constraints must be configured for deferred constraint checking.
You can also define PL/SQL triggers on the base table of a snapshot. However, such triggers must be coded so that they do not fire during snapshot refresh. Triggers that fire during snapshot refresh may generate unexpected results.
Additional Information: See "Triggers and Replication".
Altering a Snapshot Definition
Never use Enterprise Manager or a SQL DDL command (for example, ALTER TABLE) to alter a snapshot definition. To alter the definition of a snapshot, drop the snapshot and then re-create it.
Note:
Local customization of individual replicas at snapshot sites is outside the scope of Oracle's advanced replication facility. As a replication administrator, you must ensure that local customizations do not interfere with any global customizations done with Replication Manager.
|
Deleting a Snapshot
To remove a snapshot from a snapshot group:
- Expand the database node that contains the snapshot that you want to delete.
- Expand the Configuration node.
- Expand the Snapshots node.
- Expand the schema node that contains the snapshot that you want to delete.
- Right-click on the target snapshot and select Remove.
Note:
When you drop a snapshot from a snapshot group, Replication Manager automatically removes all corresponding system generated objects that were necessary to support the snapshot.
|
Managing Refresh Groups
To preserve referential integrity and transactional consistency among the snapshots of several related master tables, Oracle organizes and refreshes individual snapshots as part of a refresh group. After refreshing all of the snapshots in a refresh group, the data of all snapshots in the group corresponds to the same transactionally consistent point-in-time. Replication Manager has many features that help you create and manage refresh groups in a replication environment. The following sections explain more about managing refresh groups.
Additional Information: See "Refresh Groups" for more information about refresh groups.
Creating a Refresh Group
To create a new refresh group for a snapshot site:
- Select the database in the left pane of the Replication Manager user interface where you want to create the refresh group.
- Select Create from the File menu
- Select Refresh Group from the sub-menu.
You can optionally press the Create Refresh Group button on the toolbar.
The Create Refresh Group property sheet has two pages: General, and Snapshots.
- Use the General page to specify the name, owner, and refresh settings for the group.
- Use the Snapshots page to add snapshots to the refresh group.
Note:
To refresh a snapshot, the user account of the database link used by the snapshot must have SELECT privileges on the master base table and, for fast refreshes, on the corresponding snapshot log.
|
Adding Snapshots to a Refresh Group
To add one or more snapshots to a refresh group:
- Expand the database node that contains the refresh group that you want to add a snapshot to.
- Expand the Scheduling node.
- Expand the Refresh Groups node.
- Expand the schema node that contains the refresh group.
- Right-click on the target refresh group and select Add Snapshot(s) to Group.
- Select the schema that contains the snapshot you want to add from the Schema pull-down list.
- Select the snapshot that you want to add from the Available Snapshots list.
Press the <SHIFT> key to select a range of snapshots or press the <CTRL> key to individually select multiple snapshots.
- Press the Down Arrow to add the selected objects to the Selected Snapshots list.
- Press the OK button when you have completed selecting the snapshot(s) to add to the refresh group.
Deleting Snapshots from a Refresh Group
To remove one or more snapshots from a refresh group:
- Expand the database node that contains the refresh group that you want to remove a snapshot from.
- Expand the Scheduling node.
- Expand the Refresh Groups node.
- Expand the schema node that contains the refresh group.
- Select the target refresh group that contains the snapshot that you want to remove.
The refresh group property sheet will appear in the right pane of the Replication Manager user interface.
- Press the Snapshots tab.
- Select the snapshot(s) that you want to remove.
Press the <SHIFT> key to select a range of snapshots or press the <CTRL> key to individually select multiple snapshots.
- Press the Remove button.
- Press the Apply button.
Changing Refresh Settings for a Snapshot Group
To edit a snapshot group's refresh settings:
- Expand the database node that contains the refresh group that you want to alter.
- Expand the Scheduling node.
- Expand the Refresh Groups node.
- Expand the schema node that contains the refresh group.
- Select the target refresh group that you want to alter.
The refresh group property sheet will appear in the right pane of the Replication Manager user interface.
- Modify the scheduling characteristics in the Refresh object group.
- Press the Apply button when you have made all of the necessary refresh scheduling modifications.
Manually Refreshing a Group of Snapshots
To force the immediate refresh of a refresh group:
- Expand the database node that contains the refresh group that you want to manually refresh.
- Expand the Scheduling node.
- Expand the Refresh Groups node.
- Expand the schema node that contains the refresh group.
- Select the target refresh group that contains the snapshot that you want to refresh.
The refresh group property sheet will appear in the right pane of the Replication Manager user interface.
- Press the Refresh button.
Deleting a Refresh Group
To delete a refresh group:
- Expand the database node that contains the refresh group that you want to delete.
- Expand the Scheduling node.
- Expand the Refresh Groups node.
- Expand the schema node that contains the refresh group.
- Right-click on the target refresh group that you want to delete and select Remove.
Note:
After you drop a refresh group, Oracle no longer refreshes the group's snapshots automatically. To refresh the snapshots, you must add them to another snapshot refresh group or refresh them manually.
|
Other Snapshot Site Administration Issues
The preceding sections of this chapter explained the most commonly performed administrative procedures that involve snapshot sites. For additional information on less commonly performed administrative procedures for snapshot sites, see "Advanced Management of Master and Snapshot Groups".
Data Dictionary Views
In addition to using Replication Manager to view information about an snapshot site in an advanced replication environment, you can also query the following data dictionary views:
At the Snapshot Site:
- DBA_SNAPSHOTS
- DBA_REFRESH
- DBA_REFRESH_CHILDREN
At the Master Site:
- DBA_REGISTERED_SNAPSHOT
- DBA_SNAPSHOT_LOGS