Release 8.1.5
A67791-01
Library |
Product |
Contents |
Index |
| Oracle8i Replication Release 8.1.5 A67791-01 |
|
![]()
![]()
This chapter describes several advanced techniques that you can use in implementing an Oracle replicated database environment:
Procedural replication can offer performance advantages for large batch-oriented operations operating on large numbers of rows that can be run serially within a replicated environment.
A good example of an appropriate application is a purge operation (also referred to as an archive operation) that you run infrequently (for example, once per quarter) during off hours to remove old data, or data that was "logically" deleted from the online database. An example using procedural replication to purge deleted rows is described in "Avoiding Delete Conflicts".
All parameters for a replicated procedure must be IN parameters; OUT and IN/OUT modes are not supported. The datatypes supported for these parameters are: NUMBER, DATE, VARCHAR2, CHAR, ROWID, RAW, BLOB, CLOB, NCHAR, NVARCHAR, and NCLOB.
Oracle cannot detect update conflicts produced by replicated procedures. Replicated procedures must detect and resolve conflicts themselves. Because of the difficulties involved in writing your own conflict resolution routines, it is best to simply avoid the possibility of conflicts altogether.
Adhering to the following guidelines will help you ensure that your tables remain consistent at all sites when you plan to use procedural replication.
Serial execution ensures that your data remains consistent. The advanced replication facility propagates and executes replicated transactions one at a time. For example, assume that you have two procedures, A and B, that perform updates on local data. Now assume that you perform the following actions, in order:
The replicas of A and B on the other nodes are executed completely serially, in the same order that they were committed at the originating site. If A and B execute concurrently at the originating site, however, they may produce different results locally than they do remotely. Executing A and B serially at the originating site ensures that all sites have identical results. Propagating the transaction serially ensures that A and B will be executing in serial order at the target site in all cases.
Alternatively, you could write the procedures carefully, to ensure serialization. For example, you could use SELECT... FOR UPDATE for queries to ensure serialization at the originating site and at the target site if you are using parallel propagation.
You must disable row-level replication support at the start of your procedure, and then re-enable support at the end. This ensures that any updates that occur as a result of executing the procedure are not propagated to other sites. Row-level replication is enabled and disabled by calling the following procedures, respectively
Additional Information: See "Disabling the Advanced Replication Facility".
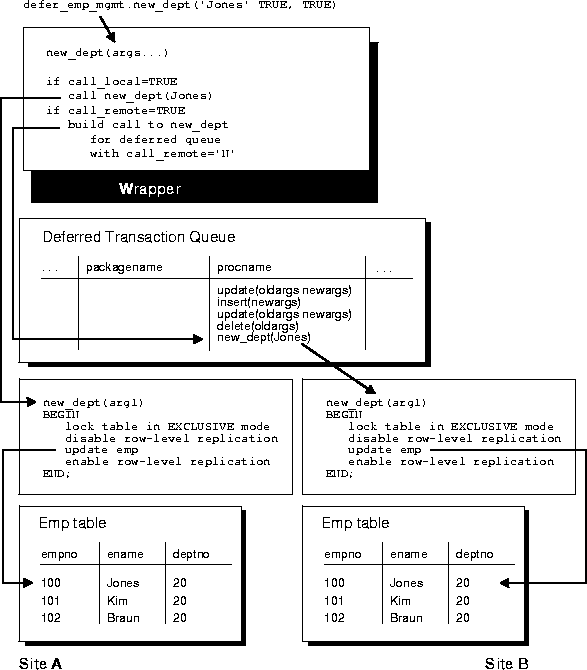
When you generate replication support for your replicated package, Oracle creates a wrapper package in the schema of the replication propagator.
The wrapper package has the same name as the original package, but its name is prefixed with the string you supply when you generate replication support for the procedure. If you do not supply a prefix, Oracle uses the default prefix, "defer_". The wrapper procedure has the same parameters as the original, along with two additional parameters: CALL_LOCAL and CALL_REMOTE. These two boolean parameters determine where the procedure gets executed. When CALL_LOCAL is TRUE, the procedure is executed locally. When CALL_REMOTE is TRUE, the procedure will ultimately be executed at all other master sites in the replicated environment.
The remote procedures are called directly if you are propagating changes synchronously. Or calls to these procedures are added to the deferred transaction queue if you are propagating changes asynchronously. By default, CALL_LOCAL is FALSE, and CALL_REMOTE is TRUE.
Oracle generates replication support for a package in two phases. The first phase creates the package specification at all sites. Phase two generates the package body at all sites. These two phases are necessary to support synchronous replication.
For example, suppose you create the package EMP_MGMT containing the procedure NEW_DEPT, which takes one argument, ENAME. To replicate this package to all master sites in your system, you can use Replication Manager to add the package to a master group and then generate replication support for the object. See "Managing Master Groups" for more information about managing master groups and replicated objects using Replication Manager. After completing these steps, an application can call procedure in the replicated package as follows:
defer_emp_mgmt.new_dept( ename         => 'Jones',
                        call_local    => TRUE,
                        call_remote  => TRUE);
As shown in Figure 8-1, the logic of the wrapper procedure ensures that the procedure is called at the local site and subsequently at all remote sites. The logic of the wrapper procedure also ensures that when the replicated procedure is called at the remote sites, CALL_REMOTE is FALSE, ensuring that the procedure is not further propagated.
If you are operating in a mixed replicated environment with static partitioning of data ownership (that is, if you are not preventing row-level replication), the replication facility will preserve the order of operations at the remote node, since both row-level and procedural replication use the same asynchronous queue.
Asynchronous data propagation is the normal configuration for advanced replication environments. However, Oracle also supports synchronous data propagation for applications with special requirements. Synchronous data propagation occurs when an application updates a local replica of a table, and within the same transaction also updates all other replicas of the same table. Consequently, synchronous data replication is also called real-time data replication. Use synchronous replication only when applications require that replicated sites remain continuously synchronized.
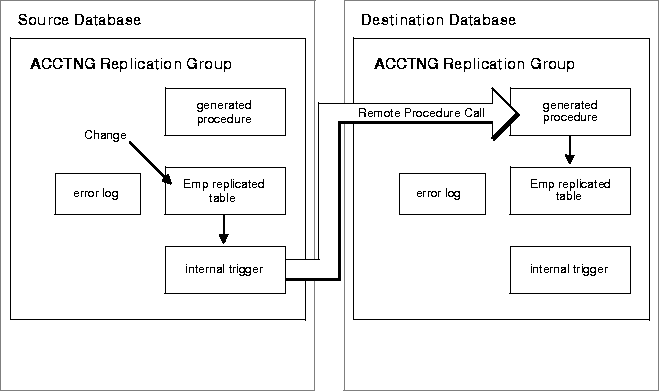
As Figure 8-2 shows, Oracle uses the same system of internal database triggers to generate RPCs that asynchronously replicate data-level changes to other replication sites to support synchronous, row-level data replication. However, Oracle does not defer the execution of such RPCs. Instead, data replication RPCs execute within the boundary of the same transaction that modifies the local replica. Consequently, a data-level change must be possible at all sites that manage a replicated table or else a transaction rollback occurs.
As shown in Figure 8-3, whenever an application makes a DML change to a local replicated table and the replication group is using synchronous row-level replication, the change is synchronously propagated to the other master sites in the replicated environment using internal triggers. When the application applies a local change, the internal triggers issue calls to generated procedures at the remote master sites in the security context of the replication propagator. Oracle ensures that all distributed transactions either commit or rollback in the event of a failure. See the discussion of distributed updates in the book Oracle8i Distributed Database Systems.
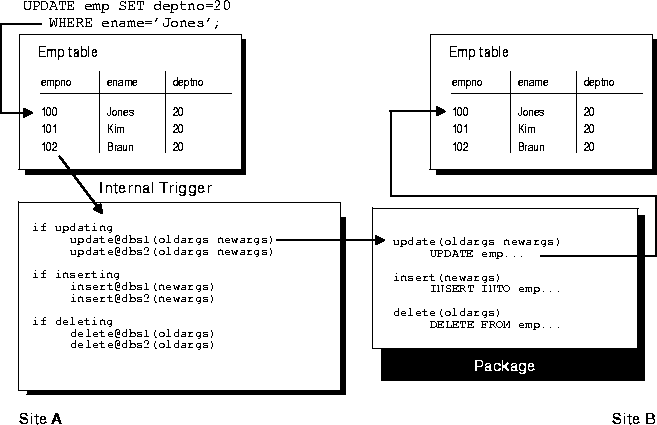
Because of the locking mechanism used by synchronous replication, deadlocks can occur. When an application performs a synchronous update to a replicated table, Oracle first locks the local row and then uses an AFTER ROW trigger to lock the corresponding remote row. Oracle releases the locks when the transaction commits at each site.
The necessary remote procedure calls to support synchronous replication are included in the internal trigger for each object. When you generate replication support for a replicated object, Oracle activates the triggers at all master sites to add the necessary remote procedure calls for the new site. Conversely, when you remove a master site from a master group, Oracle removes the calls from the internal triggers.
If all sites of a master group communicate synchronously with one another, applications should never experience replication conflicts. However, if even one site is sending changes asynchronously to another site, applications can experience conflicts at any site in the replicated environment.
If the change is being propagated synchronously, an error is raised and a rollback will be required. If the change is propagated asynchronously, Oracle automatically detects the conflicts and either logs the conflict or, if you designate an appropriate resolution method, resolves the conflict.
Additional Information: See Chapter 6, "Conflict Resolution".
When you add a new master or snapshot site for to a replication group in an advanced replication environment, Replication Manager allows you to select the data propagation mode (method) for the new site.
See Chapter 2, "Using Multimaster Replication" and Chapter 5, "Directly Create Snapshot Environment" for more information about adding master and snapshot sites to an advanced replication environment, respectively.
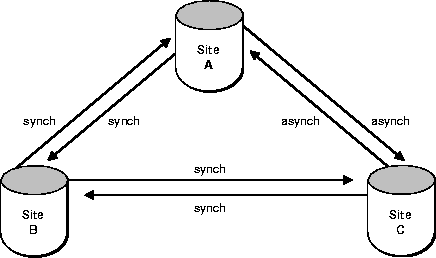
In some situations, you might decide to have a mixed-mode environment in which some master sites propagate a master group's changes asynchronously and others propagate changes synchronously. The order in which you add new master sites to a group with different data propagation modes can be important.
For example, suppose that you have three master sites: A, B, and C. If you first create site A as the master definition site, and then add site B with a synchronous propagation mode, site A will send changes to site B synchronously and site B will send changes to site A synchronously. There is no need to concern yourself with the scheduling of links at either site, because neither site is creating deferred transactions.
Now suppose that you create master site C with an asynchronous propagation mode. The propagation modes are now as illustrated in Figure 8-4.

You must now schedule propagation of the deferred transaction queue from site A to site C, from site B to site C, and from site C to sites A and B.
As another example, consider what would happen if you created site A as the master definition site, then added site C with an asynchronous propagation mode, then added site B with a synchronous propagation mode? Now the propagation modes would be as shown in Figure 8-5.
Each time that you add a new master site to a mixed-mode multimaster system, consider how the addition will affect the data propagation modes to and from existing sites.
Tip: You can view the data propagation modes between master group sites in a multimaster system quickly by using a Replication Manager destination map. See "Displaying a Destination Map for a Master Group" for more information about master group destination maps.
To change the data propagation mode from one master site to another in a master group, use the destination map for the group in Replication Manager.
API Reference: DBMS_REPCAT.ALTER_MASTER_PROPAGATION
After you switch the propagation mode between one or more master sites in a master group:
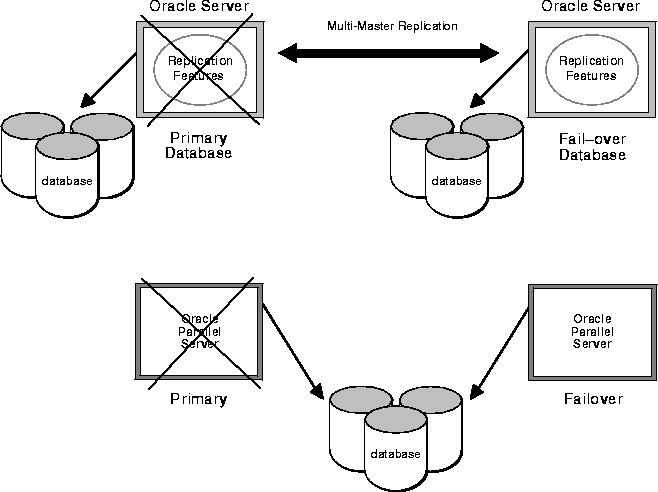
Survivability provides the capability to continue running applications despite system or site failures. Survivability allows you to run applications on a fail-over system, accessing the same, or very nearly the same, data as these systems accessed on the primary system when it failed. As shown in Figure 8-6, the Oracle Server provides two different technologies for accomplishing survivability: the Oracle Parallel Server and the advanced replication facility.
The Oracle Parallel Server supports fail-over to surviving systems when a system supporting an instance of the Oracle Server fails. The Oracle Parallel Server requires a cluster or massively parallel hardware platform, and thus is applicable for protection against processor system failures in the local environment where the cluster or massively parallel system is running.
In these environments, the Oracle Parallel Server is the ideal solution for survivability -- supporting high transaction volumes with no lost transactions or data inconsistencies in the event of an instance failure. If an instance fails, a surviving instance of the Oracle Parallel Server automatically recovers any incomplete transactions. Applications running on the failed system can execute on the fail-over system, accessing all data in the database.
The Oracle Parallel Server does not, however, provide survivability for site failures (such as flood, fire, or sabotage) that render an entire site, and thus the entire cluster or massively parallel system, inoperable. To provide survivability for site failures, you can use the advanced replication facility to maintain a replica of a database at a geographically remote location.
Should the local system fail, the application can continue to execute at the remote site. Advanced replication, however, cannot guarantee the protection of all transactions. Also, special care must be taken to prevent data inconsistencies when recovering the primary site.
|
Note: You can also configure a standby-database to protect an Oracle database from site failures. For more information about Oracle's standby database feature, see the Oracle8i Backup and Recovery Guide. |
If you choose to use the advanced replication facility for survivability, you should consider the following issues:
Suppose, for example, you are running an order-entry system that uses replication to maintain a remote fail-over order-entry system, and the primary system fails.
At the time of the failure, there were two transactions recently executed at the primary site that did not have their changes propagated and applied at the fail-over site. The first of these was a transaction that entered a new order, and the second was a transaction that cancelled an existing order.
In the first case, someone may notice the absence of the new order when processing continues on the fail-over system, and re-enter it. In the second case, the cancellation of the order may not be noticed, and processing of the order may proceed; that is, the canceled item may be shipped and the customer billed.
What happens when you restore the primary site? If you simply push all of the changes executed on the fail-over system back to the primary system, you will encounter conflicts.
Specifically, there will be duplicate orders for the item originally ordered at the primary system just before it failed. Additionally, there will be data changes resulting from the transactions to ship and bill the order that was originally canceled on the primary system.
You must carefully design your system to deal with these situations. The next section explains this process.
Oracle's advanced replication facility can be used to provide survivability against site failures by using multiple replicated master sites. You must configure your system using one of the following methods. These methods are listed in order of increasing implementation difficulty.
By default, Oracle builds and populates replicas when you:
When building a large replicated environment, the amount of data necessary to build and populate replicas throughout the system can generate an excessive amount of network traffic. To avoid saturating the network with the data necessary to build a large replicated environment, Oracle lets you perform offline instantiation of new sites in both basic and advanced replication systems. The following sections explain how to clone snapshots in a basic replication environment and offline instantiate master and snapshot sites in an advanced replication environment.
To reduce the network overhead associated with the creation of the same set of snapshots in many databases, you can perform snapshot "cloning" by following these steps:
Offline instantiation of a master site lets you add the new master site to a master group while limiting the amount of downtime required for existing sites in the multimaster replication system. Offline instantiation of a master site is useful primarily for systems with very large databases where the time required to transfer the data through network links to a new site would be prohibitive.
Assuming that you are using a default replication configuration that uses asynchronous row-level replication, the steps necessary to create a new master site using offline instantiation are as follows:
Warning: Do not resume replication activity or do other replication administration for the master group until the new master site appears at the master definition site. Otherwise, changes that you make at any site will not be propagated to the new site, and you might have problems synchronizing the group's data.
At this point, normal non-administrative activities can resume at the existing master sites. However, replication activity for the group remains suspended at the new site.
Additional Information: See the book Oracle8i Utilities to learn about the Import and Export utilities.
Please note the following:
Offline instantiation of a snapshot site in an advanced replication environment is useful when you need to create a large snapshot site, and the time required to transfer replication data through network to the new site would be prohibitive.
Use the following steps to create a snapshot site using offline instantiation:
CREATE SNAPSHOT sales.employee AS SELECT * FROM sales.emp@dbs1
Attention: Before creating snapshots, make sure that the master database has ample storage space.
Additional Information: See the book Oracle8i Utilities.
Nearly all users should find it easiest to use the Replication Manager setup wizard when configuring multimaster replication security. However, for certain cases you may need to use the replication management API to perform these setup operations.
To configure a replication environment, the database administrator must connect with DBA privileges to grant the necessary privileges to the replication administrator.
First set up user accounts at each master site with the appropriate privileges to configure and maintain the replication environment and to propagate and apply replicated changes. You must also define links for users at each master site.
In addition to the end users who will access replicated objects, there are three special categories of "users" in a replication environment:
Typically, a single user acts as administrator, propagator, and receiver. However, you can have separate users perform each of these functions. You can choose to have a single, global replication administrator or, if your replication groups do not span schema boundaries, you may prefer to have separate replication administrators for different schemas. Note, however, that you can have only one registered propagator for each database.
Table 8-1 on describes the necessary privileges that must be assigned to these specialized accounts. Most privileges needed by these users are granted to them through calls to the replication management API. You will also need to grant certain privileges directly.
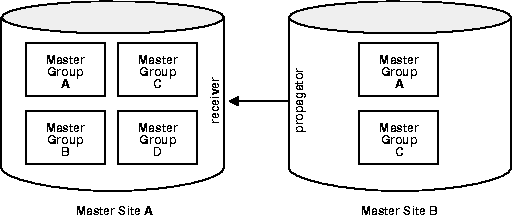
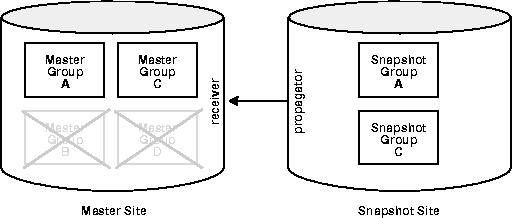
In addition to the different users, you also need to determine which type of security model you will implement: trusted or untrusted. With a trusted security model, the receiver has access to ALL local master groups. Since the receiver performs database activities at the local master site on behalf of the propagator at the remote site, the propagator also has access to ALL master groups at the receiver's site (remember that a single receiver is used for ALL incoming transactions).
For example, consider the scenario in Figure 8-7. Even though only Master Groups A and C exist at Master Site B, the propagator has access to Master Groups A, B, C, and D at Master Site A because the trusted security model has been used. While this greatly increases the flexibility of database administration (due to the mobility of remote database administration), it also increases the chances of a malicious user at a remote site viewing or corrupting data at the master site.
Regardless of the security model used, Oracle8i automatically grants the appropriate privileges for objects as they are added to or removed from a replicated environment.
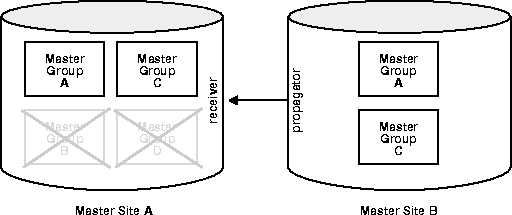
Untrusted security assigns only the privileges to the receiver that are required to work with specified master groups; the propagator, therefore, will only be able to access the specified master groups that are local to the receiver. Figure 8-8 illustrates an untrusted security model. Since Master Site B contains only Master Groups A and C, the receiver at Master Site A has been granted privileges for Master Groups A and C only, thereby limiting the propagators access at Master Site A.
Typically, master sites are considered trusted and therefore the trusted security model is used. If, however, your remote master site(s) are untrusted, you may want to use the untrusted model and assign your receiver limited privileges (a site might be considered untrusted, for example, if a consulting shop performs work for multiple customers). Use the appropriate API call listed for the receiver in Table 8-1 to assign the different users the appropriate privileges.
| User | Privileges |
|---|---|
|
global replication |
DBMS_REPCAT_ADMIN.GRANT_ADMIN_ANY_SCHEMA |
|
schema-level replication administrator |
DBMS_REPCAT_ADMIN.GRANT_ADMIN_SCHEMA |
|
propagator |
DBMS_DEFER_SYS.REGISTER_PROPAGATOR |
|
receiver |
See the "DBMS_REPCAT_ADMIN.REGISTER_USER_REPGROUP" procedure in the Oracle8i Replication API Reference book for details. Trusted: DBMS_REPCAT_ADMIN.REGISTER_USER_REPGROUP privilege => 'receiver' list_of_gnames => NULL Untrusted: DBMS_REPCAT_ADMIN.REGISTER_USER_REPGROUP privilege => 'receiver' list_of_gnames => 'mastergroupname' |
After you have created these accounts and assigned the appropriate privileges, create the following private database links, including username and password between each site:
Assuming you have designated a single user account to act as replication administrator, propagator, and receiver, you will need to create N(N-1) links, where N is the number of master sites in your replication environment.
After creating these links, you must call DBMS_DEFER_SYS.SCHEDULE_PUSH and DBMS_DEFER_SYS.SCHEDULE_PURGE, at each location, to define how frequently you want to propagate your deferred transaction queue to each remote location, and how frequently you wish to purge this queue. You will need to call DBMS_DEFER_SYS.SCHEDULE_PUSH multiple times at each site, once for each remote location.
A sample script for setting up multimaster replication between HQ.WORLD and SALES.WORLD is shown below:
/*--- Create global replication administrator at HQ ---*/
connect system/manager@hq.world
create user repadmin identified by repadmin
execute dbms_repcat_admin.grant_admin_any_schema(username => 'repadmin')

/*--- Create global replication administrator at Sales ---*/
connect system/manager@sales.world
create user repadmin identified by repadmin
execute dbms_repcat_admin.grant_admin_any_schema(username => 'repadmin')

/*--- Create single user to act as both propagator and receiver at HQ ---*/
connect system/manager@hq.world
create user prop_rec identified by prop_rec
/*--- Grant privileges necessary to act as propagator ---*/
execute dbms_defer_sys.register_propagator(username => 'prop_rec')
/*--- Grant privileges necessary to act as receiver ---*/
execute dbms_repcat_admin.register_user_repgroup(
                username => 'prop_rec',
                privilege_type => 'receiver',
                list_of_gnames => NULL)

/*--- Create single user to act as both propagator and receiver at Sales ---*/
connect system/manager@sales.world
create user prop_rec identified by prop_rec
/*--- Grant privileges necessary to act as propagator ---*/execute
dbms_defer_sys.register_propagator(username => 'prop_rec')
/*--- Grant privileges necessary to act as receiver ---*/
execute dbms_repcat_admin.register_user_repgroup(
                username => 'prop_rec',
                privilege_type => 'receiver',
                list_of_gnames => NULL)

/*--- Create public link from HQ to Sales with necessary USING clause ---*/
connect system/manager@hq.world
create public database link sales.world using sales.world

/*--- Create private repadmin to repadmin link ---*/
connect repadmin/repadmin@hq.world
create database link sales.world connect to repadmin identified by repadmin

/*--- Schedule replication from HQ to Sales ---*/
execute dbms_defer_sys.schedule_push(
     destination => 'sales.world',
     interval => 'sysdate + 1/24',
     next_date => sysdate,
     stop_on_error => FALSE,
     parallelism => 1)

/*--- Schedule purge of def tran queue at HQ ---*/
execute dbms_defer_sys.schedule_purge(
     next_date => sysdate,
     interval = 'sysdate + 1',
     delay_seconds => 0,
     rollback_segment =>'')

/*--- Create link from propagator to receiver for scheduled push ---*/
connect prop_rec/prop_rec@hq.world
create database link sales.world connect to prop_rec identified by prop_rec

/*--- Create public link from Sales to HQ with necessary USING clause
---*/connect system/manager@sales.world
create public database link hq.world using hq.world

/*--- Create private repadmin to repadmin link ---*/
connect repadmin/repadmin@sales.world
create database link hq.world connect to repadmin identified by repadmin

/*--- Schedule replication from Sales to HQ ---*/
execute dbms_defer_sys.schedule_push(
     destination => 'hq.world',
     interval => 'sysdate + 1/24',
     next_date => sysdate,
     stop_on_error => FALSE,
     parallelism => 1)

/*--- Schedule purge of def tran queue at Sales ---*/
execute dbms_defer_sys.schedule_purge(
     next_date => sysdate,
     interval = 'sysdate + 1',
     delay_seconds => 0,
     rollback_segment =>'')

/*--- Create link from propagator to receiver for scheduled push ---*/
connect prop_rec/prop_rec@sales.world
create database link hq.world connect to prop_rec identified by prop_rec
Nearly all users should find it easiest to use the Replication Manager setup wizard when configuring snapshot replication security. However, for certain specialized cases, you may need to use the replication management API to perform these setup operations.To configure a replication environment, the database administrator must connect with DBA privileges to grant the necessary privileges to the replication administrator.
First set up user accounts at each snapshot site with the appropriate privileges to configure and maintain the replication environment and to propagate replicated changes. You must also define links for these users to the associated master site. You may need to create additional users, or assign additional privileges to users at the associated master site.
In addition to end users who will be accessing replicated objects, there are three special categories of "users" at a snapshot site:
Typically, a single user performs each of these functions. However, there may be situations where you need different users performing these functions. For example, snapshots may be created by a snapshot site administrator and refreshed by another end user.
Table 8-2 describes the privileges needed to create and maintain a snapshot site.
| User | Privileges |
|---|---|
|
snapshot site replication administrator |
DBMS_REPCAT_ADMIN.GRANT_ADMIN_ANY_SCHEMA |
|
propagator |
DBMS_DEFER_SYS.REGISTER_PROPAGATOR |
|
refresher |
CREATE ANY SNAPSHOT |
In addition to creating the appropriate users at the snapshot site, you may need to create additional users at the associated master site, as well. Table 8-3 on describes the privileges need by master site users to support a new snapshot site.
In addition to the different users at the master site, you also need to determine which type of security model you will implement: trusted or untrusted. With a trusted security model, the receiver and proxy snapshot administrator have access to ALL local master groups. Since the proxy snapshot administrator and receiver perform database activities at the local master site on behalf of the snapshot administrator and propagator at the remote snapshot site, the propagator and snapshot administrator also have access to ALL master groups at the master site (remember that a single receiver is used for ALL incoming transactions).
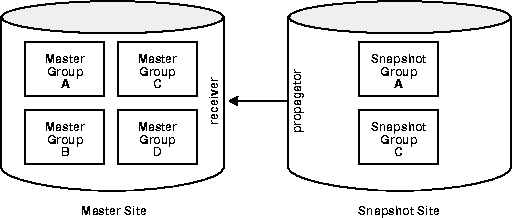
For example, consider the scenario in Figure 8-9. Even though Snapshot Groups A and C exist at the snapshot site (based on Master Groups A and C at the Master Site), the propagator and snapshot administrator have access to Master Groups A, B, C, and D at the Master Site because the trusted security model has been used. While this greatly increases the flexibility of database administration (since the DBA can perform administrative functions at any of these remote sites and have these changes propagated to the master sites), it also increases the chances of a malicious user at a remote site viewing or corrupting data at the master site.
Regardless of the security model used, Oracle8i automatically grants the appropriate privileges for objects as they are added to or removed from a replicated environment.
Untrusted security assigns only the privileges to the proxy snapshot administrator and receiver that are required to work with specified master groups; the propagator and snapshot administrator, therefore, will only be able to access these specified master groups at the Master Site. Figure 8-10 illustrates an untrusted security model with snapshot replication. Since the Snapshot Site contains Snapshot Groups A and C, access to only Master Groups A and C are required. Using untrusted security does not allow the propagator or the snapshot administrator at the Snapshot Site to access Master Groups B and D at the Master Site.
Typically, snapshot sites are more vulnerable to security breaches and therefore the untrusted security model is used. There are very few reasons why you would want to use a trusted security model with your snapshot site and it is recommended that you use the untrusted security model with snapshot sites.
One reason you might choose to use a trusted security model is when your snapshot site is considered a master site in every way (security, constant network connectivity, resources) but is a snapshot only because of data partitioning requirements (remember that horizontal or vertical partitioning are not supported in a multimaster configuration).
Use the appropriate API calls listed for the proxy snapshot administrator and receiver in Table 8-3 to assign the different users the appropriate privileges.
| User | Privileges |
|---|---|
|
proxy snapshot site administrator |
See the "DBMS_REPCAT_ADMIN.REGISTER_USER_REPGROUP" procedure in the Oracle8i Replication API Reference book for details. DBMS_REPCAT_ADMIN.REGISTER_USER_REPGROUP privilege => 'proxy_snapadmin' list_of_gnames => NULL DBMS_REPCAT_ADMIN.REGISTER_USER_REPGROUP privilege => 'proxy_snapadmin' list_of_gnames => 'mastergroupname' |
|
receiver |
See the "DBMS_REPCAT_ADMIN.REGISTER_USER_REPGROUP" procedure in the Oracle8i Replication API Reference book for details. DBMS_REPCAT_ADMIN.REGISTER_USER_REPGROUP privilege => 'receiver' list_of_gnames => NULL DBMS_REPCAT_ADMIN.REGISTER_USER_REPGROUP privilege => 'receiver' list_of_gnames => 'mastergroupname' |
|
proxy refresher |
grant CREATE SESSION
grant CREATE SESSION |
After creating the accounts at both the snapshot and associated master sites, you need to create the following private database links, including username and password, from the snapshot site to the master:
Assuming you have designated a single user account to act as snapshot administrator, propagator, and refresher, you will need to create one link for each snapshot site. You do not need a link from the master site to the snapshot site.
After creating these links, you must call DBMS_DEFER_SYS.SCHEDULE_PUSH and DBMS_DEFER_SYS.SCHEDULE_PURGE at the snapshot site to define how frequently you want to propagate your deferred transaction queue to the associated master site, and how frequently you wish to purge this queue. You must also call DMBS_REFRESH. REFRESH at the snapshot site to schedule how frequently to pull changes from the associated master site.
To avoid encountering delete conflicts, you might find it easiest to mark rows as deleted and purge them later. This section outlines a simple technique for purging these marked rows using procedural replication.
Suppose that your database contains the following MAIL_LIST table:
Name                Null?      Type
------------------- ---------- --------     --------------
CUSTNO              NOT NULL   NUMBER(4)    PRIMARY KEY
CUSTNAME                       VARCHAR2(10)
ADDR1                          VARCHAR2(30)
ADDR2                          VARCHAR2(30)
CITY                           VARCHAR2(30)
STATE                          VARCHAR2(2)
ZIP                            NUMBER(9)
PHONE                          NUMBER(10)
REMOVE_DATE                   DATE
Instead of deleting a customer when he or she requests to be removed from your mailing list, the REMOVE_DATE column would be used to indicate former customers; A NULL value would be used for current customers. After customers request removal from the mailing list, their rows are no longer updated. Such a convention avoids conflicts when the rows are actually deleted sometime later. A view of current customers could be defined as follows:
CREATE OR REPLACE VIEW corp.current_mail_list AS
 SELECT custno, custname, addr1, addr2, city, state, zip, phone
  FROM corp.mail_list WHERE remove_date IS NULL;
Periodically, perhaps once a year after the holiday sales, the former customers would be purged from the table using the REMOVE_DATE field. Such a delete could be performed using row-level replication just by performing the following delete:
DELETE corp.mail_list
  WHERE remove_date IS NOT NULL AND remove_date<'01-JAN-95';
However, for a large company with an extensive mail order business, the number of former customers could be quite large resulting in a lot of undesired network traffic and database overhead. Instead, the procedural replication could be used using the following package:
CREATE OR REPLACE PACKAGE corp.purge AS
 PROCEDURE remove_cust(purge_date IN DATE);
END;
/
CREATE OR REPLACE PACKAGE BODY corp.purge AS
 PROCEDURE remove_cust(purge_date IN DATE) IS
 BEGIN
  -- turn off row-level replication for set delete
  dbms_reputil.replication_off;
  -- prevent phantom reads
  LOCK TABLE corp.mail_list IN EXCLUSIVE MODE;
  DELETE corp.mail_list WHERE remove_date IS NOT NULL AND
                              remove_date < purge_date;
  dbms_reputil.replication_on;
 EXCEPTION WHEN others THEN
  dbms_reputil.replication_on;
 END;
END;
The DBMS_REPCAT.GENERATE_REPLICATION_SUPPORT procedure would have been used to generate the DEFER_PURGE package during the initial replication setup. Then, the procedural replication package could be called as follows by a single master site:
BEGIN
 defer_purge.remove_cust('14-APR-97','Y');
END;
The procedure, PURGE.REMOVE_CUST, would be executed locally and asynchronously executed at each master, resulting in many rows being deleted with only minimal network traffic.
To ensure that there are no outstanding transactions against the rows to be purged, your application should be written to never update logically deleted rows and the REMOVE_DATE should be old enough to ensure that the logical delete of the row is propagated before the row is purged. Thus, in the previous example, it is probably not necessary to lock the table in EXCLUSIVE mode; although this is another method of guaranteeing that these rows not be updated during the purge.
This section describes a more advanced method of designing your applications to avoid conflicts. This method, known as token passing, is similar to the workflow method described in Chapter 1. Although this section describes how to use this method to control the ownership of an entire row, you can use a modified form of this method to control ownership of the individual column groups within a row.
Both workflow and token passing allow dynamic ownership of data. With dynamic ownership, only one site at a time is allowed to update a row, but ownership of the row can be passed from site to site. Both workflow and token passing use the value of one or more "identifier" columns to determine who is currently allowed to update the row.
With workflow partitioning, you can think of data ownership as being "pushed" from site to site. Only the current owner of the row is allowed to push the ownership of the row to another site, by changing the value of the "identifier" columns.
Take the simple example of separate sites for ordering, shipping, and billing. Here, the identifier columns are used to indicate the status of an order. The status determines which site can update the row. After a user at the ordering site has entered the order, he or she updates the status of this row to SHIP. Users at the ordering site are no longer allowed to modify this row -- ownership has been pushed to the shipping site.
After shipping the order, the user at the shipping site will update the status of this row to BILL, thus pushing ownership to the billing site, and so on.
To successfully avoid conflicts, applications implementing dynamic data ownership must ensure that the following conditions are met:
With workflow partitioning, only the current owner of the row can push the ownership of the row to the next site by updating the "identifier" columns. No site is given ownership unless another site has given up ownership; thus ensuring there is never more than one owner.
Because the flow of work is ordered, ordering conflicts can be resolved by applying the change from the site that occurs latest in the flow of work. Any ordering conflicts can be resolved using a form of the PRIORITY conflict resolution method, where the priority value increases with each step in the work flow process.
The PRIORITY conflict resolution method successfully converges for more than one master as long as the priority value is always increasing.
Token passing uses a more generalized approach to meeting these criteria. To implement token passing, instead of the "identifier" columns, your replicated tables must have owner and epoch columns. The owner column stores the global database name of the site currently believed to own the row.
Once you have designed a token passing mechanism, you can use it to implement a variety of forms of dynamic partitioning of data ownership, including workflow.
You should design your application to implement token passing for you automatically. You should not allow the owner or epoch columns to be updated outside this application.
Whenever you attempt to update a row, your application should:
For example, Figure 8-11 illustrates how ownership of employee 100 passes from the ACCT_SF database to the ACCT_NY database.
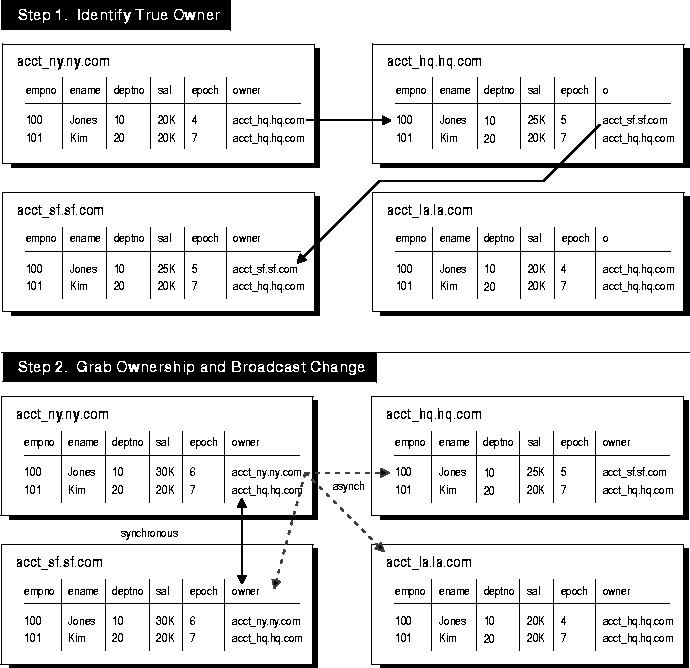
To obtain ownership, the ACCT_NY database uses a simple recursive algorithm to locate the owner of the row. The pseudo code for this algorithm is shown below:
-- Pseudo code for locating the token owner.
-- This is for a table TABLE_NAME with primary key PK.
-- Initial call should initialize loc_epoch to 0 and loc_owner
-- to the local global name.
get_owner(PK IN primary_key_type, loc_epoch IN OUT NUMBER,
          loc_owner IN OUT VARCHAR2)
{
  -- use dynamic SQL (dbms_sql) to perform a select similar to
  -- the following:
  SELECT owner, epoch into rmt_owner, rmt_epoch
     FROM TABLE_NAME@loc_owner
     WHERE primary_key = PK FOR UPDATE;
  IF rmt_owner = loc_owner AND rmt_epoch >= loc_epoch THEN
   loc_owner := rmt_owner;
   loc_epoch := rmt_epoch;
   RETURN;
  ELSIF rmt_epoch >= loc_epoch THEN
   get_owner(PK, rmt_epoch, rmt_owner);
   loc_owner := rmt_owner;
   loc_epoch := rmt_epoch;
   RETURN;
  ELSE
   raise_application_error(-20000, 'No owner for row');
  END IF;
}
After locating the owner of the row, the ACCT_NY site gets ownership from the ACCT_SF site by completing the following steps:
When the SF changes (that were in the deferred queue in Step 2 above) are ultimately propagated to the NY site, the NY site will ignore them because they will have a lower epoch number than the epoch number at the NY site for the same data.
As another example, suppose the HQ site received the SF changes after receiving the NY changes, the HQ site would ignore the SF changes because the changes applied from the NY site would have the greater epoch number.
You should design your application to implement this method of token passing for you automatically whenever you perform an update. You should not allow the owner or epoch columns to be updated outside this application. The lock that you grab when you change ownership is released when you apply your actual update. The changed information, along with the updated owner and epoch information, will be asynchronously propagated to the other sites in the usual manner.
You may encounter a situation where you need to modify a replicated object, but you do not want this modification replicated to the other sites in the replicated environment. For example, you might want to disable replication in the following situations:
You might need to do this, for example, if you need to correct the state of a record at one site so that a conflicting replicated update will succeed when you reexecute the error transaction. Or you might use an unreplicated modification to undo the effects of a transaction at its origin site because the transaction could not be applied at the destination site. In this example, you can use Replication Manager to delete the conflicting transaction from the destination site.
To modify tables without replicating the modifications, use the REPLICATION_ON and REPLICATION_OFF procedures in the DBMS_REPUTIL package. These procedures take no arguments and are used as flags by the generated replication triggers.
The DBMS_REPUTIL.REPLICATION_OFF procedure sets the state of an internal replication variable for the current session to FALSE. Because all replicated triggers check the state of this variable before queuing any transactions, modifications made to the replicated tables that use row-level replication do not result in any queued deferred transactions.
Attention: Turning replication on or off affects only the current session. That is, other users currently connected to the same server are not restricted from placing committed changes in the deferred transaction queue.
If you are using procedural replication, you should call REPLICATION_OFF at the start of your procedure, as shown in the following example. This ensures that the advanced replication facility does not attempt to use row-level replication to propagate the changes that you make.
CREATE OR REPLACE PACKAGE update AS
  PROCEDURE update_emp(adjustment IN NUMBER);
END;
/
CREATE OR REPLACE PACKAGE BODY update AS
  PROCEDURE update_emp(adjustment IN NUMBER) IS
  BEGIN
   -- turn off row-level replication for set update
   dbms_reputil.replication_off;
   UPDATE emp . . .;
   -- re-enable replication
   dbms_reputil.replication_on;
  EXCEPTION WHEN OTHERS THEN
   . . .
   dbms_reputil.replication_on;
  END;
END;
After resolving any conflicts, or at the end of your replicated procedure, be certain to call DBMS_REPUTIL.REPLICATION_ON to resume normal replication of changes to your replicated tables or snapshots. This procedure takes no arguments. Calling REPLICATION_ON sets the internal replication variable to TRUE.
If you have defined a replicated trigger on a replicated table, you may need to ensure that the trigger fires only once for each change that you make. Typically, you will only want the trigger to fire when the change is first made, and you will not want the remote trigger to fire when the change is replicated to the remote site.
You should check the value of the DBMS_REPUTIL.FROM_REMOTE package variable at the start of your trigger. The trigger should update the table only if the value of this variable is FALSE.
Alternatively, you can disable replication at the start of the trigger and re-enable it at the end of the trigger when modifying rows other than the one that caused the trigger to fire. Using this method, only the original change is replicated to the remote sites. Then the replicated trigger will fire at each remote site. Any updates performed by the replicated trigger will not be pushed to any other sites.
Using this approach, conflict resolution is not invoked. Therefore, you must ensure that the changes resulting from the trigger do not affect the consistency of the data.
To disable all local replication triggers for snapshots at your current site, set the internal refresh variable to TRUE by calling SET_I_AM_A_REFRESH, as shown in the following example:
DBMS_SNAPSHOT.SET_I_AM_A_REFRESH(value => TRUE);
To re-enable the triggers, set the internal refresh variable to FALSE, as shown below:
DBMS_SNAPSHOT.SET_I_AM_A_REFRESH(value => FALSE);
To determine the value of the internal refresh variable, call the I_AM_A_REFRESH function as shown below:
ref_stat := DBMS_SNAPSHOT.I_AM_A_REFRESH;replication:advanced
techniques<$startrange>;advanced replication:techniques<$startrange>