Release 8.1.5
A67791-01
Library |
Product |
Contents |
Index |
| Oracle8i Replication Release 8.1.5 A67791-01 |
|
![]()
![]()
This chapter describes how to administer your replicated database environment. The topics include the following:
Chapters 3 and 4 in this book discuss the most commonly performed procedures that you use to manage master and snapshot groups in an advanced replication environment. The following sections explain several less commonly used administrative procedures that involve the management of master and snapshot groups.
Replication Manager lets you propagate one or more SQL DDL statements to some or all of the master sites in a master group. This option lets you execute unique DDL that is not specifically supported within Oracle's replication management API. For example, you might want to create rollback segments and users that are necessary to support a replication environment.
Warning: Do not execute DDL that could damage global database integrity in a multimaster environment. For example, do not execute DDL statements to alter a replication object at any site.
To execute DDL at selected master sites in a master group:
The property page for the selected master group will appear in the right pane of the Replication Manager user interface.
API Equivalent: DBMS_REPCAT.EXECUTE_DDL
If the master definition site of a master group becomes unavailable or you simply want to relocate the master destination site for the group:
The property page for the selected master group will appear in the right pane of the Replication Manager user interface.
When you relocate the master definition site for a master group, you can choose to notify:
API Equivalent: DBMS_REPCAT.RELOCATE_MASTERDEF
To change the master site of a snapshot group to another master site, call the SWITCH_SNAPSHOT_MASTER procedure in the DBMS_REPCAT package, as shown in the following example:
DBMS_REPCAT.SWITCH_SNAPSHOT_MASTER(
     gname           =>   'sales',
     master          =>   'dbs2.acme.com'
     execute_as_user  =>   'FALSE');
In this example, the master site for the ACCT object group is changed to the DBS2 master site.
You must call this procedure at the snapshot site whose master site you want to change. The new database must be a master site in the replicated environment.
When you call this procedure, Oracle uses the new master to perform a full refresh of each snapshot in the local snapshot group.
The entries in the SYS.SLOG$ table at the old master site for the switched snapshot are not removed. As a result, the MLOG$ table of the switched updatable snapshot at the old master site has the potential to grow indefinitely, unless you purge it by calling DBMS_SNAPSHOT.PURGE_LOG.
Additional Information: See the "SWITCH_SNAPSHOT_ MASTER" procedure in the Oracle8i Replication API Reference book for details.
Oracle uses its internal system of deferred transactions and job queues to propagate changes among the sites in an advanced replication system. It is important that you monitor regularly the internal workings of a replication environment to ensure that it is running smoothly. The following sections explain how you can use Oracle Replication Manager to view and manage administration requests, deferred transactions, error transactions, and job queues.
An administration request is a specific call to a procedure or function in Oracle's replication management API. For example, when you use Replication Manager to create a new master group, Replication Manager completes the task by making a call to the DBMS_REPCAT.CREATE_MASTER_REPGROUP procedure. All DDL changes to replication groups and the objects within generate administration requests. Many top-level administration requests generate additional replication management API calls to complete the request.
Administration requests are inserted by the master definition site in the administration request queues at all master sites as one distributed transaction. Each master site has a scheduled job, DO_DEFERRED_REPCAT_ ADMIN, that executes requests simultaneously at each site. As administration requests are processed, each site reports back to the master definition site. Oracle removes requests that complete successfully from the administration request queue at the master definition site. However, if any errors are encountered, the administration request remains in the master definition site's administration request queue with an error status.
Replication Manager allows you view and update the status of administration requests. The following sections explain more about how to manage administration requests for a master group in a multimaster advanced replication environment.
To display the administration requests for a master group at a master site:
All administrative requests for the selected master group will be displayed in the Administrative Requests list. The following is displayed for each administrative request:
Replication Manager does not automatically update the display of the detail panel. To obtain a more current list of pending administration requests, refresh the display by selecting another tab and then reselecting the Operations tab.
Additional Information: You can also view administration requests by querying the REPCATLOG data dictionary view.
As long as each instance in an Oracle advanced replication facility has one or more SNP processes, each server 1fgruns a job at a regular interval to execute all administration requests. If you do not want to wait for Oracle to execute administration requests, use Replication Manager to apply all pending administration requests manually.
API Equivalent: DBMS_REPCAT.DO_DEFERRED_REPCAT_ADMIN
Sometimes it is necessary to remove pending administration requests for a master group. For example, certain administration requests might return errors. Even after you resolve the corresponding error situation, administration requests remain in the server's queue unless you manually purge them.
To remove selected administration requests for a master group:
To remove all administration requests for a master group:
API Equivalent: DBMS_REPCAT.PURGE_MASTER_LOG
When you use Replication Manager or make a call to a procedure in the DBMS_REPCAT pac1fgage to administer an advanced replication system, Oracle uses its internal mechanisms to broadcast the request using synchronous replication. If a synchronous broadcast fails for any reason, Oracle returns an error message and rolls back the encompassing transaction.
When an Oracle Server receives an administration request, it records the request in the REPCATLOG view and the corresponding DDL statement in a child table of the REPCATLOG view. When you view administration requests for a master group at a master site, you might observe requests that are awaiting a callback from another master site. Whenever you use Replication Manager to create an administration request for a replication group, Oracle automatically inserts a job into the local job queue, if one does not already exist for the group. This job periodically executes the procedure DO_DEFERRED_REPCAT_ADMIN. Whenever you synchronously broadcast a request, Oracle attempts to start this job immediately in order to apply the replicated changes at each master site.
Assuming that Oracle does not encounter any errors, DO_DEFERRED_REPCAT_ ADMIN will be run whenever a background process is available to execute the job. The initialization parameter JOB_QUEUE_INTERVAL determines how often the background process wakes up. You can experience a delay if you do not have enough background processes available to execute the outstanding jobs.
|
Note: When JOB_QUEUE_PROCESSES = 0 at a site, you must apply administration requests manually for all groups at the site. See "Applying Administration Requests" for more information. |
For each call of DO_DEFERRED_REPCAT_ADMIN at a master site, the site checks the REPCATLOG view to see if there are any requests that need to be performed. When one or more administration requests are present, Oracle applies the request and updates any local views as appropriate. This event can occur asynchronously at each master site.
DO_DEFERRED_REPCAT_ADMIN executes the local administration requests in the proper order. When DO_DEFERRED_REPCAT_ADMIN is executed at a master that is not the master definition site, it does as much as possible. Some asynchronous activities such as populating a replicated table require communication with the master definition site. If this communication is not possible, DO_DEFERRED_REPCAT_ADMIN stops executing administration requests to avoid executing requests out of order. Some communication with the master definition site, such as the final step of updating or deleting an administration request at the master definition site, can be deferred and will not prevent DO_DEFERRED_REPCAT_ADMIN from executing additional requests.
The success or failure of an administration request at each master site is noted in the REPCATLOG view at each site. For each master group, Replication Manager displays the corresponding status of each administration request. Ultimately, each master site propagates the status of its administration requests to the master definition site. If a request completes successfully at a master site, Oracle removes the callback for the site from the REPCATLOG view at the master definition site. If the event completes successfully at all sites, all entries in the REPCATLOG view at all sites, including the master definition site, will be removed.
By synchronously broadcasting the change, Oracle ensures that all sites are aware of the change, and thus are capable of remaining in synch. By allowing the change to be applied at the site at a future point in time, Oracle provides you with the flexibility to choose the most appropriate time to apply changes at a site.
If an object requires automatically generated replication support, you must regenerate replication support after altering the object. Oracle then activates the internal triggers and regenerates the packages to support replication of the altered object at all master sites.
Any snapshot sites that are affected by a DDL change are updated the next time you perform a refresh of the snapshot site. While all master sites can communicate with one another, snapshot sites can communicate only with their associated master site.
If you must alter the shape of a snapshot as the result of a change to its master, you must drop and re-create the snapshot.
After you administer an advanced replication environment, you should take a look at the administration requests to make sure that everything is running smoothly. While monitoring your system, you might find that there are problems related to administration requests. The following list provides you with some troubleshooting ideas for administration request problems.
An advanced replication system using asynchronous data propagation uses an internal system of deferred transactions and job queues to push changes from one site to another. Replication Manager lets you view and manage deferred and error transactions queued at each server in an advanced replication system.
To display a summary list of a replication site's deferred transactions by their outgoing destination:
The deferred transaction property sheet will appear in the right pane of the Replication Manager user interface.
All deferred transactions for the selected destination will be displayed in the body of the Transactions tab. Displayed information includes transaction ID, # of Calls, Delivery Order, and the Start Time.
To display the properties for an individual deferred transaction:
The general characteristics of the selected deferred transaction will be displayed in the right pane of the Replication Manager user interface.
To display the deferred calls for an individual deferred transaction:
The transaction's Call #, Schema, Package, Procedure, and # of Arguments will be displayed in the right pane of the Replication Manager user interface.
Additional Information: You can also view deferred transactions by querying the DEFCALL, DEFCALLDEST, DEFLOB, DEFSCHEDULE, DEFTRAN, and DEFTRANDEST views.
Each instance in an Oracle advanced replication facility that has one or more SNP processes and the necessary scheduled links automatically runs a job at a regular interval to execute deferred transactions automatically at targeted destinations. If you do not want to wait for Oracle to execute a deferred transaction, use Replication Manager to manually push all pending deferred transactions for a particular destination.
The deferred transaction property sheet will appear in the right pane of the Replication Manager user interface.
All deferred transactions for the selected destination will be displayed in the body of the Transactions tab. Displayed information includes transaction ID, # of Calls, Delivery Order, and the Start Time.
The Push Options dialog box will appear.
API Equivalent: DBMS_DEFER_SYS.PUSH
In some cases, you might know that a deferred transaction in the queue at your local site will cause an error transaction at the receiving site if pushed to the site. In such cases, it might be appropriate to delete the deferred transaction from the local queue to prevent an error transaction from happening.
Warning: See "Managing Error Transactions" for more information about error transactions and when to delete deferred transactions.
To delete an individual deferred transaction:
The deferred transaction property sheet will appear in the right pane of the Replication Manager user interface.
All deferred transactions for the selected destination will be displayed in the body of the Transactions tab. Displayed information includes transaction ID, # of Calls, Delivery Order, and the Start Time.
You have several other options available when deleting deferred transactions:
API Equivalent: DBMS_DEFER_SYS.DELETE_TRAN
When Oracle pushes a deferred transaction from a snapshot or master site to another master site, Oracle ensures that the transaction is not removed from the local queue until it has been successfully propagated to the remote site. However, a transaction can be successfully propagated to a master site without being successfully applied at the site. An error in applying a deferred transaction may be the result of a database problem, such as a lack of available space in a table that you are attempting to update, or may be the result of an unresolvable replication conflict. If an error occurs, Oracle performs the following actions at the receiving master site:
You should frequently check each site in a replicated environment for error transactions and then resolve them. To display a summary list of a replication site's local error transactions:
All local errors will be displayed in the right pane of Replication Manager.
To resolve an error transaction properly, you need specific information about what the transaction is attempting to perform. Deferred transactions consist of a series of deferred remote procedure calls that must be applied in a given order to maintain transaction consistency.
To display more information about an individual error transaction:
The local error property sheet will be displayed in the right pane of the Replication Manager user interface.
To display the deferred calls for an individual error transaction:
Review the transaction's deferred calls and call destinations, and the transaction's destinations.
Once you have determined the cause of an error transaction, you may need to perform one or more of the following actions at the destination site after fixing the error:
When you have resolved the problem that caused an error transaction, you can re-execute the error transaction. If the error transaction executes successfully, Oracle automatically removes the transaction from the local site's replication catalog.
To re-execute an error transaction:
API Equivalent: DBMS_DEFER_SYS.EXECUTE_ERROR.
When Oracle re-executes an error transaction at the receiving site, Oracle executes the transaction in the security context of the original receiver. If the original receiver is no longer a valid user (that is, if the user was dropped), the deferred transaction can be re-executed under the security context of a different user using the DBMS_ DEFER_SYS.EXECUTE_ERROR_AS_USER procedure. See this procedure, which is described in the Oracle8i Replication API Reference book.
Attention: If you re-execute a single error transaction, Oracle does not commit the transaction, even if it executes successfully. If you are satisfied with the results of the transaction, you should issue the SQL command COMMIT WORK. If EXECUTE_ERROR re-executes multiple transactions, each transaction is committed as it completes.
Sometimes, you must manually resolve an error transaction (in other words, not re-execute the transaction to resolve it). When you have resolved the problem that caused an error transaction, you should delete the error transaction. To delete an error transaction:
API Equivalent: DBMS_DEFER_SYS.DELETE_ERROR.
Oracle runs jobs in each site's job queue to complete certain tasks automatically that are necessary to manage an advanced replication environment. For example, when you use Replication Manager to create and enable a scheduled link to a remote site, the local server places a job in its job queue that Oracle periodically runs to push local changes to a remote master.
Replication Manager has several features that you can use to view and manage the job queues of each server in an advanced replication system. The following sections explain more about viewing and managing a server's local jobs.
Oracle creates a job in a site's local job queue on behalf of the following operations:
To display a summary list of a replication site's local job queue:
The detail panel of Replication Manager lists summary information for all local jobs.
To display the properties for an individual local job:
The pages of the Job property sheet let you view the various properties of the job, including:
In certain situations, you might want to edit the properties of a local job. For example, the default execution interval for a master group's administration requests is 10 minutes; the only way to edit this setting is to edit the scheduling properties for the corresponding job. To edit the properties of a local job:
The properties of the selected job will be displayed in the right pane of the Replication Manager user interface.
The Edit Job property sheet lets you edit the following properties of a job:
Rather than wait for the next execution date for a job, you can force a job to run. To run a job immediately:
The local job property sheet will be displayed in the right pane of the Replication manager user interface.
In certain cases, you might need to temporarily disable (break) a job and then later enable the job again. Or, you might need to enable a broken job after fixing a problem the prevented the job from running properly. For example, if you accidentally drop a database link upon which a job depends, the job will fail and eventually break (after 16 successive failures). After you recreate the necessary database link, you can then enable the broken job. To break or enable (make normal) a local job:
The local job property sheet will be displayed in the right pane of the Replication manager user interface.
Many operations in an advanced replication environment rely on jobs to perform work. While monitoring your system, you might find that there are problems related to jobs. You should use Replication Manager to monitor local jobs regularly.
If a job fails to execute, first check to see the status of the job. If the job is broken, check the alert log and trace files for error information and fix the error. If the job is not broken (normal), Oracle should ultimately re-execute it.
If the job is OK but has never executed, there may be a problem with the availability of SNP background processes. Check the initialization parameter JOB_QUEUE_PROCESSES to determine the number of background processes available and JOB_QUEUE_INTERVAL to determine how frequently each background processes wakes up. You can also query the DBA_JOBS_RUNNING view to explore what jobs these processes are currently running (you may have a problem with a runaway job), and the alert log and trace file can provide you with additional information about potential problems with the background process.
Databases using advanced replication are distributed databases. Follow the guidelines for distributed database backups outlined in the Oracle8i Administrator's Guide when creating backups of advanced replication databases. Follow the guidelines for coordinated distributed recovery in the Oracle8i Administrator's Guide when recovering an advanced replication database.
If you fail to follow the coordinated distributed recovery guidelines, there is no guarantee that your advanced replication databases will be consistent. For example, a restored master site may have propagated different transactions to different masters. You may need to perform extra steps to correct for an incorrect recovery operation. One such method is to drop and recreate all replicated objects in the recovered database.
Recommendation: Remove pending deferred transactions and deferred error records from the restored database, and resolve any outstanding distributed transactions before dropping and recreating replicated objects. If the restored database was a master definition site for some replicated environments, you should designate a new master definition site before dropping and creating objects. Any snapshots mastered at the restored database should be fully refreshed, as well as any snapshots in the restored database.
To provide continued access to your data, you may need to change master definition sites (assuming the database being recovered was the master definition site), or remaster snapshot sites (assuming their master site is being recovered).
After performing an export/import of a replicated object or an object used by the advanced replication facility (for example, the REPSITES view), you should run the REPCAT_IMPORT_CHECK procedure in the DBMS_REPCAT package.
In the following example, the procedure checks the objects in the ACCT replicated object group at a snapshot site to ensure that they have the appropriate object identifiers and status values:
DBMS_REPCAT.REPCAT_IMPORT_CHECK( gname     =>   'acct',
                                 master    =>   FALSE);
Additional Information: See the "REPCAT_IMPORT_CHECK" procedure in the Oracle8i Replication API Reference book for details.
Whenever Oracle detects and successfully resolves an update, delete, or uniqueness conflict, you can view information about what method was used to resolve the conflict by querying the REPRESOLUTION_STATISTICS view. This view is updated only if you have chosen to turn on conflict resolution statistics gathering for the table involved in the conflict.
Use the REGISTER_STATISTICS procedure in the DBMS_REPCAT package to collect information about the successful resolution of update, delete, and uniqueness conflicts for a table. The following example gathers statistics for the EMP table in the ACCT_REC schema:
DBMS_REPCAT.REGISTER_STATISTICS(sname    =>   'acct_rec',
                                 oname    =>   'emp');
Additional Information: See the "REGISTER_STATISTICS" procedure in the Oracle8i Replication API Reference book for details.
After you call REGISTER_STATISTICS for a table, each conflict that is successfully resolved for that table is logged in the REPRESOLUTION_ STATISTICS view. Information about unresolved conflicts is always logged to the DEFERROR view, whether the object is registered or not.
Additional Information: See the "REPRESOLUTION_STATISTICS" view and the "DEFERROR" view in the Oracle8i Replication API Reference book for details.
Use the CANCEL_STATISTICS procedure in the DBMS_REPCAT package if you no longer want to collect information about the successful resolution of update, delete, and uniqueness conflicts for a table. The following example cancels statistics gathering on the EMP table in the ACCT_REC schema:
DBMS_REPCAT.CANCEL_STATISTICS(sname    => '  acct_rec',
                               oname    =>   'emp');
Additional Information: See the "CANCEL_STATISTICS" procedure in the Oracle8i Replication API Reference book for details.
If you registered a table to log information about the successful resolution of update, delete, and uniqueness conflicts, you can remove this information from the REPRESOLUTION_STATISTICS view by calling the PURGE_STATISTICS procedure in the DBMS_REPCAT package.
The following example purges the statistics gathered about conflicts resolved due to inserts, updates, and deletes on the EMP table between January 1 and March 31:
DBMS_REPCAT.PURGE_STATISTICS(sname      =>  'acct_rec',
                             oname      =>  'emp',
                             start_date =>   '01-JAN-95',
                              end_date   =>   '31-MAR-95);
Additional Information: See the "PURGE_STATISTICS" procedure in the Oracle8i Replication API Reference book for details.
When administering a replicated environment, you may periodically want to check whether the contents of two replicated tables are identical. The following procedures in the DBMS_RECTIFIER_DIFF package let you identify, and optionally rectify, the differences between two tables when both sites are release 7.3 or higher:
The DIFFERENCES procedure compares two replicas of a table, and determines all rows in the first replica that are not in the second and all rows in the second that are not in the first. The output of this procedure is stored in two user-created tables. The first table stores the values of the missing rows, and the second table is used to indicate which site contains each row.
The RECTIFY procedure uses the information generated by the DIFFERENCES procedure to rectify the two tables. Any rows found in the first table and not in the second are inserted into the second table. Any rows found in the second table and not in the first are deleted from the second table.
To restore equivalency between all copies of a replicated table, you should complete the following steps:
You must create one table that can hold the data for the columns being compared. For example, if you decide to compare the EMPNO, SAL, and BONUS columns of the EMPLOYEE table, your CREATE statement would need to be similar to the one shown below.
CREATE TABLE missing_rows_data
(
  empno    NUMBER,
  sal    NUMBER,
  bonus    NUMBER)
You must also create a table that indicates where the row is found. This table must contain three columns with the data types shown in the following example:
CREATE TABLE missing_rows_location
(
  present     VARCHAR2(128),
  absent      VARCHAR2(128),
  r_id        ROWID
)
DBMS_RECTIFIER_DIFF.DIFFERENCES(
     sname1              =>   'hr',
     oname1              =>   'employee',
     reference_site      =>   'ny.com',
     sname2              =>   'hr',
     oname2              =>   'employee',
     comparison_site     =>   'sf.com',
     where_clause        =>   '',
     column_list         =>   'empno,sal,bonus',
     missing_rows_sname  =>   'scott',
     missing_rows_oname1 =>   'missing_rows_data',
     missing_rows_oname2 =>   'missing_rows_location',
     missing_rows_site   =>   'ny.com',
     commit_rows          =>   50);
Figure 7-1 shows an example of two replicas of the EMPLOYEE table and what the resulting missing rows tables would look like if you executed the DIFFERENCES procedure on these replicas.
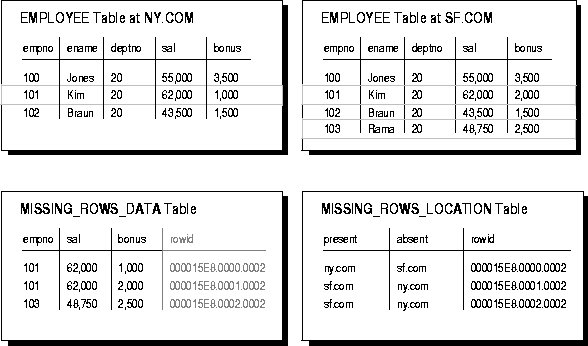
Notice that the two missing rows tables are related by the ROWID and R_ID columns.
DBMS_RECTIFIER_DIFF.RECTIFY(
     sname1              =>   'hr',
     oname1              =>   'employee',
     reference_site      =>   'ny.com',
     sname2              =>   'hr',
     oname2              =>   'employee',
     comparison_site     =>   'sf.com',
     column_list         =>   'empno,sal,bonus',
     missing_rows_sname  =>   'scott',
     missing_rows_oname1 =>   'missing_rows_data',
     missing_rows_oname2 =>   'missing_rows_location',
     missing_rows_site   =>   'ny.com',
     commit_rows          =>   50);
The RECTIFY procedure temporarily disables replication at the "comparison" site while it performs the necessary insertions and deletions, as you would not want to propagate these changes. RECTIFY first performs all of the necessary DELETEs and then performs all of the INSERTs. This ensures that there are no violations of a PRIMARY KEY constraint.
Attention: If you have any additional constraints on the "comparison" table you must ensure that they will not be violated when you call RECTIFY. You may need to update the table directly using the information from the missing rows table. If so, be certain to DELETE the appropriate rows from the missing rows tables.
The following sections explain how to manage snapshot logs. Topics include:
After you create a snapshot log, you can alter its storage parameters and support for corresponding snapshots. The following sections explain more about altering snapshot logs.
Only the owner of the master table or a user with the SELECT privilege for the master table can alter a snapshot log.
To alter a snapshot log's storage parameters, use the Storage and Options pages of the Snapshot Log property sheet or an equivalent ALTER SNAPSHOT LOG statement. For example:
ALTER SNAPSHOT LOG ON sales.customers
 PCTFREE 25
 PCTUSED 40;
To add new filter columns to a snapshot log, use the SQL command ALTER SNAPSHOT LOG. For example:
ALTER SNAPSHOT LOG ON sales.customers
 ADD (zip);
Oracle automatically tracks which rows in a snapshot log have been used during the refreshes of snapshots, and purges these rows from the log so that the log does not grow endlessly. Because multiple simple snapshots can use the same snapshot log, rows already used to refresh one snapshot may still be needed to refresh another snapshot; Oracle does not delete rows from the log until all snapshots have used them.
For example, Oracle refreshes the CUSTOMERS snapshot at the SPDB1 database. However, the server that manages the master table and associated snapshot log does not purge the snapshot log rows used during the refresh of this snapshot until the CUSTOMERS snapshot at the SPDB2 database also refreshes using these rows.
As a result of how Oracle purges rows from a snapshot log, unwanted situations can occur that cause a snapshot log to grow indefinitely when multiple snapshots are based on the same master table. For example, such situations can occur when more than one snapshot is based on a master table and when:
Always try to keep a snapshot log as small as possible to minimize the database space that it uses. To remove rows from a snapshot log and make space for newer log records, you can:
To manually purge rows from a snapshot log, execute the PURGE_LOG stored procedure of the DBMS_SNAPSHOT package at the database that contains the log. For example, to purge entries from the snapshot log of the CUSTOMERS table that are necessary only for the least recently refreshed snapshot, execute the following procedure:
DBMS_SNAPSHOT.PURGE_LOG (
 master => 'sales.customers',
 num    => 1,
 flag   => 'DELETE');
Additional Information: See the DBMS_SNAPSHOT. PURGE_LOG procedure in the Oracle8i Replication API Reference book for details.
The owner of a snapshot log or a user with the EXECUTE privilege for the DBMS_SNAPSHOT package can purge rows from the snapshot log by executing the PURGE_LOG procedure.
If a snapshot log grows and allocates many extents, purging the log of rows does not reduce the amount of space allocated for the log. To reduce the space allocated for a snapshot log:
LOCK TABLE sales.customers IN EXCLUSIVE MODE;
CREATE TABLE sales.templog AS SELECT * FROM sales.mlog$_customers;
TRUNCATE sales.mlog$_customers;
INSERT INTO sales.mlog$_customers SELECT * FROM sales.templog;
DROP TABLE sales.templog;
ROLLBACK;
Note: Any changes made to the master table between the time you copy the rows to a new location and when you truncate the log do not appear until after you perform a complete refresh.
The owner of a snapshot log or a user with the DELETE ANY TABLE system privilege can truncate a snapshot log.
To improve performance and optimize disk use, you can periodically reorganize ("reorg") tables. This section discusses how to reorganize a master table and preserve the fast refresh capability of associated snapshots.
When you reorganize a table, any ROWID information of the snapshot log must be invalidated. Oracle detects a table reorganization automatically only if the table is truncated as part of the reorg. See "Method 2 for Reorganizing Table t".
If the table is not truncated, Oracle must be notified of the table reorganization. To support table reorganizations, two procedures, DBMS_SNAPSHOT.BEGIN_TABLE_REORGANIZATION and DBMS_SNAPSHOT.END_TABLE_REORGANIZATION notify Oracle that the specified table has been reorganized. The procedures perform clean-up operations, verify the integrity of the logs and triggers that the fast refresh mechanism needs, and invalidate the ROWID information in the table's snapshot log. The inputs are the owner and name of the master table to be reorganized. There is no output.
When a table is truncated, its snapshot log is also truncated. However, for primary key snapshots, you can preserve the snapshot log, allowing fast refreshes to continue. Although the information stored in a snapshot log is preserved, the snapshot log becomes invalid with respect to ROWIDs when the master table is truncated. The ROWID information in the snapshot log will seem to be newly created and cannot be used by ROWID snapshots for fast refresh.
If you specify the PRESERVE SNAPSHOT LOG option or no option, the information in the master table's snapshot log is preserved, but current ROWID snapshots can use the log for a fast refresh only after a complete refresh has been performed. This is the default.
Note: To ensure that any previously fast refreshable snapshot is still refreshable, follow the guidelines in "Methods of Reorganizing a Database Table".
If the PURGE SNAPSHOT LOG option is specified, the snapshot log is purged along with the master table.
The following two statements preserve snapshot log information when the master table is truncated:
TRUNCATE TABLE tablename PRESERVE SNAPSHOT LOG;
TRUNCATE TABLE tablename;
The following statement truncates the snapshot log along with the master table:
TRUNCATE TABLE tablename PURGE SNAPSHOT LOG
Oracle provides four table reorganization methods that preserve the capability for fast refresh; these appear under the following headings. Other reorg methods require an initial complete refresh to enable subsequent fast refreshes.
Note: Do not use direct loader during a reorg of a master table. (Direct Loader can cause reordering of the columns, which could invalidate the log information used in subquery and LOB snapshots.)
Method 1 for Reorganizing Table t
Ensure that no transaction is issued against the reorganized table between calling dbms_snapshot.begin_table_reorganization and dbms_snapshot.end_table_reorganization.
Method 2 for Reorganizing Table t
Ensure that no transaction is issued against the reorganized table between calling dbms_snapshot.begin_table_reorganization and dbms_snapshot.end_table_reorganization.
Method 3 for Reorganizing Table t
Ensure that no transaction is issued against the reorganized table between calling dbms_snapshot.begin_table_reorganization and dbms_snapshot.end_table_reorganization.
Method 4 for Reorganizing Table t
Ensure that no transaction is issued against the reorganized table between calling dbms_snapshot.begin_table_reorganization and dbms_snapshot.end_table_reorganization.
You can drop a snapshot log independently of its master table or any existing snapshots. For example, you might decide to drop a snapshot log if one of the following situations is true:
To drop a snapshot log, complete the following:
You can also execute the equivalent DROP SNAPSHOT LOG SQL statement in SQL*Plus:
DROP SNAPSHOT LOG ON sales.customers;
Only the owner of the master table or a user with the DROP ANY TABLE system privilege can drop a snapshot log.
The following sections contain troubleshooting guidelines for managing an advanced replication environment.
If you think a database link is not functioning properly, you can drop and recreate it using Oracle Enterprise Manager, Oracle Server Manager, or another tool.
If you used a connection qualifier in a database link to a given site, the other sites that link to that site must have the exact same connection qualifier. For example, if you create a database link as follows:
CREATE DATABASE LINK myethernet CONNECT TO repsys IDENTIFIED BY secret
USING 'connect_string_myethernet'
All the sites, whether masters or snapshots, associated with the myethernet database link must include the 'connect_string_myethernet' connect string.
There are a number problems that might arise in a multimaster advanced replication system. The next few sections discuss some problems and ways to troubleshoot them.
If you add a new master site to a master group, and the appropriate objects are not created at the new site, try the following:
If you create a new master group object or alter the definition of a master group object at the master definition site and the modification is not propagated to a master site, first ensure that the administration requests at all sites have completed successfully. If requests are pending execution, you can manually execute them to complete the operation immediately.
When you execute DDL statements through the replication API, Oracle executes the statements on behalf of the user who submits the DDL. When a DDL statement applies to an object in a schema other than the submitter's schema, the submitter needs appropriate privileges to execute the statement. In addition, the statement must explicitly name the schema. For example, assume that you, the replication administrator, supply the following as the DDL_TEXT parameter to the DBMS_REPCAT.CREATE_MASTER_ REPOBJECT procedure:
CREATE TABLE scott.new_emp AS SELECT * FROM hr.emp WHERE ...;
Because each table name contains a schema name, this statement works whether the replication administrator is SCOTT, HR, or another user, as long as the administrator has the required privileges.
Suggestion: Qualify the name of every schema object with the appropriate schema.
If you make an update to your data at a master site, and that change is not properly asynchronously propagated to the other sites in your replicated environment, try the following:
If you receive the DEFERRED_RPC_QUIESCE exception when you attempt to modify a replicated table, one or more master groups at your local site are "quiescing" or "quiesced". To proceed, your replication administrator must resume replication activity for the group.
A single update statement applied to a replicated table can update zero or more rows. The update statement causes zero or more update requests to be queued for deferred execution, one for each row updated. This distinction is important when constraints are involved, because Oracle effectively performs constraint checking at the end of each statement. While a bulk update might not violate a uniqueness constraint, for example, some equivalent sequence of individual updates might violate uniqueness.
If the ordering of updates is important, update one row at a time in an appropriate order. This lets you define the order of update requests in the deferred RPC queue.
If you add an object such as a package, procedure, or view to a master group, the status of the object must be VALID. If the status of an object is INVALID, recompile the object, or drop and recreate the object before adding it to a master group.
When you generate replication support for a table, Oracle activates an internal trigger at the local site. If the table will be propagating changes asynchronously, this trigger uses the DBMS_DEFER package to build the calls that are placed in the local deferred transaction queue. EXECUTE privileges for most of the packages involved with advanced replication, such as DBMS_REPCAT and DBMS_DEFER, need to be granted to replication administrators and users that own replicated objects. The Replication Manager setup wizard and the DBMS_REPCAT_ADMIN package performs the grants needed by the replication administrators for many typical replication scenarios. When the owner of a replicated object is not a replication administrator, however, you must explicitly grant EXECUTE privilege on DBMS_DEFER to the object owner.
If you discover an unexpected unresolved conflict, and you were mixing procedural and row-level replication on a table, carefully review the procedure to ensure that the replicated procedure did not cause the conflict. Ensure that ordering conflicts between procedural and row-level updates are not possible. Check if the replicated procedure locks the table in EXCLUSIVE mode before performing updates (or uses some other mechanism of avoiding conflicts with row-level updates). Check that row-level replication is disabled at the start of the replicated procedure and re-enabled at the end. Ensure that row-level replication is re-enabled even if exceptions occur when the procedure executes. In addition, check to be sure that the replicated procedure executed at all master sites. You should perform similar checks on any replicated triggers that you have defined on replicated tables.
If deferred transactions at a site are not being pushed to their destinations, there can be several reasons for the problem. The following sections explain some possible causes.
When you create a scheduled link, Oracle adds a corresponding job to the site's job queue. If you have scheduled a link to push deferred transactions at a periodic interval, and you encounter a problem, you should first be certain that you are not experiencing a problem with the job queue.
When Oracle pushes a deferred transaction to a remote site using serial propagation, it uses a distributed transaction to ensure that the transaction has been properly committed at the remote site before the transaction is removed from the queue at the local site. For information on diagnosing problems with distributed transactions (two-phase commit), see the book Oracle8i Distributed Database Systems.
If you notice that transactions are not being pushed to a given remote site, you may have a problem with how you have specified the destination for the transaction. When you create a scheduled link, you must provide the full database link name. If you use Replication Manager, you should not have any problems.
Having the wrong view definitions can lead to erroneous deferred transaction behavior. The DEFCALLDEST and DEFTRANDEST views are defined differently in CATDEFER.SQL and CATREPC.SQL. The definitions in CATREPC.SQL should be used whenever advanced replication is used. If CATDEFER.SQL is ever (re)loaded, ensure that the view definitions in CATREPC.SQL are subsequently loaded.
There are a number problems that might happen with snapshot sites in an advanced replication system. The next few sections discuss some problems and ways to troubleshoot them.
If you unsuccessfully attempt to create a new object at a snapshot site, try the following:
The following sections explain several common snapshot refresh problems.
Several common factors can prevent the automatic refresh of a group of snapshots:
When a snapshot refresh group is experiencing problems, ensure that none of the above situations is preventing Oracle from completing group refreshes.
When Oracle fails to refresh a group automatically, the group remains due for its refresh to complete. Oracle will retry an automatic refresh of a group with the following behavior:
If after sixteen attempts to refresh a refresh group Oracle continues to encounter errors, Oracle considers the group broken. The General page of the Refresh Group property sheet in Schema Manager indicates when a refresh group is broken. You can also query the BROKEN column of the USER_REFRESH and USER_REFRESH_CHILDREN data dictionary views to see the current status of a refresh group.
The errors causing Oracle to consider a snapshot refresh group broken are recorded in a trace file. After you correct the problems preventing a refresh group from refreshing successfully, you must refresh the group manually. Oracle then resets the broken flag so that automatic refreshes can happen again.
Additional Information: The name of the snapshot trace file is of the form SNPn, where n is platform specific. See your platform-specific Oracle documentation for the name on your system.
If you encounter a situation where Oracle continually refreshes a group of snapshots, check the group's refresh interval. Oracle evaluates a group's automatic refresh interval before starting the refresh. If a group's refresh interval is less than the amount of time it takes to refresh all snapshots in the group, Oracle continually starts a group refresh each time the SNP background process checks the queue of outstanding jobs.
If a snapshot log is growing without bounds, check to see whether a network or site failure has prevented a master from becoming aware that a snapshot has been dropped. You may need to purge part of the log as described in "Purging Rows from a Snapshot Log" and unregister the snapshot.
If you have a problem refreshing a snapshot, try the following:
At the master site, an Oracle database automatically registers information about the snapshots based on the master tables. The following sections explain more about Oracle's snapshot registration mechanism.
You can use the General page of the Snapshot Log property sheet in Schema Manager to list the snapshots associated with a snapshot log. For additional information, you can query the DBA_REGISTERED_SNAPSHOTS data dictionary view to list the following information about a remote snapshot:
You can also join the DBA_REGISTERED_SNAPSHOT view with the DBA_SNAPSHOT_LOGS view at the master site to obtain the last refresh times for each snapshot. Administrators can use this information to monitor snapshot activity from master sites and coordinate changes to snapshot sites if a master table needs to be dropped, altered, or relocated.
Oracle automatically registers a read-only snapshot at its master database when you create the snapshot, and unregisters the snapshot when you drop it.
Note: Oracle7 master sites cannot register snapshots.
Caution: Oracle cannot guarantee the registration or unregistration of a snapshot at its master site during the creation or drop of the snapshot, respectively. If Oracle cannot successfully register a snapshot during creation, Oracle completes snapshot registration during a subsequent refresh of the snapshot. If Oracle cannot successfully unregister a snapshot when you drop the snapshot, the registration information for the snapshot persists in the master database until it is manually unregistered.
If necessary, you can maintain registration manually. Use the REGISTER_SNAPSHOT and UNREGISTER_SNAPSHOT procedures of the DBMS_SNAPSHOT package at the master site to add, modify, or remove snapshot registration information.
Additional Information: The REGISTER_SNAPSHOT and UNREGISTER_SNAPSHOT procedures are described in chapter 9, "Data Dictionary Views" in the Oracle8i Replication API Reference manual.
There are several procedures in the DBMS_REPCAT package that allow you to update the comment information in the various views associated with replication. Table 7-1 lists the appropriate procedure to call for each view.
|
View |
DBMS_REPCAT Procedure |
Additional Information |
|---|---|---|
|
REPGROUP |
COMMENT_ON_REPGROUP( |
The parameters for the COMMENT_ON_REPGROUP procedure are described in the Oracle8i Replication API Reference book. |
|
REPOBJECT |
COMMENT_ON_REPOBJECT( |
The parameters for the |
|
REPSITES |
COMMENT_ON_REPSITES( |
The parameters for the COMMENT_ON_REPSITES procedure are described in the Oracle8i Replication API Reference book. |
|
REPCOLUMN_ GROUP |
COMMENT_ON_COLUMN_GROUP( |
The parameters for the COMMENT_ON_COLUMN_GROUP procedure are described in the Oracle8i Replication API Reference book. |
|
REPPRIORITY_ GROUP |
COMMENT_ON_PRIORITY_GROUP( |
The parameters for the COMMENT_ON_PRIORITY_GROUP procedure are described in the Oracle8i Replication API Reference book. |
|
REPPRIORITY_ GROUP |
COMMENT_ON_SITE_PRIORITY( |
The parameters for the COMMENT_ON_SITE_PRIORITY procedure are described in the Oracle8i Replication API Reference book. |
|
REPRESOLUTION |
COMMENT_ON_UNIQUE_RESOLUTION( |
The parameters for the COMMENT_ON_UNIQUE_RESOLUTION procedures are described in the Oracle8i Replication API Reference book. |
|
REPRESOLUTION |
COMMENT_ON_UPDATE_RESOLUTION( |
The parameters for the COMMENT_ON_UNIQUE_RESOLUTION procedures are described in the Oracle8i Replication API Reference book. |
|
REPRESOLUTION |
COMMENT_ON_DELETE_RESOLUTION( |
The parameters for the COMMENT_ON_UNIQUE_RESOLUTION procedures are described in the Oracle8i Replication API Reference book. |