Release 8.1.5
A67778-01
Library |
Product |
Contents |
Index |
| Oracle8i Parallel Server Concepts and Administration Release 8.1.5 A67778-01 |
|
![]()
![]()
This chapter explains the init.ora parameters you must set to allocate PCM locks to datafiles for an OPS instance.
Tuning PCM locks may not be enough to properly scale your application. For more information, please refer to Chapter 12, "Application Analysis"and Chapter 13, "Designing Databases for Parallel Server".
Chapter 9, "Parallel Cache Management Instance Locks", for a conceptual discussion of PCM locks and GC_* parameters and Oracle8i Reference for descriptions of initialization parameters used to allocate locks for OPS.
Note:
See Also:
This section describes planning the use and maintenance of PCM locks. It covers:
The IDLM allows you to allocate only a finite number of locks. For this reason you need to analyze and plan for the number of locks your application requires. You also need to know how much memory locks and resources require. Consider these ramifications:
The key to assigning locks is to analyze how often data is changed using the INSERT, UPDATE, and DELETE commands. You can then determine how to group objects into files based on whether they should be read-only or read/write. Finally, assign locks based on the groupings you have made. In general, follow these guidelines:
They key distinction is not between types of objects (index or table), but between operations being performed on an object. The operation dictates the quantity of locks needed.
You must allocate locks at various levels:
Begin by getting to know your datafiles and the blocks they contain.
Use the following command to determine the file ID, file name, tablespace name, and number of blocks for all databases.
   SELECT FILE_NAME, FILE_ID, TABLESPACE_NAME, BLOCKS
   FROM DBA_DATA_FILES;
Results are displayed as in the following example:
FILE_NAME               FILE_ID     TABLESPACE_NAME     BLOCKS
---------------------------------------------------------------
/v7/data/data01.dbf     1           SYSTEM               200
/v7/data/data02.dbf     2           ROLLBACK            1600
. . .
Use the following approach to estimate the number of locks required for particular uses.
Many locks are needed on heavily used, concurrently updated datafiles. But a query-only application does not need many locks; a single lock on the datafile suffices.
This reduces lock contention, minimizes I/O activity, and increases accessibility of the data in the files.
This avoids unnecessary lock management overhead.
On large applications, carefully study the business processes involved. Worksheets similar to those in this section may be useful.
Determine the types of operations your system performs on a daily basis. The distinction between operations needing X locks and those needing S locks is the key. Every time you have to go from one mode to the other, you need locks. Take into consideration the interaction of different instances on a table. Also take into consideration the number of rows in a block, the number of rows in a table, and the growth rate. Based on this analysis, group your objects into files, and assign free list groups.
| Object | Operations needing X mode: Writes | OPS needing S mode: Reads | TS/Datafile | ||
| INSERTS | UPDATES | DELETES | SELECTS | ||
|
A |
|
80% |
|
Single row? |
|
|
B |
|
|
|
100% |
|
|
C |
|
|
|
|
|
|
D |
|
|
|
|
|
| Object | Instance 1 | Instance 2 | Instance 3 |
|
D |
DELETE |
SELECT |
|
|
E |
|
|
|
|
F |
|
|
|
| Table Name | TS to put it in | Row Size | Number of Columns |
|
|
|
|
|
|
|
|
|
|
|
|
|
|
|
In many cases, you need relatively few PCM locks to cover read-only data compared to data that is updated frequently. This is because read-only data can be shared by all instances of a parallel server. Data that is never updated can be covered by a single PCM lock. Data that is not read-only should be covered by more than a single PCM lock.
If data is read-only, then once an instance owns the PCM locks for the read-only tablespace, the instance never disowns them.The Integrated Distributed Lock Manager (IDLM) operations are not required after the initial lock acquisition.
For best results, partition your read-only tablespace so it is covered by its own set of PCM locks. Do this by placing read-only data in a tablespace that does not have writable data. Then allocate PCM locks to the datafiles in the tablespace using the GC_FILES_TO_LOCKS parameter.
You can map PCM locks to particular data blocks to partition PCM locks among instances based on the data each instance accesses.
This technique minimizes unnecessary distributed lock management. Likewise, it minimizes the disk I/O caused by an instance having to write out data blocks because a requested data block was covered by a PCM lock owned by another instance.
For example, if Instance X primarily updates data in datafiles 1, 2, and 3, while Instance Y primarily updates data in datafiles 4 and 5, you can assign one set of PCM locks to files 1, 2, and 3 and another set to files 4 and 5. Then each instance acquires ownership of the PCM locks for the data it updates. One instance disowns the PCM locks only if the other instance needs access to the same data.
By contrast, if you assign one set of PCM locks to datafiles 3 and 4, I/O increases. This is because both instances regularly use the same set of PCM locks.
Set the GC_FILES_TO_LOCKS initialization parameter to specify the number of PCM locks covering data blocks in a datafile or set of datafiles. This section covers:
Chapter 9, "Parallel Cache Management Instance Locks", to understand how the number of data blocks covered by a single PCM lock is determined.
See Also:
The syntax for setting the GC_FILES_TO_LOCKS parameter specifies the translation between the database address and class of a database block, and the lock name protecting it. You cannot specify this translation for files not mentioned in the GC_FILES_TO_LOCKS parameter.
The syntax for setting this parameter is:
GC_FILES_TO_LOCKS="{file_list=#locks[!blocks][R][EACH][:]} . . ."
Where:
Spaces are not permitted within the quotation marks of the GC_FILES_TO_LOCKS parameter.
In addition to controlling the mapping of PCM locks to datafiles, GC_FILES_TO_LOCKS controls the number of locks in the default bucket. The default bucket is used for all files not explicitly mentioned in GC_FILES_TO_LOCKS. A value of zero can be used and the default is "0=0". For example, "0=100", "0=100R", "0-9=100EACH". By default, locks in this bucket are releasable; you can however, set these locks to be fixed.
You can specify releasable hashed PCM locks by using the R option with the GC_FILES_TO_LOCKS parameter. Releasable hashed PCM locks are taken from the pool of GC_RELEASABLE_LOCKS
REACH is a keyword that combines "R" and "EACH". For example, GC_FILES_TO_LOCKS="0-9=100REACH". EACHR is not a valid keyword.
Omitting EACH and "!blocks" means that #locks PCM locks are allocated collectively to file_list and individual PCM locks cover data blocks for every file in file_list. However, if any datafile contains fewer data blocks than the number of PCM locks, some PCM locks will not cover a data block in that datafile.
The default value for !blocks is 1. When specified, blocks contiguous data blocks are covered by each one of the #locks PCM locks. To specify a value for blocks, you must use the "!" separator. You would primarily specify blocks, and not specify the EACH keyword, to allocate sets of PCM locks to cover multiple datafiles. You can use blocks to allocate a set of PCM locks to cover a single datafile where PCM lock contention on that datafile is minimal, thus reducing PCM lock management.
Always set the !blocks value to avoid breaking data partitioning gained by using free list groups. Normally you do not need to pre-allocate disk space. When a row is inserted into a table and new extents need to be allocated, contiguous blocks specified with !blocks in GC_FILES_TO_LOCKS are allocated to the free list group associated with an instance.
For example, you can assign 300 locks to file 1 and 100 locks to file 2 by adding the following line to the parameter file of an instance:
GC_FILES_TO_LOCKS = "1=300:2=100"
The following entry specifies a total of 1500 locks; 500 each for files 1, 2, and 3:
GC_FILES_TO_LOCKS = "1-3=500EACH"
By contrast, the following entry specifies a total of only 500 locks spread across the three files:
GC_FILES_TO_LOCKS = "1-3=500"
The following entry indicates that 1000 distinct locks should be used to protect
file 1. The data in the files is protected in groups of 25 blocks.
GC_FILES_TO_LOCKS = "1=1000!25"
The following entry indicates that the 1000 hashed locks protecting file 1 in groups of 25 blocks may be released by the instance when no longer needed.
GC_FILES_TO_LOCKS = "1=1000!25R"
To specify fine grain locks for data blocks with a group factor, specify the following in the parameter file of an instance:
GC_FILES_TO_LOCKS="1=0!4"
This specifies fine grain locks with a group factor of 4 for file 1.
Use the following guidelines to set the GC_FILES_TO_LOCKS parameter:
If a datafile is defined with the AUTOEXTEND clause or you issue the ALTER DATABASE ... DATAFILE ... RESIZE command, you should regularly monitor the datafile for an increase in size. If the datafile's size is increasing, update the parameter GC_FILES_TO_LOCKS as soon as possible, then shut down and restart your parallel server.
If the number of PCM locks specified for file_list is less than the actual number of data blocks in the datafiles, then the IDLM uses some PCM locks to cover more datablocks than specified. This can hurt performance, so you should always ensure that sufficient PCM locks are available.
At some point, you may need to add a datafile using the ALTER TABLESPACE ... ADD DATAFILE command, with OPS running. If you do this, then you should update GC_FILES_TO_LOCKS as soon as possible, then shut down and restart your parallel server.
Setting GC_FILES_TO_LOCKS is an important tuning task in OPS. This section covers some simple checks to help ensure your parameter settings are providing the best performance. This section covers:
Sites that run continuously cannot afford to shut down to permit adjustment of parameter values. Therefore, when you size these parameters, remember to provide room for growth, or room for files to extend.
Additionally, whenever you add or resize a datafile, create a tablespace, or drop a tablespace and its datafiles, adjust the value of GC_FILES_TO_LOCKS before restarting Oracle with OPS enabled.
Check that the number of locks allocated is not larger than the number of data blocks allocated.
Check the FILE_LOCK data dictionary view to see the number of locks allocated per file. Check V$DATAFILE to see the maximum size of the data file.
To avoid lock assignment problems, check the following:
If a tablespace is actually read-only, consider setting it to read-only in Oracle. This ensures that no write to the database occurs and no PCM locks are used. The exception to this is a single lock you can assign to ensure the tablespace will not have to contend for spare locks.
Count the number of objects in each file, as follows:
  SELECT E.FILE_ID      FILE_ID,
         COUNT(DISTINCT OWNER||NAME ) OBJS
    FROM DBA_EXTENTS     E,
         EXT_TO_OBJ V
   WHERE E.FILE_ID = FILE#
     AND E.BLOCK_ID >= LOWB
     AND E.BLOCK_ID <= HIGHB
     AND KIND != 'FREE EXTENT'
     AND KIND != 'UNDO'
   GROUP BY E.FILE_ID;
Examine the files storing multiple objects. Run CATPARR.SQL to use the EXT_TO_OBJ view. Make sure the objects can coexist in the same file. That is, make sure the GC_FILES_TO_LOCKS settings are compatible.
Consider the consequences for PCM lock distribution if you add a datafile to the database. You cannot assign locks to this file without shutting down the instance, changing the GC_FILES_TO_LOCKS parameter, and restarting the database. This may not be possible for a production database.
In this case, the datafile will be assigned to the pool of remaining locks and the file must contend with all files not mentioned in the GC_FILES_TO_LOCKS parameter.
This section describes how to set two additional GC_* parameters:
For GC_RELEASABLE_LOCKS, Oracle recommends the default setting. This is the value of DB_BLOCK_BUFFERS. This recommendation generally provides optimal performance. However, you can set GC_RELEASABLE_LOCKS to less than the default to save memory, or more than the default to get a possible reduction in locking activity. Too low a value for GC_RELEASABLE_LOCKS could adversely affect performance.
The statistic "releasable freelist waits" in the V$SYSSTAT view tracks the number of times the system runs out of releasable locks. If this condition occurs, as indicated by a non-zero value for releasable freelist waits, you must increase the value of GC_RELEASABLE_LOCKS.
If you are using fixed locks, it is wise to check that the number of locks allocated is not larger than the number of data blocks allocated. Blocks currently allocated may be zero if you are about to insert into a table. Find the number of blocks allocated to a rollback segment by entering:
   SELECT S.SEGMENT_NAME NAME,
         SUM(RBLOCKS) BLOCKS
    FROM DBA_SEGMENTS S,
         DBA_EXTENTS R
   WHERE S.SEGMENT_TYPE = 'ROLLBACK'
     AND S.SEGMENT_NAME = R.SEGMENT_NAME
   GROUP BY S.SEGMENT_NAME;
This query displays the number of blocks allocated to each rollback segment. When there are many unnecessary forced reads/writes on the undo blocks, try using releasable locks. By default, all rollback segments are protected by releasable locks.
The parameter GC_ROLLBACK_LOCKS takes arguments much like the GC_FILES_TO_LOCKS parameter, for example:
GC_ROLLBACK_LOCKS="0=100:1-10=10EACH:11-20=20EACH"
In this example rollback segment 0, the system rollback segment, has 100 locks. Rollback segments 1 through 10 have 10 locks each, and rollback segments 11 through 20 have 20 locks each.
Invalid: GC_ROLLBACK_LOCKS="1-10=100".
Valid: GC_ROLLBACK_LOCKS="1-10=100EACH".
This section discusses several issues to consider before tuning PCM locks:
False pinging occurs when you down-convert a lock element protecting two or more blocks that are concurrently updated from different nodes. Assume that each node is updating a different block covered by the same lock. In this event, each node must ping both blocks, even though the node is updating only one of them. This is necessary because the same lock covers both blocks.
No statistics are available to show false pinging activity. To asses false pinging, you can only consider circumstantial evidence. This section describes activity you should look for.
The following SQL statement shows the number of lock operations causing a write, and the number of blocks actually written:
   SELECT VALUE/(A.COUNTER + B.COUNTER + C.COUNTER) "PING RATE"
     FROM V$SYSSTAT,
       V$LOCK_ACTIVITY A,
       V$LOCK_ACTIVITY B,
       V$LOCK_ACTIVITY C
   WHERE A.FROM_VAL = 'X'
       AND A.TO_VAL = 'NULL'
       AND B.FROM_VAL = 'X'
       AND B.TO_VAL = 'S'
       AND C.FROM_VAL = 'X'
       AND C.TO_VAL = 'SSX'
       AND NAME = 'DBWR cross instance writes';
Table 15-1 shows how to interpret the ping rate.
Use this formula to calculate the percentage of pings that are definitely false:
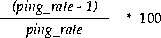
Then check the total number of writes and calculate the number due to false pings:
   SELECT Y.VALUE "ALL WRITES",
       Z.VALUE "PING WRITES",
       Z.VALUE * pingrate "FALSE PINGS",
   FROM V$SYSSTAT Z,
       V$SYSSTAT Y,
   WHERE Z.NAME = 'DBWR cross instance writes'
   AND Y.NAME = 'physical writes';
Here, ping_rate is given by the following SQL statement:
   CREATE OR REPLACE VIEW PING_RATE AS
   SELECT ((VALUE/(A.COUNTER+B.COUNTER+C.COUNTER))-1)/
       (VALUE/(A.COUNTER+B.COUNTER+C.COUNTER)) RATE
   FROM V$SYSSTAT,
       V$LOCK_ACTIVITY A,
       V$LOCK_ACTIVITY B,
       V$LOCK_ACTIVITY C
   WHERE A.FROM_VAL = 'X'
       AND A.TO_VAL   = 'NULL'
       AND B.FROM_VAL = 'X'
       AND B.TO_VAL   = 'S'
       AND C.FROM_VAL = 'X'
   AND C.TO_VAL   = 'SSX'
   AND NAME = 'DBWR cross instance writes';
Needless to say, the goal is not only to reduce overall pinging, but also to reduce false pinging. To do this, look at the distribution of instance locks in GC_FILES_TO_LOCKS and check the data in the files.
Be sure to check the amount of time needed for a PCM lock to convert. This time differs across systems. Enter the following SQL statement to find the lock conversion duration:
   SELECT *
   FROM V$SYSTEM_EVENT
   WHERE EVENT = 'lock element cleanup'
This SQL statement displays a table similar to the following:
                       TOTAL_    TOTAL_      TIME_     AVERAGE_
EVENT                  WAITS     TIMEOUTS    WAITED    WAIT
--------------------   ------    -------     ------    ----------
lock element cleanup   32709     44          685660    20.9624262
This means that a lock conversion took 20.9 hundredths of a second (0.209 seconds).
Enter the following SQL statement to see which sessions are currently waiting, and which have just waited for a PCM lock conversion to complete:
   SELECT *
   FROM V$SESSION_WAIT
   WHERE EVENT = 'lock element cleanup'
This section explains how to determine the number of PCM locks and resources your system requires. This is the value you need to set for the LM_LOCKS and LM_RESS parameters.
To find this value, add the number of fixed (non-releasable) locks set per instance (the sum of GC_FILES_TO_LOCKS and GC_ROLLBACK_LOCKS--fixed locks only) to the total number of releasable locks (the value of GC_RELEASABLE_LOCKS), and multiply by two.
2 *(GC_FILES_TO_LOCKS + GC_ROLLBACK_LOCKSfixed + GC_RELEASABLE_LOCKS)
This figure represents the maximum number of PCM locks and resources your system requires. This calculation is independent of the number of instances.
Also consider the following:
Assume your system has the following settings for each instance:
GC_FILES_TO_LOCKS="1=100:2-5=1000:6-10=1000EACH:11=100R"
GC_ROLLBACK_LOCKS="1-10=10EACH:11-20=20EACH"
GC_RELEASABLE_LOCKS=50,000
Add the GC_FILES_TO_LOCKS values as follows: File 1 has 100 fixed locks. Files 2, 3, 4, and 5 share 1000 locks. File 6 has 1000 fixed locks, file 7 has 1000 fixed locks, file 8 has 1000 fixed locks, file 9 has 1000 fixed locks, and file 10 has 1000 fixed locks. File 11 does not have fixed locks. Hence there is a total of 6,100 fixed locks set by GC_FILES_TO_LOCKS.
Add the GC_ROLLBACK_LOCKS values as follows: Files 1 through 10 have 10 fixed locks each, and Files 11 through 20 have 20 fixed locks each, for a total of 300 fixed locks.
Entering these figures into the formula, calculate the following:
2 * (6,100 + 300 + 50,000) = 112,800
You would thus set the LM_LOCKS and LM_RESS parameters to 112,800.
|
See Also:
For the complete equation to calculate locks and resources, please refer to "Determining the Amount of Locks Needed and Setting LM_* Parameters". Also refer to "GC_FILES_TO_LOCKS Syntax" to see details about the syntax of using this parameter. |