Release 8.1.5
A67773-01
Library |
Product |
Contents |
Index |
| Oracle8i Backup and Recovery Guide Release 8.1.5 A67773-01 |
|
![]()
![]()
If you do not use Recovery Manager, you can make backups of your database using operating system utilities and recover datafiles using SQL*Plus. This chapter explains how to use O/S methods to back up an Oracle database, and includes the following topics:
Before taking a backup, identify all the files in your database. Then ascertain what you need to back up.
SQL> SELECT name FROM v$datafile;
NAME
--------------------------------------------------------------------------------
/vobs/oracle/dbs/tbs_01.f
/vobs/oracle/dbs/tbs_02.f
/vobs/oracle/dbs/tbs_03.f
/vobs/oracle/dbs/tbs_11.f
/vobs/oracle/dbs/tbs_12.f
/vobs/oracle/dbs/tbs_21.f
/vobs/oracle/dbs/tbs_22.f
/vobs/oracle/dbs/tbs_23.f
/vobs/oracle/dbs/tbs_24.f
9 rows selected.
You can also join the V$TABLESPACE and V$DATAFILE views to obtain a listing of datafiles along with their associated tablespaces:
SQL> SELECT t.name "Tablespace", f.name "Datafile"
2> FROM v$tablespace t, v$datafile f
3> WHERE t.ts# = f.ts#
4> ORDER BY t.name;

Tablespace                     Datafile
---------------------------    --------------------------
SYSTEM                         /vobs/oracle/dbs/tbs_01.f
SYSTEM                         /vobs/oracle/dbs/tbs_02.f
SYSTEM                         /vobs/oracle/dbs/tbs_03.f
TBS_1                          /vobs/oracle/dbs/tbs_11.f
TBS_1                          /vobs/oracle/dbs/tbs_12.f
TBS_2                          /vobs/oracle/dbs/tbs_21.f
TBS_2                          /vobs/oracle/dbs/tbs_22.f
TBS_2                          /vobs/oracle/dbs/tbs_23.f
TBS_2                          /vobs/oracle/dbs/tbs_24.f
SELECT member FROM v$logfile;
MEMBER
--------------------------------------------------------------------------------
/vobs/oracle/dbs/t1_log1.f
/vobs/oracle/dbs/t1_log2.f
2 rows selected.
SHOW PARAMETERS control_files;
NAME                                TYPE    VALUE
----------------------------------- ------- ------------------------------
control_files                       string  /vobs/oracle/dbs/cf1.f
While Recovery Manager is the recommended tool for backing up an Oracle database, you can also make backups using O/S utilities. The utility you choose is dependent on your operating system.
This section describes the various aspects of making O/S backups, and includes the following topics:
Take a whole database backup of all files that constitute a database after the database is shut down to system-wide use in normal priority. A whole database backup taken while the database is open or after an instance crash or SHUTDOWN ABORT is inconsistent. In such cases, the files are inconsistent with respect to the checkpoint SCN.
You can take a whole database backup if a database is operating in either ARCHIVELOG or NOARCHIVELOG mode. If you run the database in NOARCHIVELOG mode, however, the backup must be consistent, i.e., you must shut down the database cleanly before the backup.
The set of backup files that result from a consistent whole database backup are consistent because all files correspond to the same SCN. You can restore the database without performing recovery. After restoring the backup files, you can perform additional recovery steps to recover the database to a more current time if the database is operated in ARCHIVELOG mode. Also, you can take inconsistent whole database backups if your database is in ARCHIVELOG mode.
Only use a backup control file created during a whole database backup to restore the other files taken in that backup, not for complete or incomplete database recovery. The reason is that Oracle recognizes backup control files created with the ALTER DATABASE BACKUP CONTROLFILE statement as backup control files; O/S copies of control files look like current control files to Oracle. Unless you are making a whole database backup, always back up the control file using a SQL statement.
See also: For more information about backing up control files, see "Performing Control File Backups".
To guarantee that a database's datafiles are consistent, shut down the database with the NORMAL, IMMEDIATE, or TRANSACTIONAL options before making a whole database backup. Never perform a whole database backup after an instance failure or after the database is shut down using a SHUTDOWN ABORT statement unless your database is in ARCHIVELOG mode.
SHUTDOWN NORMAL;
SHUTDOWN IMMEDIATE;
SHUTDOWN TRANSACTIONAL;
Do not make a whole database backup when the instance is aborted or stopped because of a failure. Reopen the database and shut it down cleanly first.
For example, if all datafiles, control files, and parameter files are contained in /disk1/oracle/dbs on UNIX, you might back up the directory to /disk2/backup as follows:
% cp -r /disk1/oracle/dbs /disk2/backup
STARTUP;
See Also: For more information on starting up and shutting down a database, see the Oracle8i Administrator's Guide.
DBVERIFY is an external command-line utility that performs a physical data structure integrity check on an offline database. Use DBVERIFY primarily when you need to ensure that a backup database or datafile is valid before it is restored or as a diagnostic aid when you have encountered data corruption problems.
The name and location of DBVERIFY is dependent on your operating system. For example, to perform an integrity check on datafile tbs_52.f on UNIX, you can execute the dbv command as follows:
% dbv file=tbs_52.f

DBVERIFY: Release 8.1.5.0.0

(c) Copyright 1998 Oracle Corporation.  All rights reserved.

DBVERIFY - Verification starting : FILE = tbs_52.f

DBVERIFY - Verification complete

Total Pages Examined         : 250
Total Pages Processed (Data) : 4
Total Pages Failing   (Data) : 0
Total Pages Processed (Index): 15
Total Pages Failing   (Index): 0
Total Pages Processed (Other): 29
Total Pages Empty            : 202
Total Pages Marked Corrupt   : 0
Total Pages Influx           : 0
See Also: For more information about using DBVERIFY, see Oracle8i Utilities.
Only make tablespace and datafile backups when operating in ARCHIVELOG mode. You cannot use individual datafile backups to restore a database operating in NOARCHIVELOG mode because you do not have archived redo logs to recover the datafiles to the same point in time.
This section contains the topics:
You can back up all or specified datafiles of an online tablespace while the database is open. When you back up an individual datafile or online tablespace, Oracle stops recording checkpoints in the headers of the online datafiles being backed up.
Oracle stops recording checkpoints as a direct result of issuing the ALTER TABLESPACE BEGIN BACKUP statement, which puts the database is in hot backup mode. You must put the database in hot backup mode to make O/S backups when the database is open. After the backup is completed, Oracle advances the file header to the current database checkpoint, but only after you execute the ALTER TABLESPACE END BACKUP statement to take the tablespace out of hot backup mode.
When you restore a datafile, the header has a record of the most recent datafile checkpoint that occurred before the online tablespace backup, not any that occurred during it. As a result, Oracle asks for the appropriate set of redo log files to apply should recovery be needed.
SELECT tablespace_name, file_name
FROM sys.dba_data_files
WHERE tablespace_name = 'USERS';

TABLESPACE_NAME                     FILE_NAME
-------------------------------   --------------------
USERS                             /oracle/dbs/tbs_21.f
USERS                             /oracle/dbs/tbs_22.f
In this example, /oracle/dbs/tbs_21.f and /oracle/dbs/tbs_22.f are fully specified filenames corresponding to the datafiles of the USERS tablespace.
ALTER TABLESPACE users BEGIN BACKUP;
% cp /oracle/dbs/tbs_21.f /oracle/backup/tbs_21.backup
% cp /oracle/dbs/tbs_22.f /oracle/backup/tbs_22.backup
ALTER TABLESPACE users END BACKUP;
If you forget to mark the end of an online tablespace backup, and an instance failure or SHUTDOWN ABORT occurs, Oracle assumes that media recovery (possibly requiring archived redo logs) is necessary at the next instance startup. To avoid performing media recovery in this case, use the ALTER DATABASE datafile filename END BACKUP statement.
See Also: See the Oracle8i Reference for more information about the DBA_DATA_FILES data dictionary view. For more information about startup and shutdown commands, see the SQL*Plus User's Guide and Reference.
To check the backup status of a datafile, query the V$BACKUP view. This view lists all online files and gives their backup status. It is most useful when the database is open. It is also useful immediately after a crash, because it shows the backup status of the files at the time of the crash. Use this information to determine whether you have left tablespaces in hot backup mode.
V$BACKUP is not useful if the control file currently in use is a restored backup or a new control file created after the media failure occurred. A restored or re-created control file does not contain the information Oracle needs to fill V$BACKUP accurately. Also, if you have restored a backup of a file, that file's STATUS in V$BACKUP reflects the backup status of the older version of the file, not the most current version. Thus, this view can contain misleading information on restored files.
For example, the following query displays the current backup status of datafiles:
SELECT file#, status FROM v$backup;

FILE#        STATUS
---------   ---------
0011         INACTIVE
0012         INACTIVE
0013         ACTIVE
...
In the STATUS column, INACTIVE indicates that the file is not currently being backed up, whereas ACTIVE indicates that the file is currently being backed up.
When backing up several online tablespaces, use either of the following procedures:
ALTER TABLESPACE ts1 BEGIN BACKUP;
ALTER TABLESPACE ts2 BEGIN BACKUP;
ALTER TABLESPACE ts3 BEGIN BACKUP;
tbs_1.f, tbs_2.f, and tbs_3.f as follows:
% cp /oracle/dbs/tbs_1.f /oracle/backup/tbs_1.bak
% cp /oracle/dbs/tbs_2.f /oracle/backup/tbs_2.bak
% cp /oracle/dbs/tbs_3.f /oracle/backup/tbs_3.bak
ALTER TABLESPACE ts1 END BACKUP;
ALTER TABLESPACE ts2 END BACKUP;
ALTER TABLESPACE ts3 END BACKUP;
SQL> ALTER TABLESPACE tbs_1 BEGIN BACKUP;
% cp /oracle/dbs/tbs_1.f /oracle/backup/tbs_1.bak
SQL> ALTER TABLESPACE tbs_1 END BACKUP;
Oracle recommends the serial option because it minimizes the time between ALTER TABLESPACE ... BEGIN/END BACKUP statements. During online backups, more redo information is generated for the tablespace.
Sometimes systems allow you to mirror a disk or file, i.e., maintain an exact duplicate of the primary data in another location, and then split the mirror. Splitting the mirror involves separating the copies so that you can use them independently of one another.
Some RAID devices benefit from suspending writes while the split operation is occurring; your RAID vendor can advise you on whether your system would benefit from this feature.
The basic steps for using SUSPEND and RESUME are as follows:
ALTER TABLESPACE users BEGIN BACKUP;
ALTER SYSTEM SUSPEND;
ALTER SYSTEM RESUME;
ALTER TABLESPACE users END BACKUP;
See Also: For more information about the SUSPEND/RESUME feature, see the Oracle8i Administrator's Guide. For more information about the ALTER SYSTEM command with the RESUME and SUSPEND options, see the Oracle8i SQL Reference.
You can back up all or some of the datafiles of an individual tablespace while the tablespace is offline. All other tablespaces of the database can remain open and available for system-wide use. You must have the MANAGE TABLESPACE system privilege to take tablespaces offline and online.
SELECT tablespace_name, file_name
FROM sys.dba_data_files
WHERE tablespace_name = 'USERS';

TABLESPACE_NAME                     FILE_NAME
-------------------------------   -----------------
USERS                              /oracle/dbs/users.f
In this example, /oracle/dbs/users.f is a fully specified filename corresponding to the datafile in the USERS tablespace.
ALTER TABLESPACE users OFFLINE NORMAL;
After you take a tablespace offline with normal priority, all datafiles of the tablespace are closed.
users.f:
% cp /disk1/oracle/dbs/users.f /disk2/backup/users.backup
ALTER TABLESPACE users ONLINE;
After you bring a tablespace online, it is open and available for use.
Back up the control file of a database after making a structural modification to a database operating in ARCHIVELOG mode. To back up a database's control file, you must have the ALTER DATABASE system privilege.
You have three options when backing up the control file:
The primary method for backing up the control file is to use a SQL statement to generate a binary file.
ALTER DATABASE CREATE DATAFILE '/oracle/dbs/tbs_20.f' AS '/oracle/dbs/tbs_4.f';
/oracle/backup/cf.bak:
ALTER DATABASE BACKUP CONTROLFILE TO '/oracle/backup/cf.bak' REUSE;
The REUSE option allows you to have the new control file overwrite a control file that currently exists.
The TRACE option of the ALTER DATABASE BACKUP CONTROLFILE statement helps you manage and recover your control file. The TRACE option prompts Oracle to write SQL commands to the database's trace file rather than generate a physical backup. The statements in the trace file start the database, re-create the control file, and recover and open the database appropriately.
Each SQL statement in the trace file is commented. Thus, you can copy the commands from the trace file into a script file, edit them as necessary, and use the script to recover the database if all copies of the control file are lost (or to change the size of the control file). The trace file is located in the location specified by the USER_DUMP_DEST initialization parameter.
To back up the control file to a trace file, mount the database and issue the following statement:
ALTER DATABASE BACKUP CONTROLFILE TO TRACE;
Assume that you want to generate a script that will re-create the control file for the SALES database. The database has these characteristics:
You issue the following statement to create the trace file:
ALTER DATABASE BACKUP CONTROLFILE TO TRACE NORESETLOGS;
You then edit the trace file to create a script that creates a new control file based on the control file that was current when you generated the trace file. To avoid recovering offline normal or read-only tablespaces, omit them from the CREATE CONTROLFILE statement. At database open time, the dictionary check code will mark these files as MISSING. The RENAME command will rename them back to their filenames.
For example, the script might read as follows:
# The following statements will create a new control file and use it to open the database.
# No data other than log history will be lost. Additional logs may be required for media
# recovery of offline datafiles. Use this only if the current version of all online logs
# are available.

STARTUP NOMOUNT
CREATE CONTROLFILE REUSE DATABASE SALES NORESETLOGS ARCHIVELOG
          MAXLOGFILES 32
          MAXLOGMEMBERS 2
          MAXDATAFILES 32
          MAXINSTANCES 16
          MAXLOGHISTORY 1600
LOGFILE
          GROUP 1
              '/diska/prod/sales/db/log1t1.dbf',
              '/diskb/prod/sales/db/log1t2.dbf'
          )    SIZE 100K
        GROUP 2
              '/diska/prod/sales/db/log2t1.dbf',
                '/diskb/prod/sales/db/log2t2.dbf'
        ) SIZE 100K,
        GROUP 3
              '/diska/prod/sales/db/log3t1.dbf',
              '/diskb/prod/sales/db/log3t2.dbf'
        ) SIZE 100K
DATAFILE
        '/diska/prod/sales/db/database1.dbf',
        '/diskb/prod/sales/db/filea.dbf'
;

# This datafile is offline, but its tablespace is online. Take the datafile offline
# manually.
ALTER DATABASE DATAFILE '/diska/prod/sales/db/filea.dbf' OFFLINE;

# Recovery is required if any datafiles are restored backups,
# or if the most recent shutdown was not normal or immediate.
RECOVER DATABASE;

# All redo logs need archiving and a log switch is needed.
ALTER SYSTEM ARCHIVE LOG ALL;

# The database can now be opened normally.
ALTER DATABASE OPEN;

# The backup control file does not list read-only and normal offline tablespaces so that
# Oracle can avoid performing recovery on them. Oracle checks the data dictionary and
# finds information on these absent files and marks them 'MISSINGxxxx'. It then renames
# the missing files to acknowledge them without having to recover them.
ALTER DATABASE RENAME FILE 'MISSING0002'
     TO '/diska/prod/sales/db/fileb.dbf';
Using the command without NORESETLOGS produces the same output. Using the command with RESETLOGS produces a similar script that includes statements that recover and open the database, but resets the redo logs upon startup.
The following situations can cause a tablespace backup to fail and be incomplete:
Upon detecting an incomplete online tablespace backup at startup, Oracle assumes that media recovery is necessary for startup to proceed.
For example, Oracle may display:
SQL> startup
ORACLE instance started.
Total System Global Area                         19839308 bytes
Fixed Size                                          63820 bytes
Variable Size                                    11042816 bytes
Database Buffers                                  8192000 bytes
Redo Buffers                                       540672 bytes
Database mounted.
ORA-01113: file 12 needs media recovery
ORA-01110: data file 12: '/oracle/dbs/tbs_41.f'
SQL>  SELECT * FROM v$backup WHERE status = 'ACTIVE';
FILE#      STATUS             CHANGE#    TIME
---------- ------------------ ---------- ---------
         12 ACTIVE                  20863 25-NOV-98
         13 ACTIVE                  20863 25-NOV-98
         20 ACTIVE                  20863 25-NOV-98
 3 rows selected.
ALTER DATABASE DATAFILE 12,13,20 END BACKUP;
ALTER DATABASE OPEN;
STARTUP MOUNT;
RECOVER DATABASE;
SQL>  SELECT * FROM v$backup WHERE status = 'ACTIVE';
FILE#      STATUS             CHANGE#    TIME
---------- ------------------ ---------- ---------
0 rows selected.
See Also: For information on recovering a database, see Chapter 14, "Performing Operating System Recovery".
Export and Import are utilities that move Oracle data in and out of Oracle databases. Export writes data from an Oracle database to an operating system file in a special binary format. Import reads Export files and restores the corresponding information into an existing database. Although Export and Import are designed for moving Oracle data, you can also use them to supplement backups of data.
This section describes the Import and Export utilities, and includes the following topics:
See Also: The Export and Import utilities are described in detail in Oracle8i Utilities.
The Export utility allows you to back up your database while it is open and available for use. It writes a read-consistent view of the database's objects to an operating system file. System audit options are not exported.
Table 13-1 lists available export modes.
| Mode | Description |
|
User |
Exports all objects owned by a user. |
|
Table |
Exports all or specific tables owned by a user. |
|
Full Database |
Exports all objects of the database. |
Following are descriptions of Export types:
The Import utility allows you to restore the database information held in previously created Export files. It is the complement utility to Export.
Assume that the schedule illustrated in Figure 13-1 is used in exporting data from an Oracle database
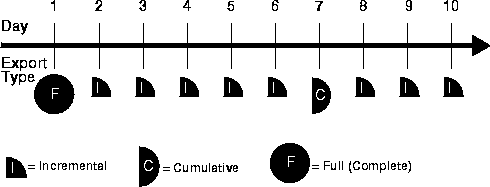
A complete export was taken on Day 1, a cumulative export was taken every week, and incremental exports were taken daily. Follow these steps to recover: