Release 8.0.3
A54894-01
Library |
Product |
Contents |
Index |
| Oracle8(TM)
Getting Started for Windows NT Release 8.0.3 A54894-01 |
|
This chapter describes how to administer Oracle8.
Specific topics discussed are:
When you reboot your Windows NT machine, the following three main Oracle services are started:
If any of these three services does not start and you attempt to use any of the Oracle8 Utilities, such as Server Manager, the following message appears:
ORA-12547:TNS: lost contact
This error is analogous to the following Oracle7 error:
ORA-09352: Windows 32-bit Two-Task driver unable to spawn new ORACLE task
To eliminate this error message:
The Control Panel window appears.
The Services dialog box appears.
|
Note: You must complete steps 3 and 4 in order. |
|
Note: To start Oracle services whenever the machine reboots, choose the Startup button, and choose Automatic Startup Type. |
If you cannot find these service names in the list, use ORADIM80 to create them. See Chapter 4, "Database Tools" for instructions on using ORADIM80.
Depending upon what other products you have installed, additional Oracle networking and server services can also be available:
See Oracle Networking Products Getting Started for Windows Platforms for information on Oracle networking services.
On occasion (for example, if you want to re-install the Oracle8 database), you must stop the Oracle Services.
The Control Panel window appears.
The Services dialog box appears.
Use the Service dialog box to configure when and how the Oracle8 database is started.
To configure the Oracle8 database to start automatically each time you reboot:
The Control Panel window appears.
The Services dialog box appears.
The Service dialog box appears.
To start or shut down an Oracle8 database with Server Manager:
C:\>SVRMGR30
SVRMGR> CONNECT INTERNAL/PASSWORD
| To... | Go to Section... |
|---|---|
|
Start a database |
|
|
Shut down a database |
Before starting the database, ensure that a database instance has been created and that the services have been started.
After completing these steps, you can connect to the Oracle8 database.
|
Note: See the section "Choosing Which Database Tools to Use" in Chapter 4, "Database Tools" for a list of other tools that can start the database. |
To shut down a database using Server Manager:
SVRMGR> SHUTDOWN [MODE]
|
Note: See the section "Choosing Which Database Tools to Use" in Chapter 4, "Database Tools" for a list of other tools that can shut down the database. |
Oracle Enterprise Manager enables you to start and shut down your Oracle8 database in several different ways. This section describes how to use the Navigator. You can also use:
See the Oracle Enterprise Manager Administrator's Guide for information on using these tools to start your database.
| Note:
This section assumes you have configured Oracle Enterprise Manager. If you have not, see the section "Configuring Oracle Enterprise Manager" in Chapter 6, "Configuration Tasks" for instructions. |
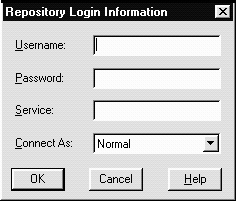
The Repository Login Information dialog box appears.
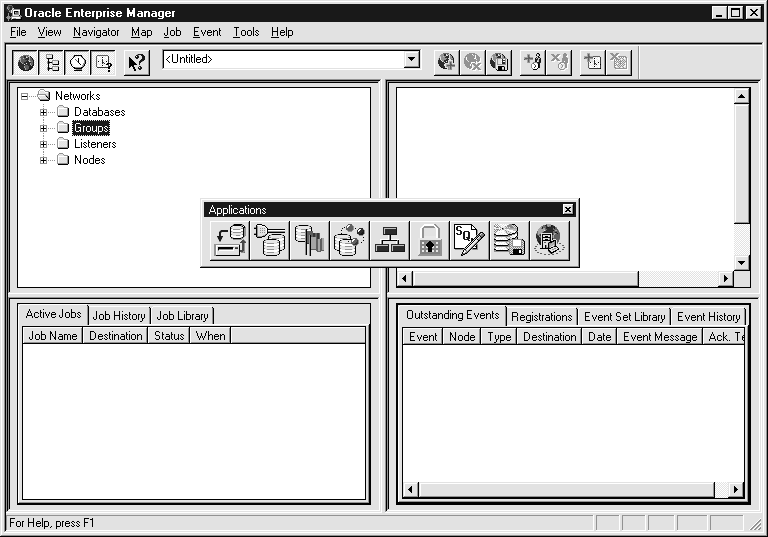
The Oracle Enterprise Manager Console appears. The Navigator Window displays in the upper-left portion of the console.
The list of databases in your Oracle Enterprise Manager network appears.
The Login Information dialog box appears.
| Note:
If this is the first time you have used Oracle Instance Manager, the Login Information dialog box appears. If you have previously logged in, the Oracle Instance Manager opens without prompting you to log on. Go to Step 8. |
The Oracle Instance Manager window appears.
The initialization parameters appear for the Oracle8 database.
The Save Configuration dialog box appears.
You are returned to the Oracle Enterprise Manager Console.
| To... | Go to Section... |
|---|---|
|
Start a database |
|
|
Shut down a database |
The Login Information dialog box appears.

The Startup dialog box appears.

Your Oracle8 database starts.
The Login Information dialog box appears.
The Shutdown Options dialog box appears:
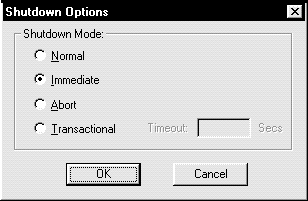
Your Oracle8 database shuts down.
You can immediately shut down the Oracle8 database by stopping the service OracleServiceORCL. This automated procedure is equivalent to manually entering the following two commands:
C:\> SVRMGR30
SVRMGR> SHUTDOWN IMMEDIATE
This causes the database to terminate and roll back active transactions, disconnect clients, and shut down.
To use this feature, you must set either of two registry parameter values to TRUE in \\HKEY_LOCAL_MACHINE\SOFTWARE\ORACLE.
| Note:
ORA_SID_SHUTDOWN must be added to the registry. |
If either of these parameters is set to FALSE (the default setting), you cannot shut down the database by stopping OracleServiceORCL. In addition, two other registery parameters are available:
| Note:
ORA_SHUTDOWN_TIMEOUT and ORA_SID_SHUTDOWN_TIMEOUT must be added to the registry. |
To immediately shut down the database by selecting OracleServiceORCL:
The Control Panel window appears.
The Services dialog box appears.
This automatically starts Server Manager, which issues the SHUTDOWN IMMEDIATE command.
See Appendix C, "Configuration Parameters and the Registry" for instructions on setting ORA_SHUTDOWN, ORA_SID_SHUTDOWN, ORA_SHUTDOWN_TIMEOUT, and ORA_SID_SHUTDOWN_TIMEOUT.
To run multiple instances, ensure that you have already created each instance and started the services for each instance using ORADIM80 or the Services dialog box in Windows NT.
You then run multiple instances by starting each of the instances using Server Manager.
To run multiple instances:
C:\> SET ORACLE_SID=SID
where SID is the name of the instance.
C:\>SVRMGR30
SVRMGR>CONNECT INTERNAL/PASSWORD
SVRMGR>STARTUP PFILE=%ORACLE_HOME%\RDBMS80\INITSID.ORA
where SID is the name of the instance.
This section describes how to authenticate nonprivileged database users (not database administrators) using Windows NT without requiring a password at the database level.
|
Note: See the Oracle8 Server Administrator's Guide for general information on authenticating users. |
When you use Windows NT to authenticate nonprivileged database users, your database relies on Windows NT to restrict access to database accounts. A database password is not needed for this type of feature.
To use Windows NT for nonprivileged user authentication:
|
Note: You can set OS_AUTHENT_PREFIX to the null string (a set of double quotes with no string included, ""). This eliminates the need for any prefix to the Windows NT user names. |
C:\> SVRMGR30
SVRMGR> CREATE USER OPS$USERID IDENTIFIED EXTERNALLY;
where:
|
OPS$ |
is the value set for the OS_AUTHENT_PREFIX initialization parameter. |
|
USERID |
is the user's Windows NT user name. |
Example:
To authenticate a user whose Windows NT user name is FRANK, when the OS_AUTHENT_PREFIX is set to XYZ, enter:
SVRMGR> CREATE USER XYZFRANK IDENTIFIED EXTERNALLY;
If you logged onto the client workstation as FRANK, or are using a share from the Windows NT machine hosting the Oracle8 database as user FRANK, you do not need to enter your database user name. For example, using Server Manager, enter:
SVRMGR> CONNECT /@SERVICE_NAME
where @SERVICE_NAME is the Net8 alias of the remote database.
The Oracle8 database searches the data dictionary for an automatic login user name corresponding to the Windows NT user name of FRANK, verifies it, and allows you to connect as XYZFRANK.
As the Oracle8 user name is the whole name XYZFRANK, all objects created by XYZFRANK (that is tables, views, indexes, etc.) are prefixed by this name. For another user to reference the table SHARK owned by XYZFRANK, the user must enter:
SVRMGR> SELECT * FROM XYZFRANK.SHARK
|
Attention: Automatic authorization accounts are supported for all Net8 protocols. |
|
Note: No other changes are required in the initialization parameter file to enable automatic logins. |
You can use any of the following methods to authenticate database administrators for your Oracle8 database:
|
Note: See the Oracle8 Server Administrator's Guide for more information on selecting a database administrator authentication method. |
The Password Utility ORAPWD80 creates password files. Password files are located in the ORACLE_HOME\ DATABASE directory and are of the form PWDSID.ORA, where SID identifies the instance. The essential elements of a password file are.
Use Server Manager to add or delete user names, user passwords, and user privileges in password files. In addition to creating the password file, you must also set the REMOTE_LOGIN_PASSWORDFILE to one of the following values:
|
Caution: To move or copy password files, use only ORADIM80. Copying or manually moving them may result in ORADIM80 not being able to find a password to start an instance. |
You can have the Windows NT operating system authenticate database administrators.
To use operating system authentication:
An authenticated database administrator can now connect to a local or remote database over a secure connection by entering the following commands:
SVRMGR> CONNECT / AS SYSOPER
SVRMGR> CONNECT / AS SYSDBA
DBAs who issue the CONNECT INTERNAL command from a client machine must belong to one of the following Windows NT local groups:
The SYSDBA and SYSOPER roles are mapped as follows:
| This role... | Maps to... |
|---|---|
|
SYSDBA |
ORA_SID_DBA, ORA_DBA |
|
SYSOPER |
ORA_SID_OPER, ORA_OPER |
For example, an authenticated connection exists between a client machine and a Windows NT machine running the Oracle8 database (with the authenticated user name being NTUSER2). The Oracle8 database then searches for the user name NTUSER2 in group ORA_ORCL_DBA when the user enters the command:
SVRMGR> CONNECT / AS SYSDBA
If the user name NTUSER2 is located, the user is given DBA privileges. If not found, Oracle8 checks the global group ORA_DBA.
There are two ways to connect as INTERNAL to the Oracle8 database:
This section describes both types of connections.
|
Note: CONNECT INTERNAL continues to be supported for backwards compatibility only. |
|
Note: When REMOTE_LOGIN_PASSWORDFILE is set to NONE, connecting remotely to a database as INTERNAL is prohibited even if the correct password is supplied. |
Follow the procedures below to connect as INTERNAL with a password:
SVRMGR> CONNECT INTERNAL/PASSWORD
where PASSWORD is the password created with ORAPWD80 or ORADIM80.
There are three ways to connect as INTERNAL without a password:
To connect as INTERNAL without a password, you must install Net8 Client and Net8 Server. Both products include the Net8 Native Authentication Adapter, which enables a user to make secure Windows NT and Windows 95 client connections to an Oracle8 database without a password. To do this, you must create a new local Windows NT users group and add a Windows NT operating system user to that group. This enables you to log into a Windows NT domain, of which your Oracle8 database is just one of many resources to which you have access. Once you access this domain, you are automatically validated as an authorized DBA who can access the Oracle8 database without a password.
To create a user account that uses the Net8 Native Authentication Adapter:
The New Local Group dialog box appears.
|
|
(specific to one instance) |
|
|
(specific to all instances) |
The Windows NT local group appears in the Groups list at the bottom of the User Manager Utility window.
The Local Group Properties dialog box appears.
The Add Users and Groups dialog box appears.
The Windows NT user account appears in the Local Group Properties dialog box.
You are returned to the User Manager window.
| For... | Enter... |
|---|---|
|
Windows NT local and remote logins or Windows 95 remote logins: |
CONNECT INTERNAL/@CONNECT_STRING where CONNECT_STRING maps to the database alias. |
To change the Internal password in either of two ways (both involve re-creation of the password file):
C:\>ORADIM80 -DELETE -SID ORCL
C:\>ORADIM80 -NEW -SID ORCL -INTPWD NEW_PASSWORD - MAXUSERS N
where NEW_PASSWORD is the new Internal password and N is the maximum number of DBAs/operators who can be logged in at once with this password.
See the Oracle8 Server Administrator's Guide for specific instructions.
The Oracle8 database allows roles to be granted to users directly by Windows NT. When users are enrolled using the automatic authenticated accounts, Windows NT local groups can grant these users database roles. Windows NT groups are created by using the Windows NT User Manager.
|
Note: See the Oracle8 Server Administrator's Guide for more information on database roles. |
When you use Windows NT to authenticate users, you can operate the database so that it uses Windows NT groups to identify a user's database roles when they create a database session. Use the Windows NT User Manager to create, grant, or revoke database roles to users.
To grant database roles with Windows NT:
The New Local Group dialog box appears.
ORA_SID_ROLENAME [_D] [_A]
where:
The Windows NT local group appears in the Groups list at the bottom of the User Manager Utility main window.
The Local Group Properties dialog box appears.
The Add Users and Groups dialog box appears.
The user appears in the Local Group Properties dialog box.
You are returned to the User Manager main window.
Using this syntax appropriately in Step 5, you can convert the database roles in the following table to Windows NT groups. Then users who are:
and
have the privileges associated with ROLE2 and ROLE4 by default. ROLE1 and ROLE 3 are available for use by the user if they use the SET ROLE command. Additionally, users can grant ROLE3 and ROLE4 to other roles.
| Database Roles | Windows NT Groups |
|---|---|
|
ROLE1 |
ORA_ORCL_ROLE1 |
|
ROLE2 |
ORA_ORCL_ROLE2_D |
|
ROLE3 |
ORA_ORCL_ROLE3_A |
|
ROLE4 |
ORA_ORCL_ROLE4_DA |
|
Note: When the Oracle8 database converts the group name to a role name, it changes the name to uppercase. |
When OS_ROLES is set to TRUE in the INITSID.ORA file, it is important to understand how roles, and the privileges granted to these roles, are obtained by Oracle users whose IDs are not defined externally.
The user connects over Net8 with the Oracle user name SCOTT/TIGER. The roles applied to the Oracle user name SCOTT consist of all roles defined for the Windows NT user account that were mapped to the database roles above. All roles available under an authenticated connection are determined by the Windows NT user ID and the Oracle-specific Windows NT local groups to which the user belongs (for example, ORA_SID_ROLE1 or ORA_SID_ROLE4_DA).
With the Oracle8 database, you can encrypt the password used to verify a remote database connection.
To enable password encryption:
Once these parameters are set to TRUE, whenever a user attempts a remote login, the Oracle8 database encrypts the password before sending it to the remote database. If the connection fails, the failure is noted in the audit log. The Oracle8 database then checks if either of these parameters is set to FALSE. If so, the Oracle8 database attempts the connection again using an unencrypted version of the password. If the connection is successful, the success is noted in the audit log, and the connection proceeds.
The section provides an overview of using the Oracle Enterprise Manager Console. The Console is the centralized point from where you manage your database network. See Chapter 8, "Understanding Oracle Enterprise Manager" for a conceptual overview of the Oracle Enterprise Manager and the Oracle Enterprise Manager Administrator's Guide for specific instructions on using the console.
You can customize the Oracle Enterprise Manager Console to suit both your preferences and the DBA tasks you perform. The individual windows in the Console can be minimized, resized, and relocated. The windows can be sized by selecting and dragging the splitter bar between the windows.
This section provides procedures for using the following console features:
When you start Oracle Enterprise Manager, you are prompted for a user name, password, and service name. By supplying this authentication information, you log into the Repository and are identified by the console and its communication daemon.
Whenever you submit a job or register an event set, it is marked as belonging to you. Any messages regarding the job or event are sent only to you.
For example:
The next day, you can run the console on your home PC. The agent that performed the backup job then delivers messages related to the backup job to the new Console and daemon. The agent can also notify multiple administrators of an event's occurrence by email or electronic paging.
The Navigator simplifies ad-hoc administration. For example, if you want to grant a privilege to a single user, you can click the right-mouse button on that user in the Navigator tree and choose Quick Edit from the context-sensitive menu. The Quick Edit User property sheet is displayed, allowing you to easily add the privilege.
The Navigator makes it easy to perform simple, single tasks. However, for more complicated, composite tasks, use one of the integrated DBA applications. For example, to assign a set of privileges to several users, use Security Manager, one of the DBA applications integrated into Oracle Enterprise Manager.
Although the Navigator can display all objects being managed, you may not want to view the entire system in one Navigator tree if your system is a large and complex environment. Consequently, the Navigator can be divided into smaller tree lists. These subtrees can be displayed in separate windows. The objects in the Navigator can also be filtered to control which objects are displayed.
Graphical cues (status indicators) show the state of an object in the Navigator tree. For example, the status of a database is depicted graphically by a green or red signal light icon. You can determine at a glance the states of items in the Navigator tree as they change dynamically.
A user-defined group is a collection of nodes or services of the same type. You can group services based on organization, geographic location, or function. For example, you might create a group of databases called CAL_MAIL that contains the mail databases in California.
Because nodes and services can belong to more than one group, a group can also contain other groups of the same type. For example, the group CAL_MAIL can belong to the group US_MAIL, which is a group of all the mail databases in the United States.
Groups can be placed on maps. If you double-click a group icon, it expands to reveal its members and subgroups. The state of a group is also depicted graphically on a map. Groups inherit the worst state of a member. For example, if one service in a group is down, that state is shown on the map.
Grouping nodes or services simplifies tasks that are applied to all members of the group. For example, in order to back up all the databases in the CAL_MAIL group, you only need to schedule the backup job once with the group as the destination. The backup is scheduled on all relevant databases.
You create maps by dragging and dropping objects from the Navigator into the Map window. Any number of maps can be created, then saved or edited.
A map can perform DBA tasks. For example, you can double-click an object to call up its property sheet. You can also select items from the map and launch one of the integrated applications to administer them.
The console application is written in Microsoft's Visual C++ and uses OLE2 technology to enable applications to integrate or plug into the console. Integrated applications also use the common services provided by the Oracle Enterprise Manager platform.
Besides the standard suite of integrated database administrator applications that Oracle Corporation provides with Oracle Enterprise Manager, third-party developers have developed integrated applications using the Enterprise Manager application programmatic interfaces (APIs). For more information on integrating third-party applications into the Console, see the Oracle Enterprise Manager Application Developer's Guide.
|
Copyright © 1997 Oracle Corporation. All Rights Reserved. |
|