Release 8.1.5
A67766-01
Library |
Product |
Contents |
Index |
| Oracle Advanced Security Administrator's Guide Release 8.1.5 A67766-01 |
|
![]()
![]()
This chapter describes how to configure and use SecurID authentication with the Oracle server and clients. It assumes that you are familiar with the Security Dynamics ACE/Server and that the ACE/Server is installed and running.
This chapter covers the following topics:
To use SecurID authentication included in the Oracle Advanced Security option release 8.1.5, you need the following:
Because SecurID card codes can be used only once, SecurID authentication does not support database links, also known as "proxy authentication."
When using SecurID authentication, password encryption is disabled. This means that the SecurID card code (and, if you use standard cards, the PIN), are sent over to the Oracle server in clear text. This could be a security problem. Consequently, Oracle recommends that you turn on the Oracle Advanced Security option encryption, which ensures that the PIN is encrypted when sent to the Oracle server.
|
More Information:
For information on how to turn on encryption, see Chapter 2, "Configuring Encryption and Checksumming". |
You enable SecurID authentication by performing the following tasks, each of which is fully described in the next few pages:
Step 1: Register Oracle as a SecurID client (ACE/Server Release 1.2.4)
Step 2: Install Oracle Advanced Security
Step 3: Ensure that Oracle can find the correct UDP port (ACE/Server Release 1.2.4)
Step 4: Configure Oracle as a SecurID client
Register the machine on which the Oracle Server resides as a SecurID client with the ACE server. You can do this with the Security Dynamics tool sdadmin. To create a client, go to the Client menu and choose Create Client (ACE/Server 1.2.4) or Add Client (ACE/Server 2.0).
Refer to the Security Dynamics ACE/Server Instruction manual, version 1.2.4, or to the Security Dynamics ACE/Server version 2.0 Administration manual for more detailed information.
Install the Oracle Advanced Security option on the Oracle server and Oracle client in a typical installation of Oracle8i using the Oracle Installer.
First verify that the ACE/Server, the Oracle server, and the Oracle Advanced Security option are installed.
Make sure that the Oracle server can discover what the correct UDP port for contacting the ACE/Server is. These port numbers are typically stored in a file called services. On the UNIX operating system, this file is typically in the /etc directory. If you are using NIS (Network Information Services) as a naming service, make sure that the services map contains the correct entries for SecurID.
You need the following from your SecurID administrator:
Install the SecurID configuration files on the Oracle server machine. You can obtain them from any other SecurID client or from the machine that runs the ACE/Server.
These files are typically stored in /var/ace. On the Oracle server machine, create this directory and copy the configuration files to it. At the minimum, you need the file sdconf.rec. The configuration files are used by both Oracle and the standard SecurID tools. Because the SecurID tools run setuid root, there can be a problem with the access permissions on the directory /var/ace and the files in this directory. Make sure that the owner of the Oracle executable (for example, the user "oracle8") is able to read all the files in /var/ace and can create new files in this directory.
There are two methods for reaching this goal without compromising security. Both methods work, but Oracle recommends that you use method #1. Both methods allow you to use Oracle with SecurID authentication and still continue using the other SecurID tools.
The owner of the Oracle executable should also own the /var/ace directory and the files in /var/ace. For example, if the owner of the Oracle executable is the user "oracle8," perform the following steps, as root:
# chown oracle8 /var/ace
# chmod 0770 /var/ace
# chown oracle8 /var/ace/*
# chmod 0660 /var/ace/*
The other option is to have root own the /var/ace directory and the files in /var/ace, but give the Oracle group read and write access. If the Oracle group is "dba", you need to perform the following steps, as root:
# chown root /var/ace
# chmod 0770 /var/ace
# chgrp dba /var/ace
# chown root /var/ace/*
# chmod 0660 /var/ace/*
# chgrp dba /var/ace/*
Note the following:
# ln -s $VAR_ACE /var/ace
Whether Oracle can read the configuration data depends on how you installed the ACE client software on the Oracle server. During the installation of the ACE client software, you can specify which administrator should own the configuration files.
If root is the owner of the ACE server configuration data files, you will have to change the UNIX file permissions so that the owner of the oracle executable can read and write to these files. For example, the following commands give Oracle access to the files, and all the Security Dynamics tools that run as setuid root will still be able to access the files.
# chown oracle8 /var/ace
# chown oracle8 /var/ace/*
# chmod 0770 /var/ace
# chmod 0660 /var/ace/*
If the environment variable VAR_ACE is set to a different location than /var/ace, you should instead execute the following commands:
# ln -s $VAR_ACE /var/ace
# chown oracle8 $VAR_ACE
# chown oracle8 $VAR_ACE/*
# chmod 0770 $VAR_ACE
# chmod 0660 $VAR_ACE/*
If the ACE files are not owned by root, you have two options:
For the change to take effect, do the following:
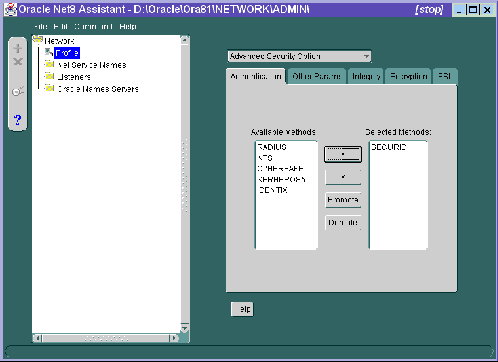
You configure SecurID authentication either by using Net8 Assistant, or by modifying the sqlnet.ora file with any text editor.
This graphical interface tool makes it easy to set parameters in the sqlnet.ora file and other Oracle8i configuration files.
In the Net8 Assistant's left pane, click the Profile folder. Then go to the drop down list box at the top of the right pane, and select Advanced Security Option. The tabbed pages for the Oracle Advanced Security option appear.
Go to the menu bar and click File > Save Network Configuration.
The following pages tell you how to set each parameter.
Do this by setting the SQLNET.AUTHENTICATION_SERVICES parameter.
You create users for SecurID authentication by performing the following steps:
When the sdadmin tool asks for a login name when creating a new user, fill in the same name you will use later to create the Oracle user.
|
More Information:
See the Security Dynamics documentation listed in "Related Publications" in the Preface of this guide. |
If you want the user to be able to specify a new PIN to the card using the Oracle tools, choose the option that allows the user to make up his or her own PIN. If you do not allow this, the user will have to use the Security Dynamics tools to generate a PIN if the card is in new-PIN mode. Activate the user on the Oracle Server. (The Oracle Server should already be registered as a SecurID client.)
You can do this by using SQL*Plus connected as a user with the create user database role. Use the following syntax to create an account:
SQL> CONNECT system/manager
SQL> CREATE USER os_authent_prefix username IDENTIFIED EXTERNALLY
The OS_AUTHENT_PREFIX is an Oracle Server initialization parameter (for example, in the file init.ora). The OS_AUTHENT_PREFIX default value is OPS$. The user name should be the same as the name you assigned to the card in step 1 above.
For example, suppose you have assigned a card to the user "king," and that OS_AUTHENT_PREFIX has been set to a null value (""), at this point you should create an Oracle user account using the following syntax:
SQL> CREATE USER king IDENTIFIED EXTERNALLY;
You may want to give this user some database privileges. At the minimum, the user should have the "create session" privilege.
SQL> GRANT CREATE SESSION TO king;
The user king can now connect to Oracle using the appropriate SecurID card.
|
More Information:
For information on how to log into an Oracle server after SecurID authentication has been installed and configured, see "Logging in to the Oracle Server". |
If you experience problems while configuring SecurID authentication, verify the following:
Use the SecurID tool kitconts (for ACE/Server 1.2.4) or sdinfo (for ACE/Server 2.0) to verify the name of the authentication service and the port numbers that SecurID is expecting to use. Verify that these port numbers match those in
/etc/services, or the services map if you are using NIS.
ACE/Server release 1.2.4 only: Verify that the /var/ace/sdconf.rec file is present on the machine running the Oracle server. Also verify that the permissions on the /var/ace/sdconf.rec file and the directory /var/ace are set so that the Oracle process can read and write in the directory.
ACE/Server release 2.0 only: Make sure the ACE configuration data is in the /var/ace directory. Use of the VAR_ACE environment variable is not supported. Also make sure that the owner of the oracle executable can read and write the files in this directory.
trace_level_server = admin
Turning tracing on at the client side is less informative, because all interaction between the Oracle server and the ACE server happens at the Oracle server side of the SQL*Net or Net8 connection. Be sure to turn off tracing when you have completed your check.
SQL> SELECT * FROM all_users;
to get a list of all database users.
sqlplus system/manager@oracle_dbname
the SecurID log file displays:
03/24/95 10:04 User not on client machinename
This is not an error. Since the Oracle client and server negotiated to use SecurID because of the SQLNET.AUTHENTICATION_SERVICES line in SQLNET.ORA, Oracle will contact the ACE/Server to validate 'system'. When validation fails, Oracle will validate the password internally. If the password is valid, you will be able to connect.
The only way to eliminate the warning message is to disable SecurID authentication. To do so, change the sqlnet.ora file on the Oracle client to:
SQLNET.AUTHENTICATION_SERVICES=(NONE)
Setting this parameter to this value disables the SecurID authentication adapter. You will no longer be able to connect to Oracle using the SecurID card.
This section describes how to use SecurID authentication with the Oracle client tools. It assumes that you are already familiar with SecurID concepts, and that you have configured Oracle for use with the SecurID authentication.
This section discusses the following topics.
See "Step 5: Configure SecurID authentication". Also refer to "Related Publications" of the Preface of this Guide.
More Information:
Before you use SecurID authentication to verify passwords, make sure the following things have been done:
SecurID authentication allows you to log into the Oracle server with the PASSCODE that is generated by the SecurID card. The PASSCODE replaces the password in the Oracle connect statement.
There are two types of SecurID cards:
Depending on the type of card, you type the PIN
or
The standard cards generate and display a PASSCODE. When logging in to Oracle, you need to specify your user name, your PIN and the current PASSCODE, using the following syntax:
sqlplus username/<pin><passcode>@net_service_name
For example, if the card is assigned to user king, the PIN is "3511," and the card shows the number "698244," this is how you would log into Oracle using SQL*Plus:
% sqlplus king/3511698244@oracle_database
or,
% sqlplus king@oracle_database % enter password: 3511698244If you have a PINPAD card, you first have to type in your PIN on the card and generate a new PASSCODE. You would then use this PASSCODE to connect to Oracle using the following syntax:
sqlplus username/passcode@net_service_name
For example, if the card is assigned to user "king", first generate a PASSCODE by typing the PIN on the PINPAD card. (Refer to the Security Dynamics documentation on how to do this.) For example, if the generated PASSCODE is "698244", to connect to Oracle using SQL*Plus, you would type:
% sqlplus king/698244@oracle_dbname
If you are logging in for the first time, or the administrator has put your card in the new-PIN mode, you have to assign a PIN to the card. You can tell that this is the case if, while trying to connect to Oracle, you get the following error message:
ORA-12681 "Login failed: the SecurID card does not have a pincode yet"
To assign a PIN to a card you connect to the Oracle Server using a special syntax. First, you need to select a PIN, which is typically four to eight digits long. Depending on the type of SecurID card you have, you may be able to use letters as well.
Use the following the syntax while connecting to the Oracle database:
sqlplus username/+<new_pin>+<tokencode>@oracle_dbname
For the tokencode, enter the cardcode that is currently displayed on your SecurID card's LCD. If you have a PINPAD card, do not enter the PIN on the card.
For example, if the card is assigned to user "king", your new PIN is "45618", and the SecurID card currently displays number "564728", you would type:
% sqlplus king/"+45618+564728"@oracle_dbname
Use the following syntax while connecting to the database. Otherwise, the administrator must select the new PIN for you.
sqlplus username/+<new_pin>+<old_pin><tokencode>@oracle_dbname
For the tokencode, enter the cardcode that is currently displayed on your SecurID card's LCD. If you have a PINPAD card, do not enter the PIN on the card.
If the new PIN is accepted, you will be connected to Oracle. The next time you want to connect to Oracle you should use the procedure described in "Logging into the Oracle Server". If the new PIN is rejected, you will get the following error:
ORA-12688 "Login failed: the SecurID server rejected the new pincode"
As an additional safety step, the ACE/Server sometimes asks for the next card code, to ensure that the person who is trying to log in actually has the card in his or her possession. This is the case if you get the following error message when you try to log into Oracle:
ORA-12682, "Login failed: the SecurID card is in next PRN mode"
The next time you want to log in to Oracle, you will have to specify the next two card codes. The syntax you use to log into Oracle depends on the kind of SecurID card you have (Standard versus PINPAD).
If you have a standard card, specify the following:
Steps 1, 2, and 3 above replace the password. The "+" character is important, because it separates the first card code (passcode) from the second one. Use the following syntax:
sqlplus <username>/ "<pincode><passcode>+<next passcode>"@<net_service_name>
For example, if the card is assigned to user "king", the PIN is "3511", and the card first shows the number "698244" and the next number is "563866", you would type:
% sqlplus king/"3511698244+563866"@oracle_database
This connects you to the Oracle server and puts the card back into normal mode. The next time you want to log in to the Oracle server, use the procedure described in "Logging in to the Oracle Server".
If you have a PINPAD card, do the following to log on to the Oracle server:
sqlplus <username>/ "<first passcode>+<second passcode>"@net_service_name
For example, if the card is assigned to user "king":
% sqlplus king/"231003+831234"@oracle_dbname
This connects you to Oracle and puts the card back into normal mode. The next time you want to log in to Oracle, use the procedure described in"Logging in to the Oracle Server".